
Table of contents
- Getting started
- Dashboard
- Statistics
- Chat sessions
- Inbox
- Documents
- Search queries
- Campaigns
- Conversions
- Sync
- Auto-tags
- Widget
- API keys
- Settings
- Set up WhatsApp
- Leads
- Customers
- Segments
- External lead sources
- Automations
- Affiliates
- Surveys
- Forms
- Reviews
- Abandoned Carts
- Bookmarks
- Helpdesk
- Products
- Hotel chat
- Appointments
- InsightHub Voice
- Assistants
- Organization & billing
- Partner
- Support requests
- Synonyms
- FAQ
- Data protection for your shop
Getting started
Onboarding depends on the platform your website runs on.
For WordPress / WooCommerce
With our WordPress plugin, setup takes two steps:
- Install the InsightHub plugin — from the WordPress admin → Plugins → Install. Activate it.
- Follow the onboarding wizard — the plugin automatically connects to InsightHub, creates the organization and website, imports your products and pages, and sets up the widget. You only need to enter your InsightHub account.
Once the wizard finishes, everything is synced and the AI assistant is live on your site. Use the app at insighthub.sg5.biz to manage statistics, chats and leads.
For Shopify
Shopify connects directly via the Shopify Admin API — no plugin needed:
- Create an app in the Shopify Dev Dashboard — at dev.shopify.com, create an app, add the scopes
read_products,read_content(optionallyread_orders) under API access, and release the version. - Install the app on your store — install it on your shop and approve the data-access prompt. You'll find the Client ID and Client Secret in the app's settings afterwards.
- Connect InsightHub — under Settings → Sync & Filters, pick the Shopify platform, enter your shop domain (
your-store.myshopify.com) plus Client ID and Client Secret, and verify with “Test connection”. InsightHub exchanges the credentials for an access token automatically — no token to manage.
Then run the first sync from Sync (“Sync Shopify” — products, pages and blog posts) and optionally pick an auto-sync interval so changes from the shop flow in automatically. Note: only visible (published) content is synced. Legacy custom apps with a permanent Admin API token (shpat_…) keep working.
Finally, embed the widget: copy the snippet from Settings → Chat Widget and paste it into layout/theme.liquid right before </body> in the Shopify admin.
For Microsoft Dynamics 365 Business Central
Business Central connects directly through the Microsoft API — ideal when your item data lives in the ERP:
- Create an app registration in Microsoft Entra ID — in the Azure portal under Microsoft Entra ID → App registrations, create an app, generate a client secret and grant the Dynamics 365 Business Central API permission (Application) with admin consent.
- Collect the IDs — the Entra tenant ID (Azure portal → Overview), your BC environment (e.g.
Production) and the company ID (the company GUID, readable via the/companiesAPI endpoint). - Connect InsightHub — under Settings → Sync & Filters pick the platform Microsoft Business Central, enter tenant ID, environment, company ID, client ID and client secret, then verify with “Test connection”.
Then run the first sync from Sync (“Sync Business Central”) and optionally pick an auto-sync interval. Note: Business Central provides items (no webshop pages); blocked items are skipped, and you set the price currency in the settings (default: EUR).
For a website without a shop system
A static website, Webflow, Wix, TYPO3 or your own application needs no plugin and no shop connection — the assistant learns from the pages of the website:
- Register and add the website — create an account at insighthub.sg5.biz, add an organization and a website.
- Choose the platform — under Settings → Sync & Filters pick Other website (no shop system) and enter the Site URL. Only the website's pages are set up there; shop and WordPress fields are not shown.
- Find the sitemap — “Find sitemap” reads the website's
robots.txtand the usual sitemap addresses, fills in Sitemap URLs and tells you how many pages are listed. If that is more than Max Pages, the limit is raised to match (up to 500). A website with more than 500 pages gets a note with a link to contact us. Then save. - Load the pages — start “Sync Static Pages” under Sync. The result says how many pages were loaded.
- Add the chat — copy the snippet from Settings → Chat Widget and paste it before
</body>on every page of your website.
The “Setup not finished” banner on the dashboard opens a short wizard with the same steps: website, first sync, chat widget. With this platform the assistant works as a website assistant — it searches your pages first, answers from what it finds and links the section. A prompt you wrote yourself under Settings → AI always stays as it is.
Long pages such as a help center or an FAQ belong under Pages split into sections: the search covers about the first 8,000 characters of a whole page, and Documents marks every page that is longer.
Without a website: Google listing or your own details
A business without a website — say a flower shop that works by phone and WhatsApp — needs no pages and no chat code. The assistant works with your business details:
- The first question — when the site has no platform and no address yet, the “Setup not finished” notice on the dashboard asks first: Does your business have a website? Yes leads to the steps above, No website — we have a Google listing or Neither to this wizard.
- Business details — with a Google listing you find it by name and city (or paste the link from Google Maps); name, address, phone, industry and rating are taken over, the opening hours into Settings → Opening hours if you like. Read listing again fetches the current state later. What is missing shows as “not known yet” — the assistant doesn't make it up but tells callers it doesn't know.
- What you offer — your products and services in your own words, one per line; upload price lists or menus under Documents.
- Phone assistant — pick the language and voice, check the greeting callers hear right now, and set how callers reach it: a number of your own or forwarding your existing number (Voice). The phone assistant is an add-on.
- Done — you can add a website or the chat later at any time; your details stay.
Your business details become the assistant's knowledge in chat and on the phone; a prompt you wrote yourself stays as it is. If your site was taken over from a demo, the wizard starts at the phone assistant — the details came with the demo.
For other platforms (Magento, Sana Commerce, …)
Without the plugin you register manually and configure sync for your system:
- Register manually — create an account at insighthub.sg5.biz, add an organization and a website.
- Set up sync for your CMS / webshop system — under Settings → Sync & Filters, pick your platform (Magento, Sana Commerce, Shopware …) and enter the API credentials. Then run the first sync from Sync.
Once sync completes, you can embed the widget on your site or use the app to track statistics and chat sessions.
Dashboard
The dashboard is yours: every team member arranges their own widgets for each website. It shows only what your website uses and what your role may see — the same rules as the menu on the left. Each widget loads on its own, so a slow number never holds up the page; if one fails, it shows Try again in that widget only.
- Today — appointments today and the next one, conversations waiting for a reply, unassigned conversations, new leads, chats and calls today.
- Getting started — the setup checklist for a new website (connect products or pages, chat widget, first chat, contact email, team). It disappears once everything is done.
- Helpdesk inbox — unassigned, mine, waiting for a reply and SLA overdue; a click opens that folder.
- Upcoming appointments and Bookings — the next appointments, requests waiting for approval, bookings in the period with cancellations and no-shows, by channel and booking type.
- Leads — new leads compared with the previous period, the pipeline by status and the top sources.
- Chat quality, Search, Phone assistant, Reviews, Campaigns, Knowledge base (products, documents, last syncs and sync problems), Plan usage (conversations this month, AI usage, trial days) and Key figures (all-time totals).
Customize switches to edit mode: drag a widget by its handle to move it (on a phone, use the up and down arrows), pick a size (S, M, L = one, two or three columns), remove it with ×, or open Add widget for the full catalogue. Reset to default brings back the standard layout. The period at the top (last 7, 30 or 90 days) applies to every widget. Your layout and period are saved for you, on every device.
Statistics
Detailed search analysis: query counts, trends over time, top search terms, and zero-result queries.
- Trend chart — zero-result rate over the selected period. A falling line means improving search quality.
- Top queries — most frequent searches with hit counts.
- Who searched? — breakdown by identified customers, known visitors, repeat visitors, and anonymous queries. Click any tile to jump to the filtered detail view.
Use the PDF export button to get the full report as a print-ready PDF — ideal for weekly or monthly reporting.
Chat sessions
Every conversation between an end-customer and the AI assistant is logged here — both widget chats on your website and WhatsApp conversations (when the WhatsApp add-on is active), plus phone calls handled by the Voice assistant (see InsightHub Voice). You see the full message history, linked products, and the rating of each answer.
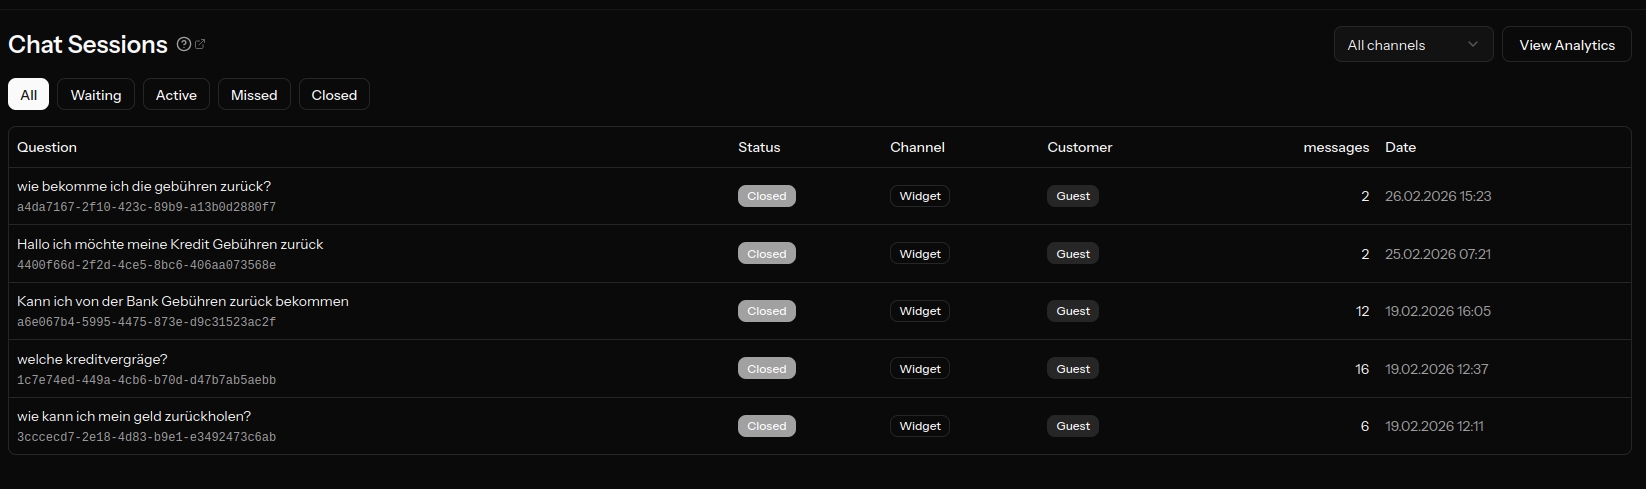
- Session list — chronological view with filters by period, status, channel (widget / WhatsApp / phone), and rating. Each row shows the conversation's newest message, as in other chat apps. When it comes from your side, a prefix says who wrote it: "AI:" for the assistant, "You:" for your team. A message its sender deleted reads "This message was deleted by the sender". Hover over the row to see the customer's first question.
- Detail view — full conversation with the sources used.
- Reply directly — you can jump into any chat and send a message to the customer yourself. For WhatsApp this goes through the official Cloud API; for widget chats your reply appears in the customer's chat window in real time. You can also answer website chats right in the Inbox.
- Translate — every visitor message and every AI answer has Translate: the translation into your site's language appears under the original, with the original's language (e.g. "(id)" for Indonesian). It is saved — after a reload and for your whole team it is there right away, without translating again. Your own replies have no button. Once the visitor's language is known (one of their messages or an AI answer was translated), the reply box offers Translate to …: your draft is rewritten in the visitor's language, and Undo translation brings your text back. Whatever is in the box is what gets sent. If a translation fails, the reason shows in one line under the message. If a saved translation is wrong, Translate again next to the language label fetches a new one and replaces it (on a computer it appears when you hover, on a phone it is always there; the same in a lead's WhatsApp thread).
- Pause the AI — turning off the AI on a session hands control over to your team. Incoming messages are no longer answered automatically and instead show up in the chat detail for manual handling. Click "Resume AI" to switch the assistant back on.
- Archive — cleans up the list without losing anything: an archived conversation leaves the session list but still counts in every statistic (chat analytics, chat score, dashboard, conversation allowance and reports). Archive on the detail page, or several conversations at once with the checkboxes and Archive selected. The Archived filter next to the status tabs shows them; unarchive them there at any time. When the customer writes again, the conversation is back in the list automatically.
- Archive closed — archives all closed conversations whose last message is older than 7, 30 or 90 days in one go; you see how many first. If you like, the auto-archive does this once a day (Settings → AI → Chat sessions).
- Archive or delete? — deleting removes a conversation and its messages for good, from the statistics too, and is reserved for SG5 administrators. To clean up the list, archiving is all you need.
- Analytics — answer rate, topic distribution, common open questions.
Low-rated answers are a great starting point for expanding your documents.
Inbox
The Inbox brings the conversations with your customers from three channels into one list, newest activity first:
- Email — the mailboxes with Show in Inbox switched on (Settings → Mailboxes).
- WhatsApp — the messages of your WhatsApp number (Show WhatsApp in Inbox), as long as the number is not handled in the Helpdesk.
- Website chats — the chats from the chat window on your website. The list shows the visitor's name (otherwise "Website visitor"), the last message and whether the AI answers (AI active) or someone on your team has taken over (Taken over by …).
The channel filter shows one mailbox, WhatsApp or the website chats only; the search and Unread only apply to all three. Unread messages count toward the number next to "Inbox" in the sidebar, website chats included.
In a website chat you see the whole history with visitor, AI and team. Take over pauses the AI for this chat; your reply appears in the visitor's chat window within a few seconds, and sending a reply takes over the conversation by itself. Resume AI hands the chat back to the assistant. Visitor and AI messages translate with Translate just like on the chat page — it is the same saved translation. On the right you link the chat to an existing lead or create a new one from the visitor's name and email. Website chats are visible to everyone who may see the Chat sessions; taking over and replying needs the permission to edit leads.
Documents
Documents are your AI assistant's knowledge base. Add texts, FAQs, how-tos, or product backgrounds that aren't synced from your shop.
- Add — write directly in the editor or paste markdown.
- Edit — update existing documents anytime; changes become available to chat immediately.
- Assign — link documents to specific search queries so they're preferred as sources for those searches.
Common pattern: a single "Shipping & returns" document covers most service questions.
Adding an FAQ
FAQs are the fastest way to cover common customer questions. A well-maintained FAQ collection noticeably reduces the volume of chat and email enquiries.

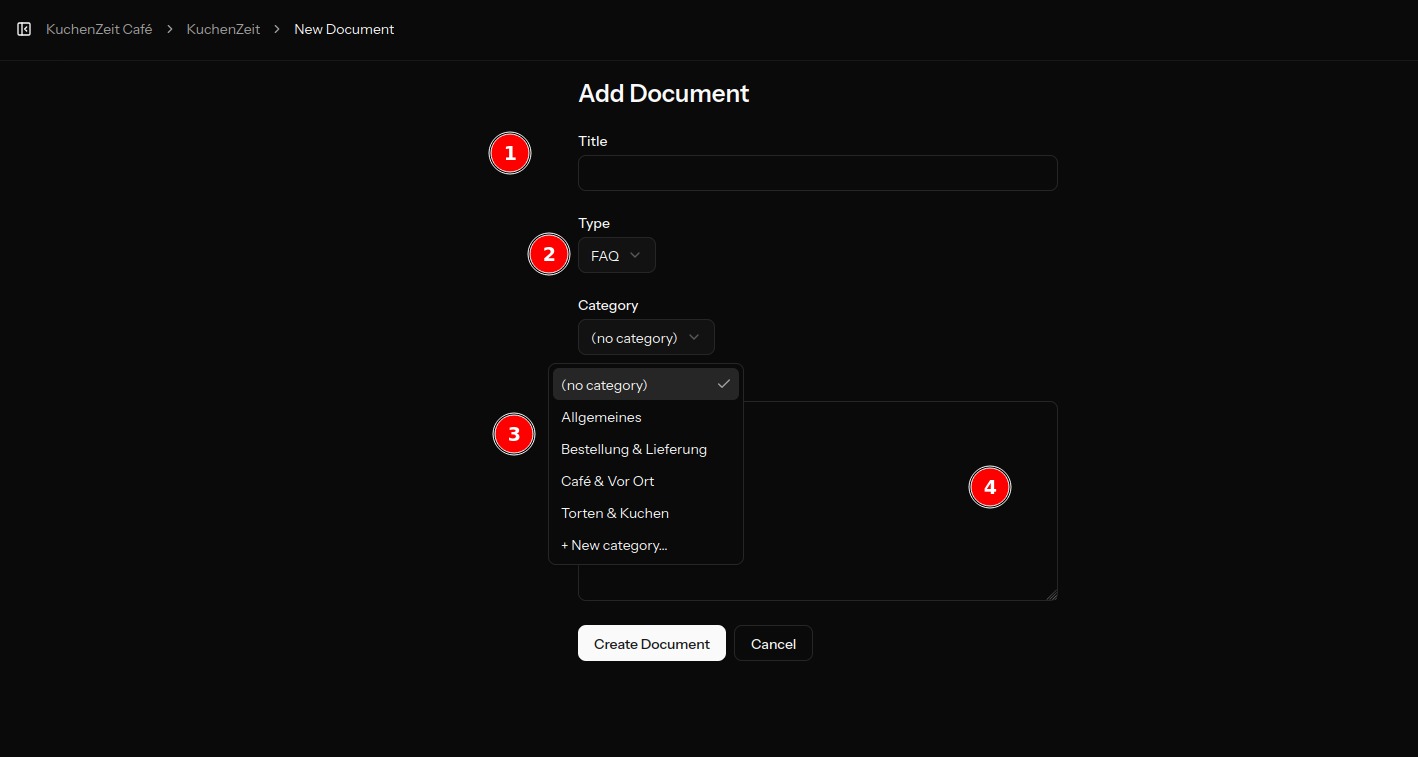
- Title — phrase it the way a customer would actually ask ("How long does shipping take?" rather than "Shipping times").
- Type — choose FAQ. This tells the assistant the entry is a question-answer pair and prioritizes it for matching search queries.
- Category — pick an existing category or use + New category… to create one. Helps you find things later and groups related FAQs in the widget.
- Content — the actual answer. Keep it concise and concrete; the assistant uses the text verbatim as a source. Markdown (lists, links, etc.) is supported.
Tip: after saving, head to Search queries to check whether the FAQ actually surfaces for the expected search terms — and adjust the title or add tags if it doesn't.
Translating FAQs
If your widget uses several languages (see Languages & automatic translation), FAQs can be maintained per language — visitors then see question and answer in their widget language automatically:
- Per FAQ — the FAQ edit page shows a "Translations" card with a tab per supported language. Empty fields fall back to the original text, so you don't have to translate everything. Auto-translate empty fields fills missing titles and answers via AI; you review and save.
- All at once — on the documents list (FAQ filter), Translate all FAQs starts a background run that only fills missing languages. Existing translations are never overwritten.
- Categories — category names are translated on the "Manage categories" page via the language icon on each FAQ category (with the same auto-translate button). One name per language and category — widget grouping always stays consistent.
Visibility: public or internal only
Every document has a visibility. Public (default) means available in the widget, in search and to customer assistants. Internal only is known exclusively to back-office assistants with the knowledge "All documents" — internal content never appears in the widget or in a customer answer. Use it for process descriptions, price lists or escalation rules for your team without publishing them. Choose the visibility when creating or editing a document; on the documents list, click the badge to switch it and filter by Internal only. Pages synced from WordPress stay public until you switch them.
Search queries
Complete log of all search queries from your website — with hit counts, timestamps, and (when available) the linked customer.
- Cohort filter — by identified customers, known visitors, repeat visitors, or anonymous queries. Quickly answers who is searching for what.
- Group by customer — collapses all queries from one person, sorted by frequency. Great for the sales perspective.
- Status — new, in progress, done. Helps you work through zero-result queries.
Ignore a product for a search term — when a term returns an off-topic product (e.g. a rat spray for a search for “aphids”), hide it for that exact term via the eye icon on the product badge. The product still shows for every other search. One click restores it — and the assign dialog gathers all ignored products under “Ignored products”.
The three-dot menu on each row lets you archive a query, link it to a campaign, or generate synonyms.
Campaigns
The Campaigns page shows where your website's visitors come from and what they turn into: visits, leads and customers by source, medium, campaign and landing page, with a timeline and a PDF report.
- UTM tracking — visits from links with UTM tags (newsletters, ads, social posts) are attributed to the matching source and campaign. With All visits, visits without tags count too, with where they came from as the source.
- Tables — sources, campaigns and top landing pages with visits, leads and one column per status that counts as won or lost. Clicking a row filters the other tables. Shops also see customers, revenue and the average order value.
- Orders and Leads — shops switch between the two views at the top. Which one opens first is set under Settings → Conversions → Campaigns page; the open view stays in the address, so a reload or a shared link shows the same view.
- Clicks & goals — when your site has click goals, every table shows a Clicks column, the Goals table lists clicks and visits per goal, and the Visits with … filter limits the whole page to the visits with a click on that goal. Clicks never count as leads.
- WhatsApp chats — with WhatsApp chats linked to visits, the tables, a tile and the chart also show the chats that started from each source, campaign and page.
- PDF report — shows the same clicks, goals and WhatsApp chats as the page and keeps the Visits with … filter.
Conversions
Under Settings → Conversions you decide which visits InsightHub records on your website, how it recognizes a visitor, and which clicks count as goals. The results are on the Campaigns page. Sites without their own settings keep counting only campaign visits; once you save the tab, the new settings apply.
Record visits
- All visits — visits without UTM tags count too. The source comes from where the visitor came from: search engines (e.g. google / organic), social networks (e.g. facebook / social), other websites (their domain / referral), or direct (direct / direct).
- Only campaign visits — only visits from links with UTM tags, as before.
- Off — no visits. Click goals and forms still count.
Bots, crawlers and link previews are not counted.
Recognize visitors
- Without cookies (recommended, the default for new sites) — nothing is stored in the browser. InsightHub recognizes a visitor for one day from their IP address and browser, made unrecognizable with a key that changes every day. Neither the IP address nor the browser is stored.
- For the browser tab — the page keeps a visitor ID until the tab is closed.
- With a cookie after consent — once the visitor agrees to statistics cookies, a first-party cookie (7, 30 or 90 days) recognizes them on later visits. Works with the WP Consent API (Complianz, CookieYes …), Google Consent Mode and
InsightHub.consent(true). Without consent InsightHub works without cookies; if the visitor withdraws consent, the cookie is deleted.
Form leads and shop orders find their visit with every setting — without cookies through the same daily key.
Click goals
Clicks that matter without a form: a WhatsApp chat, a call, a booking. The ready-made goals are WhatsApp (links to wa.me, api.whatsapp.com or whatsapp:), Phone call (tel:), Email (mailto:), Booking (InsightHub booking buttons and embedded booking calendars), Download (links to PDF, ZIP, Office, audio and video files) and Outbound link (links to other websites). You switch each on separately and can give it your own name.
Custom goals are recognized by the text of the link or button, by the link address, by a CSS selector, or only by code with InsightHub.track("goal_…"). Each click counts for one goal, custom goals first; if the same visitor clicks again within a minute, it counts once.
WhatsApp chats
A chat that starts on WhatsApp can be linked to the visit it came from, so you see its source, campaign and the page with the WhatsApp button. It needs your WhatsApp number connected to InsightHub (with its display phone) and the WhatsApp click goal switched on. Choose how chats are linked:
- Off — chats are not linked to visits (the default).
- First message (recommended) — InsightHub remembers the prefilled text of each WhatsApp click and matches the chat's first message with the clicks of the last minutes (60 by default). Nothing visible is added to the message. With Vary the wording per visitor, each visitor gets a slightly different greeting, so two visitors who click at the same time can be told apart.
- Reference in the message — a short code such as “(Ref K7PQ)” is added to the end of the prefilled text. It finds the visit reliably, even days later; customers see the code and can delete it. You can change the word in front of it.
- Hidden reference — the same code as invisible characters. Customers don't see it, and some phones drop it. It is a hidden marker in your customers' messages, so mention it in your privacy notice.
Links to your number without a prefilled text start with a text you set (“Hello!” by default). Two things work in every mode: a chat from a Meta click-to-WhatsApp ad is linked to its ad, and a message that matches the text of one of your WhatsApp buttons tells you the page the button is on. The tab shows how many chats of the last seven days started, were linked and could not be told apart; with many of the latter, Reference in the message works better. A linked chat counts in the Campaigns tables, shows where it came from in the helpdesk conversation, and passes its origin to the lead, also when you create the lead from the chat later. The code is never shown in the conversation's subject or to the AI assistant.
Forms
With the WordPress plugin, Bricks and Elementor forms send their leads by themselves (plugin → Conversions). On other pages, call InsightHub.convert({…}) after a form was sent, and InsightHub.enrich({…}) for further steps of the same form — the tab shows both snippets to copy. Every lead joins the visit it came from; if there is none, it goes under direct / direct, so no lead is lost.
If a site doesn't need the Website field, hide it like any built-in field under Settings → Custom Fields.
Script on your pages
Tracking runs in the InsightHub script. In the WordPress plugin, version 2.52.0 or later, switch on Conversion tracking in its Conversions tab (it starts off); the plugin then puts the script on every page, in tracking-only mode without the chat. Recognize visitors and everything else is set here in InsightHub; the plugin's tab shows the current choice. On other websites, add one of the snippets from the tab to every page. To test, open your website with ?sg5ih_debug=1: a small window shows every visit and click that was counted.
Campaigns page
Show first decides which view the Campaigns page opens with: Automatic (Orders for shops, Leads otherwise), Orders or Leads. It has its own Save button, separate from the tracking settings above. A site without orders only has the Leads view.
Sync
Connect InsightHub to your shop and keep product data current.
- Full sync — re-ingest all products and static pages. Recommended once at start, then only on major changes.
- Incremental sync — only changed products; runs automatically based on configuration.
- Stock monitor — flags out-of-stock items so the chat won't recommend them (WooCommerce only).
- Shopify sync — on Shopify sites a single “Sync Shopify” card replaces the product/page syncs: one run fetches products, pages and blog posts. The auto-sync interval (Settings → Sync & Filters) keeps it running automatically — from every minute up to every 24 hours; stock and prices stay current too.
- Business Central sync — on Business Central sites the “Sync Business Central” card pulls the items straight from Dynamics 365 (blocked items are skipped). The auto-sync interval keeps the data current here too; BC has no webshop pages.
- Website without a shop system — with the platform “Other website” the page shows only “Static Page Sync”: it loads the pages from your sitemap and page lists. The result tells you how many pages were loaded and how many of them are longer than the search covers.
If sync fails, logs are visible directly on this page. Most common cause: invalid API credentials in Settings → Sync & Filters.
Widget
The chat-and-search widget embeds on your website via a JavaScript snippet. The widget configuration sets appearance and behavior.
- Mode — chat only, search only, or combined. A reservation mode is also available for hospitality.
- Appearance — color, icon color, position (bottom right/left), greeting text, and the product cards' stock-status labels.
- Embed code — grab the ready-made snippet under Settings → Chat Widget (copy button); paste it once before your closing
</body>tag. WordPress sites with the InsightHub plugin don't need this — the widget embeds automatically. - Embedding on Shopify — in the Shopify admin, go to Online Store → Themes → ⋯ → Edit code, open
layout/theme.liquidand paste the snippet right before</body>. Save — the widget appears on every storefront page.
Configuration and content changes update in the widget automatically — no re-embedding required.
Languages & automatic translation
The widget speaks eight languages (German, English, French, Spanish, Italian, Dutch, Portuguese, Indonesian). Under Settings → Chat Widget you choose which of them your site uses:
- Widget language — the default language of the interface (tabs, placeholders, labels, FAQ area).
- Automatic language detection — enable detection and pick the supported languages. Visitors then see the widget in their browser language automatically; everyone else gets the default. Example: German, Dutch and Indonesian supported, English as the fallback.
- Language picker in the widget — with two or more supported languages, the widget header shows a small language dropdown. Someone on a borrowed computer with the wrong browser language can switch manually — the choice is remembered in the browser and takes precedence over auto-detection from then on.
- Custom texts per language — title, subtitle, placeholder, button labels, disclaimer and the stock-status labels can be overridden per language (the "Translations" card on the Widget tab). The Auto-translate button fills empty fields via AI from your default texts — fields you already filled stay untouched; you review and save.
- AI notice (EU AI Act) — visitors must be told before the chat starts that they are talking to an AI (Art. 50 AI Act, in force since August 2, 2026). When your disclaimer is empty, the widget therefore shows automatically, in every language: "You are chatting with an AI assistant. Answers may contain errors – for important matters please contact our team." Your own disclaimer replaces that line — name the AI explicitly in it ("AI assistant" or "AI chatbot", not just "chatbot"), optionally with your privacy-policy link. The notice cannot be switched off entirely.
FAQ content can be translated too — see Translating FAQs. The AI assistant's answers follow the customer's language automatically anyway.
API keys
Keys for server-to-server calls to the InsightHub API. Useful if you want to plug your own scripts or third-party systems into InsightHub.
- Generate — create a new named key. The value is shown only once — copy it safely and store it in your password manager.
- Rotate — if compromise is suspected, delete the old key and generate a new one.
Note: fine-grained per-key permissions aren't available right now — every key has the same access rights. Let us know if you need permission separation; happy to build it as a feature.
Settings
Your website's settings are split into several tabs — everything the engine needs to know per site about your shop, your content, and your branding lives here.
General
Name, slug, language, locale (date, currency, timezone), and date formats. Sets how numbers and dates display in the app and the widget. Branding (logo, colors, font) overrides the organization's Brand for this site; besides the normal logo you can add a logo for dark mode for dark backgrounds, e.g. a booking page in dark mode.
Opening hours
When your business is open — the phone assistant goes by it. Weekly hours: one or more ranges per day (a second range for a lunch break); a day without a range is closed, and Copy Monday to Tuesday–Friday saves typing. Public holidays: country and region (Austria and Germany by state, Switzerland by canton, Indonesia nationwide) — the public holidays of the next 12 months are listed, and you can switch off any day on which you are open (e.g. 8 December). Closures and special hours: company holidays, inventory days or shorter hours on single days, with a name and an optional sentence for callers (“We're on company holidays”). A line at the top shows what applies right now (“Closed now — open again tomorrow from 8 am”). The times use the timezone from General. Until weekly hours are set, nothing changes.
How the phone assistant uses them: it greets by the situation — during opening hours with your usual greeting, outside them with “You're calling outside our business hours – we'll be back tomorrow from 8 am”, on holidays and closures with the sentence of the day (“Today is a public holiday – we'll be back …”); callbacks the same (see Setup). It also knows the hours during the conversation (“Are you open today?”) and transfers calls only during opening hours. The website chat and WhatsApp know the current hours as well — so don't type opening hours into a prompt by hand: there they would go stale as soon as you change them here. A new demo on the Partner page takes the weekly hours from the website or the Google listing and the public holidays from the listing's state.
Sync & Filters
Platform (WooCommerce, WordPress, Shopify, Sana Commerce, Shopware, … or Other website (no shop system)), API credentials, exclude rules, and static-page configuration. Stock monitoring is set up here too. Nothing is preselected: a site that is not connected yet shows only the Site URL and the static pages until you choose a platform.
Static pages are pages and sitemaps the assistant reads as knowledge (e.g. FAQ, shipping, about us). You put each page into one of two lists: Whole pages are read as one document per page — for product, landing and other pages of normal length, without the website's menu and footer. The search covers about the first 8,000 characters of each, and the assistant reads the passage that matches the question; longer pages therefore belong in the second list. Pages split into sections creates one document per heading (h2 / h3) — for long help or FAQ pages: the assistant then finds each section on its own and links straight to it. Pages from sitemaps stay whole too. Re-sync automatically (every 6 or 12 hours, daily, every 2 days, weekly) fetches the pages again on its own; unchanged pages and sections are not processed again. That keeps the assistant's knowledge current when the pages change.
Sitemaps: “Find sitemap” looks up the sitemap from the Site URL and counts its pages. Under Leave out sitemap pages you enter patterns, one per line: a sitemap page is skipped when its address contains the text, and * stands for any characters (e.g. /tag/ or */archive/*). Pages you list yourself are never skipped. Under Documents, a whole page that is longer than the search covers carries the mark “Too long” — move it to Pages split into sections when its later parts matter. On a site whose long pages are prepared in parts for the search, the page shows its number of parts instead (e.g. “12 parts”, or “Being prepared” while that is still running): the assistant then finds every part of the page, and there is nothing for you to do. The page itself lists its parts.
Pages in several languages: the assistant reads each page's language and its language versions from the page itself (<html lang> and the hreflang links most websites already have), the same for WordPress pages (Polylang, WPML) and Shopify pages. Add every language version as its own page — e.g. the German and the English help page. The assistant then pairs them, answers from the version in the chat's language, shows a topic only once and links to the page in the visitor's language. Under Documents each page shows its language (DE, EN …); open a page to see its other language versions, so you can check the pairing worked.
For the Shopify platform, enter your shop domain plus the Dev-Dashboard app's Client ID and Client Secret (legacy permanent Admin API tokens keep working), verify with “Test connection”, and pick the auto-sync interval. Stock monitoring applies to WooCommerce only — on Shopify the auto-sync keeps stock and prices current.
For sites using the WordPress Plugin (Push), the “Pull plugin settings” button reads the site's live configuration on demand — search-refinement mode, sync and tracking toggles, and the plugin, WordPress, and WooCommerce versions. This lets you see a site's setup without logging into its WordPress admin.
Widget
Appearance, mode, position, and chat features for the front-end widget — see also Widget.
Conversions
Which visits are counted, how visitors are recognized, click goals and forms — see Conversions.
Email & Reports
Contact email, Outgoing email, and scheduled reports (weekly/monthly). Outgoing email holds everything the site sends email with — lead emails, automations, appointment confirmations, surveys and reports: the sender name (shown in front of the address, e.g. “Example Shop <[email protected]>”; empty = the bare address), the From address for lead & customer emails (empty = the contact email), the email signature for lead emails, and the SMTP login. Under Send through choose Own SMTP server (the default, the fields above) or A mailbox: the site then sends through one of its mailboxes — sender name, From address and login come from the mailbox, so the password lives in one place. Reports land directly in your inbox.
Search
Fine-tuning of semantic search — minimum score, sorting, fallback behavior. Useful when your catalog is very large and the default behaviour misses results.
AI
Which AI model answers the chat and which embedding model indexes the search. The Quick select lists the providers InsightHub offers with their models — next to each provider you see where it processes your data: EU (Azure OpenAI in the EU data zone, Mistral), US (OpenAI) or Global. InsightHub default lets your plan decide (see below); Custom endpoint is for self-hosted or other OpenAI-compatible models. The AI provider status box shows which provider and model actually answer right now and whether the InsightHub key or your own is used.
Your own API key: with your own key you can pick any provider and model — including those not included on the InsightHub key (marked "own API key required" in the list) — and your own API URL. The InsightHub key is never sent to a foreign endpoint. Your keys are stored encrypted; AI usage on your own key does not count toward the plan's conversation allowance.
Plan model: on the InsightHub key your plan decides which model answers by default and which other models you may pick (for example, Professional may choose GPT-4.1 mini or Mistral Medium, Business the whole catalog). A model outside that list runs only with your own key — or, by arrangement with us, via the "stronger model" switch on the billing page.
Changing the embedding model: a different embedding model is a different vector space — every product and document has to be re-indexed. On a site that already has content, saving asks for a confirmation; search stays available meanwhile but may return incomplete results until the re-index has finished.
Daily AI allowance: every plan includes an allowance of AI tokens per day as a safety fuse (limited during the trial, much higher on paid plans). It counts chat conversations and the AI assists — translations, reply suggestions, image translations, FAQ translations, auto-tags, call summaries and the indexing during sync. Once it is used up, chat and assists answer with an error until midnight (UTC); search, documents and leads keep working. You can see the current state under Billing → AI usage; for legitimate exceptions (say, a one-off FAQ translation into many languages) the SG5 team can raise a site's daily limit. A single chat message can be up to 4,000 characters long. When a trial ends without a subscription the site is paused: widget, chat and sync resume once a plan is active, and your data is kept.
Chat sessions: Archive closed conversations automatically takes the closed conversations whose last message is older than the chosen period (7 days to 1 year) out of the chat sessions list once a day — they stay in the statistics. "Off" (the default) archives nothing automatically. See Chat sessions.
Mailboxes
The site's email mailboxes, each with its own SMTP (sending) and IMAP (fetching), from name and signature. Test connection checks both logins before you save. Show in Inbox and Polling enabled bring the inbox into the Inbox page; the Helpdesk switch turns the mailbox into a ticket system with SLA, spam rules, auto reply, reply defaults and access — see Helpdesk setup.
Mail filters
Open Settings → Mailboxes → Mail filters to organise incoming mail with named rules. Each rule has four steps:
- Filter name: name the rule. “Put this filter at the first position” runs it before the other rules.
- Conditions: match all conditions, any condition or all messages. Check sender address or name, recipient, CC, subject, body text, attachment name, whether an attachment exists, a named header or the mailbox. Only “matches regular expression” interprets a pattern; every other operator uses literal text, so
@example.comneeds no escaping. - Actions: ignore for leads, do not match to a lead, skip automations, mark as spam in helpdesk, add a tag or assign a user. You can combine actions. “Stop processing further filters” stops after a match.
- Where it applies: all or selected mailboxes, and leads intake, helpdesk intake or team inbox. All are selected by default. Lead actions affect leads intake; spam, tags and assignment affect helpdesk.
Drag rules into order or use the arrows and “Move to top”. Disable individual rules without deleting them. Outbound mail and replies linked to a lead through reply headers are never filtered. Ignored mail leaves the unmatched list but stays stored and can still be manually attached to a lead.
Test checks the last 500 scoped inbound mails without changes and shows up to 20 examples. Save the filter and test again before confirming Apply to existing mails. Only ignore, do-not-match and tags are applied retroactively; closed helpdesk conversations remain unchanged. The dry run sends no email and changes nothing on the mail server. Older emails without the needed details are skipped for header, sender-name or attachment conditions.
The Hit log shows up to 100 hits from the last 30 days, including time, sender, subject and actions. Existing spam rules were converted into named filters per mailbox. On the unmatched-mail list, Create filter from this mail opens an editor with the sender, mailbox and “Ignore for leads”; you can choose the sender domain instead. Managing filters requires permission to edit mailbox settings.
Helpdesk
What all helpdesk channels share: numbering (prefix, digits, number in the subject at the start or the end), tags and saved replies — each for all or specific channels. Under Notifications you set who hears about conversations nobody has taken yet: everyone who works in the helpdesk, or selected people (see Helpdesk notifications). The tab starts with the helpdesk channels (mailboxes with the Helpdesk switch, WhatsApp) and links to their cards. See Helpdesk → Settings.
Channels
Configuration of additional communication channels — the WhatsApp Cloud API (paid add-on) and SMS notifications (own tab, available to every site). Phone Number ID, Access Token and webhook data live here. Step-by-step: Set up WhatsApp; the number can be a helpdesk mailbox too — see WhatsApp as a support channel. The phone channel has its own Voice tab (also a paid add-on) — see InsightHub Voice. SG5 switches both add-ons on for your site: under Organization → Billing → Add-ons you see per site whether they are active and ask for them with Contact us (or write to [email protected]); an active add-on is billed on top of the plan.
Templates
Manage email and WhatsApp templates in two tabs.
Email is a single template manager with a section rail: Custom templates (your own freely-named lead emails for chat, automation and manual sending) sit alongside the built-in system emails — Reviews (invitation, reminder, reply), Reports (weekly/monthly), Surveys (invitation) and Chat / Contact (contact and reservation requests). Every system email can be customised per language (subject + body); leaving a field blank uses the built-in default text. Insert placeholders (e.g. name, order number, review link) from the side panel.
WhatsApp templates are submitted to Meta for review; once approved, they can be used in automation rules.
Clone (the copy icon on each template) creates a copy under the next version name — clarification_no_loan becomes clarification_no_loan_v2, the next clone _v3 — with the text, category, language, placeholders and status tags. The copy is not submitted: it opens in the editor as a Draft. Save draft keeps it a draft; Save & submit to Meta (or Submit to Meta in the list) sends it for review. The original template stays in use until the new version is approved. A cloned quick reply stays a quick reply.
Archive (the archive icon on each template, or Archive for all ticked templates) puts away a template you no longer offer — for example the original once its _v2 is approved. An archived template no longer shows in any picker (lead page, helpdesk reply, new conversation, automations, appointment reminders); the Archived filter lists it with a count, and Unarchive brings it back. It can be edited again once it is unarchived. Automations and appointment reminders that already use it keep sending it — the editor shows “This template is archived” on that step and offers the current templates to replace it. Archiving changes nothing at Meta. Sync from Meta leaves archived templates archived; a template Meta no longer has (deleted in WhatsApp Manager, for example) is archived during the sync and marked “no longer at Meta”. Delete, by contrast, removes a template from InsightHub entirely (Meta keeps it) — to keep it and its history, archive it instead. An archived template keeps its name.
Automation
Rules that automatically act on certain events — e.g. "When a new lead arrives via the form, send a WhatsApp welcome template" or "Mark a lead as lost after 60 days of no response". Conditions, actions, and time windows are freely combinable.
Credentials
Reusable, typed credentials for everything this site connects to: Secret / API key (usable in automations as {{ secrets.name }}), Bearer token, Header auth, Basic auth, Microsoft sign-in (Business Central & co. through a service account, see Business Central) and Trello (see Helpdesk → Trello). Secrets are stored encrypted and never shown again; Test checks credentials that can be verified on their own. Credentials still used by an external system or a flow cannot be deleted — the card shows where they are in use.
External systems
Connect your ERP, till, booking tool or any other system once for the whole site. Two kinds: an MCP server (Model Context Protocol — the standard more and more systems offer; the available tools are discovered automatically) or hand-described HTTP tools for a REST API. Credentials are never entered directly: store them under Credentials and pick them by name. Test connection lists the tools found. Optionally a detail-page panel shows a tool's result as a card on lead or ticket detail pages — for example the customer's open invoices from the ERP; record fields (email, company, ticket number) fill the parameters. Connected systems are used by back-office assistants and by the automation step "Query external system".
Appointments
Calendar connections for assistant-side booking: several accounts at once — Google Calendar, Microsoft 365 / Outlook, Apple iCloud / CalDAV, iCal feeds, Cal.com or TidyCal — with one booking calendar and any number of calendars checked for conflicts, video conferencing (Google Meet, Microsoft Teams or Zoom — independent of the calendar), the time zone and the site's bookable hours. Title, duration, booking rules, notifications and the public booking page are set per booking type under Appointments → Booking types. Details under Appointments.
External Storage
Connect S3, SFTP, or similar storage buckets — for example, to import lead CSVs from an external system into InsightHub on a schedule.
Share passwords
While writing an email you can share lead documents from a Nextcloud storage as a link (Insert link → Nextcloud share (lead document)). Under Settings → External Storage → Destinations → Share defaults you set up named passwords for this — one per recipient group, for example "Law firm A", "Customer" or "Partner".
- Add and change: Add password, enter a name and a password with at least 10 characters, then Save passwords. The app shows a saved password only as "set"; to replace it, type a new one. Exactly one is the Default.
- When sharing: in the dialog, under Password, pick one of the named passwords (the default is preselected), type your own, or share without a password. The password itself never appears in the email — send it to the recipient another way.
- Which link needs which password: the "Shared files" list on the lead page shows the password's name next to the lock.
- Existing links: renaming, replacing or removing a password does not change links already shared; they keep the password they got when they were shared.
A single default password you set earlier appears as "Standard". Users who may manage leads can revoke a shared link.
When the storage is unreachable
When an external storage does not answer — the server is offline, overloaded or reports an error such as "521" — every team member of the site sees an amber bar at the top of every page: which storage is affected, since when, and when it was last checked (in the site's time zone). While it shows, uploading and opening documents fails. Check whether the server (your Nextcloud, for example) opens in the browser, or contact your hosting provider. InsightHub checks the storage every 5 minutes on its own; once it answers again, the bar disappears without you doing anything — within 5 minutes, or right after the next successful upload or download. Documents whose upload failed during the outage were not stored: upload them again afterwards. Users who may manage settings find a link to Settings → External Storage in the bar; the × hides it on the current page.
Imports
Scheduled lead imports from the configured External Storage — schedule, field mapping, status of the last runs.
Failure notifications: when a scheduled run keeps failing — lead import, shop sync, search monitor, mailbox polling or a report — the organization's owners and admins get one notification (email and the bell in the app) and one more once the run works again. The message carries the error text and links to the affected page. Switch it off under Settings → Notifications → "Sync & imports".
Menu
Settings → Menu sets up the sidebar for each site. The layout applies to everyone who works on the site.
- Rename groups: click a group's name (for example "CRM") and type a new one, such as "Sales". A name you type is shown as typed in every app language. "Reset name" brings the standard name back.
- Move items: drag an item by its handle (⋮⋮) into another group or to another position — or use the arrows: at the top or bottom of a group, they move the item into the group before or after it. The arrows in a group's header change the order of the groups.
- Your own groups: "Add group" creates a new group (up to 10 groups). When you remove a group, its items go back to their usual group; a standard group can be removed once it is empty.
- Show and hide: the switch next to each item hides it for this site, wherever you moved it. Some items share one switch (for example Chat Sessions and Chat Analytics); this is noted under the name. What a person sees also depends on their permissions and the features active on the site; a group without visible items is not shown.
- Reset: "Reset menu" restores the standard groups, their names and the order; the switches stay as they are. Changes take effect when you click "Save Menu Settings".
The dashboard always stays the first item. You can hide it like any other item; it stays reachable through the site's name in the breadcrumb navigation at the top. New menu items from later versions appear in their standard group.
Set up WhatsApp
The WhatsApp add-on lets you automatically send a welcome message to every new lead via the official Meta Cloud API — and reply to inbound messages directly from the app. This guide walks you through the one-time setup. Budget about 45 minutes; some of that is Meta-side review that runs in parallel.
Prerequisites
- A Facebook account (personal is fine) for the business owner — this becomes the Business Manager admin in step 1.
- A phone number that has never been used in WhatsApp (personal or Business), or that you can permanently sign out of WhatsApp first. Landlines work if they can receive an SMS or voice call.
- A company name for the WhatsApp profile — Meta reviews the display name once.
- Optional: a logo (640×640 PNG) for the WhatsApp business profile.
Step 1 — Create a Meta Business Account
- Open business.facebook.com and sign in with the Facebook account.
- Click Create account top left. Enter business name, your name, and a business email. ~5 minutes, free.
- Confirm the business email via the link Meta sends — without it some actions stay locked.
Step 2 — Create a WhatsApp Business Account (WABA)
- In Business Manager: Accounts → WhatsApp Accounts → Add → Create a WhatsApp account.
- Follow the wizard: business details, timezone, currency — Meta creates the WABA automatically.
- Click Add phone number. Enter the number, display name, description. Verify the number via SMS or voice code.
The display name goes into a short Meta review (1–2 business days). You can keep going in parallel.
Step 3 — Grant InsightHub tech-provider access
- In Business Manager: Settings → Accounts → Apps → Add → Connect an app.
- Paste the SG5 InsightHub App ID:
924493397254027. - Go to Settings → Accounts → WhatsApp Accounts, pick your WABA → Assign people and assets → pick the SG5 app and grant Full control.
Step 4 — Generate a permanent access token
The "temporary" 24-hour token shown on the Cloud API setup screen expires and breaks service — generate a System User Token instead:
- In Business Manager: Settings → Users → System Users → Add. Name e.g.
insighthub-wa, role Admin. - Select the new system user → Assign assets → add the WhatsApp account and the SG5 app with Full control.
- Click Generate new token → Expiration Never → Permissions:
whatsapp_business_messagingandwhatsapp_business_management. - Copy the token — it's only shown once.
Step 5 — Paste values into InsightHub
Open Settings → Channels → WhatsApp for your site. You'll need:
- Phone Number ID — visible in the Meta dashboard under WhatsApp → API Setup.
- Business Account ID (WABA ID) — same page, top.
- Display phone number — E.164 format (e.g.
+43 1 234 56 78). - Access token — the System User Token from step 4.
- Webhook Verify Token — any random string. Pick your own.
- App Secret — from the Meta App's "Basic settings" (used to verify webhook signatures).
Save → click Test connection. You should see your verified display name + quality rating.
Step 6 — Register the webhook in Meta
So inbound WhatsApp replies land in InsightHub:
- In Meta dashboard (developers.facebook.com) open your app → WhatsApp → Configuration → Webhooks.
- Callback URL:
https://insighthub-gateway.sg5host.com/v2/webhooks/whatsapp - Verify Token: the same value you set in step 5.
- Click Verify and save → Meta hits the verify endpoint immediately.
- Subscribe to fields: messages (required), optionally message_status for delivery reports.
Step 7 — Templates for outbound
WhatsApp only lets you message a lead who has never written to you via a Meta-approved template. InsightHub ships lead_welcome_generic as a default. On first setup, create the template once under Templates → WhatsApp and click "Submit to Meta" for review. UTILITY templates typically clear review in 1–3 business days.
Once approved, set up an automation rule in Settings → Automation (e.g. "Welcome new leads") to send the template on lead.created.
Template category: Utility or Marketing
Meta decides a template's category itself: when you submit it and in later reviews of templates it already approved. What you pick when you create a template is a suggestion. The category sets the price of every send. Marketing templates cost more and fall under Meta's marketing limits.
- Utility: follows an action or request of the customer and promotes nothing. Examples: order status, appointment confirmation, the result of a check.
- Marketing: anything promotional, such as offers, recommendations, coupons and other products or services.
- Mixed content counts as marketing. If a template combines information with an offer, Meta classes the whole template as marketing. Example: "Your check is done. We'd also be happy to check your other contracts for free."
Tip: Split the result and the offer into two templates. The result stays Utility; send the offer as its own Marketing template, only to contacts who opted in.
How InsightHub shows the category:
- InsightHub takes Meta's category when a template is submitted, on Sync from Meta, automatically once a day, and right away when Meta reports a change.
- When Meta re-classified a template, Templates → WhatsApp shows a line below it such as "Meta changed this template from Utility to Marketing on 06.10.2026." When Meta announces a change, you see the date in advance.
- The organization's owners and admins get a notification in the bell and by email. You can switch it off under Settings → Notifications → WhatsApp template category changed.
- Once Meta has a template, the category can't be changed. If Meta rejects a template, you can change it and submit again.
- After a sync, InsightHub lists templates that exist at Meta but not in InsightHub. If one of your quick replies has the same name and language, the list says so. Rename the quick reply so the two can't be mixed up.
Disagree? In WhatsApp Manager, go to Message templates → Go to Business Support → Template category updates to request a review within 60 days. Details in Meta's template categorization guidelines.
Keep using the WhatsApp Business app (Coexistence)
Want to keep your existing WhatsApp Business number on your phone and still run InsightHub's AI assistant, helpdesk and automations on the same number? Meta's Coexistence makes that possible: the WhatsApp Business app stays active on the phone while InsightHub works alongside it through the Cloud API.
How to connect the number:
- On the phone: WhatsApp Business app up to date (version 2.24.17 or newer), two-step verification switched on.
- In InsightHub open Settings → Channels → WhatsApp and pick App + API in parallel (Coexistence) under "Connect WhatsApp in one click".
- In Meta's popup choose "Connect existing WhatsApp Business account" and scan the QR code with the WhatsApp Business app on the phone (Settings → Linked devices).
- Done — phone number ID, WABA and access token are stored automatically. Right after that InsightHub asks the app for your contacts: customers and leads known only by number get the name from your address book. Meta allows this for 24 hours after connecting — the "Sync contacts" button repeats it if needed.
What happens afterwards:
- Incoming messages arrive on the phone and in InsightHub (helpdesk, lead page, Inbox).
- If you reply from the app on the phone, the reply shows up in InsightHub too — marked "WhatsApp App". The AI assistant stands down for that contact, exactly as after a reply from InsightHub.
- Replies sent from InsightHub (assistant, helpdesk, automations, templates) show up in the app on the phone as well.
- Chats from before the connection stay on the phone — they are not imported into InsightHub yet.
Meta's limits: at most 20 messages per second through the API, no delivery reports for messages written on the phone, one number belongs to exactly one WhatsApp Business account. If you want the number to run only through InsightHub, pick "API only" when connecting — the app on the phone can then no longer use it.
Opt-in & GDPR
Meta requires a documented opt-in before you send marketing messages. For transactional UTILITY messages (e.g. welcome after form submit), an "I agree to be contacted via WhatsApp" checkbox on the lead form is enough. Store the checkbox state — Meta can ask to see it during audits.
Rate limits & quality rating
Every newly verified number starts at Tier 1: 250 recipients per 24h. With good quality (low block + spam-report rate) Meta auto-promotes you — 1k, 10k, 100k. Watch the quality rating in the Meta dashboard; a red rating throttles you.
Common issues
- "Test connection" fails with OAuthException — the token expired or doesn't have all permissions. Regenerate it per step 4.
- Template rejected with "number of params" on send — the variable mapping in the automation rule doesn't match the
{{1}}, {{2}}placeholders. Open the rule, fill in each position, save. - Webhook receives no messages — the Verify Token must be exactly identical in InsightHub and Meta. The app must subscribe to the messages field.
- Token expires every 24h — you copied the temporary Cloud API setup token, not the System User token. Repeat step 4.
Need help with setup? Email [email protected] — we'll do it together in a 30-minute call.
Leads
Leads are prospects who reached you via form, chat widget, WhatsApp, import, or manual entry. The Leads area is your central lightweight CRM — from first inquiry to closed deal, all in one place.
Import a lead's details
Above the "Create lead" form there is an Import details box. Paste what you have — InsightHub works out what it is:
- A website (
example.com): the homepage, imprint, contact and "About us" pages are read. It suggests the company, contact person, address, phone, email and a short description. - A Google Maps link or a Plus Code (e.g.
68GX+4G Vienna): the Google listing (Google Business Profile) is loaded right away — company, phone, website, address, categories, opening hours and rating. - A company and city (e.g. "City Flowers Vienna"): the matching Google listings appear below, and one click picks the right one.
If the Google listing has a website, it is read in the same step.
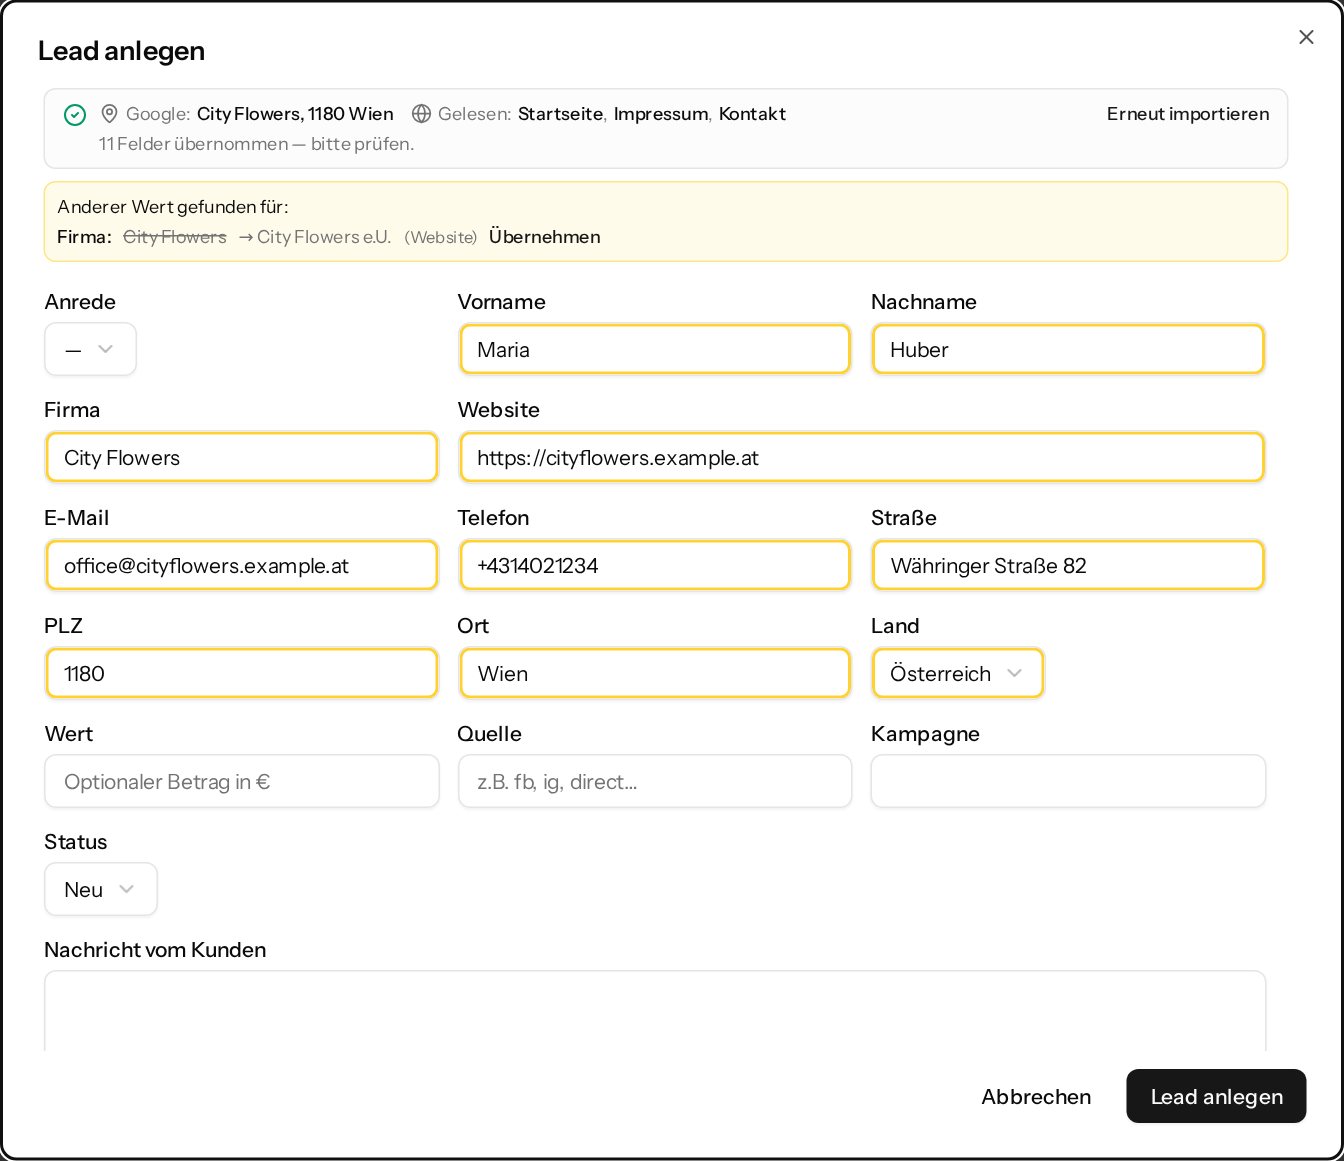
- Only empty fields are filled, and they are highlighted. What you already entered stays. If a source says something else, it shows in the yellow box and you can take it over with one click.
- The top line names what was read (with links). Import again reopens the box with the last input. Descriptions go into the notes ("From Google:", "From the website:").
- On the lead page, Google listing under the Website field opens the saved listing in Google Maps, and the button next to the field opens the website.
- When you save, the activity timeline shows which fields came from the website and which from the Google listing.
- Sites that load their content only with JavaScript can't be read yet. Each site can run 30 website lookups and 30 Google searches per hour.
Bricks and Elementor forms (through the WordPress plugin) and the AI assistant can send a lead's website too.
Status & workflow
Every lead has a status — changeable inline via dropdown in the list:
- New — just arrived, untouched
- Attempted — first response sent
- Initial call — meeting or call has happened
- Awaiting documents — lead still needs to send something
- Customer — deal closed
- Lost — no deal, with optional reason tag
Direct actions from the lead detail
- Email directly — reply editor opens inside the lead, sent via your SMTP. Lead's replies come back into the same lead thread automatically (IMAP polling).
- WhatsApp directly — if the WhatsApp add-on is active, message the lead with one click; inbound replies appear in the lead detail in real time. Also works outside the 24-hour service window via an approved template.
- Upload files — drag-and-drop documents onto the lead (quotes, contracts, scans). Attachments on inbound emails are automatically linked to the lead too.
- Notes & reminders — internal memos and callback reminders with date/time. Due reminders trigger notifications; Remove reminder on the card deletes a saved one in one click. When adding an activity note there is an "Also set last contact to now" checkbox — handy after a phone call, which is contact InsightHub cannot observe on its own.
- Assign owner — hand a lead over to a team member. Reply, document, and WhatsApp notifications then go to that person.
Quick Actions
The Quick Actions card on a lead's page creates links from your link templates (Settings → Automation → Link templates, each template with Show on lead). Every template is a button of its own with its Copy button label; from the sixth on, the others are under More…. One tap creates the link and copies it at once — the button reads “Copied” for two seconds, and the link appears below with Copy to copy it again. On a phone, Share opens the share sheet, so the link goes straight into WhatsApp or an email. If the browser does not allow the copy, copy with Copy as before.
- Quick actions display (at the top of the link templates) — Buttons (default) or Dropdown: every template in one menu as before, without the copy on tap.
- Copy on tap and Offer sharing — per template, both on by default. Off: the button only creates the link and you copy it with Copy; without sharing, that template has no Share button.
Arranging the lead page
On a lead's page you arrange the panels yourself: Customize at the top right shows a handle with its name on every panel. Drag it to another place, also from the main column into the sidebar and back; with the keyboard: focus the handle, Space, arrow keys, Space. While you customize, the fields can't be edited. Every change is saved at once, Done ends customizing, Reset layout brings back the default order. The arrangement is yours alone and applies to every lead; your colleagues see their own. The lead details stay in the main column. Panels you don't see right now (WhatsApp while it is off, for example) keep their place and come back there. On a phone the two columns are stacked.
Panels you don't need (Appointments, for example) you hide while customizing, with the eye icon at their handle. They are then listed at the top under Hidden panels; a click on + Appointments brings the panel back to its default place. The lead details can't be hidden, and Reset layout shows all panels again.
Overview & filters
- Sort by creation date, status, last contact, last updated
- The "Last Contact" and "Updated" columns mean different things: "Last Contact" is when you last sent something out (email or WhatsApp) and can also be set by hand on the lead, e.g. after a phone call. "Updated" is when anything on the lead last changed — status, assignee, fields or a new note.
- Filter by source, owner, campaign, status
- Filter by your own choice fields — choice, multiple-choice and yes/no fields shown as a column in the lead list appear under Filters as their own dropdown, e.g. Dienstleistung = Sportwetten (for a multiple choice: leads that contain the value). With more than two such fields you pick the field first, then the value. The filter is part of the address and doesn't change the numbers on the status chips.
- Hide rows by your own fields — Customize view → Hide rows matching also lists every active choice, multiple-choice and yes/no field; you pick the value from the field's options. Hidden leads are left out of the list and the numbers, and the setting only applies to you. Leads without a value in the field stay visible; when a field is deactivated, its rule no longer applies.
- Choosing columns — Customize view lists the columns in three groups: Contact and address, Lead and dates and Custom fields. Salutation, title (prefix and suffix), first and last name, street, postal code, city, country and campaign are available as columns too; they start switched off. Tick one and it shows in your own view only, also after a reload; Reset to default hides it again. Fields the site hides under Settings → Custom Fields are not offered.
- AJAX search over name, email, phone, company
- "Created via" column shows the origin (form, manual, import, WhatsApp, API)
Activity timeline
The lead detail has a chronological timeline on the right: status changes, emails, WhatsApp messages, uploaded documents, notes, automation-rule actions. Every team member sees at a glance what has happened on the lead so far.
Unassigned documents
Files that reach InsightHub without a lead — say a signed document whose signer used a link without the lead id, or a form upload with an unknown email address — are never lost: they sit under Leads → Unassigned documents (an amber badge with the count at the top of the Leads page while something is open). Each file shows name, size, source and the sender's note (e.g. "Signatur: name · Vorlage 7"), can be opened or downloaded, and is assigned through the lead search — it then appears under the lead's documents and the assignee is notified.
Hiding built-in fields
Settings → Custom Fields also lists every built-in lead field, each with its own switch: salutation, titles, first and last name, company, website, email, phone, address, source, campaign, value, last contact, “created via” and “created at”. Hide what a site doesn't need. The field then disappears from “Create lead”, the lead page, the lead list's columns and “Customize view”.
- The data stays. Automations, imports and reading the website keep writing the field.
- InsightHub itself needs the display name and the status; they always stay visible.
- With email and phone both hidden, the page points out that leads can no longer be contacted from InsightHub.
Statuses per segment
Under Settings → Lead statuses, each custom status can use Show only when … with a segment or condition, for example “Credit” for “EBK needed”. The button summarizes the condition; save the status settings afterwards. System statuses have no visibility condition.
The lead's status picker follows its tags and edited custom fields immediately. The current status stays visible even when it no longer fits, marked “Not usual for this lead”. Bulk changes offer statuses fitting all selected leads; mixed segments or a selection extending beyond this page offer only unconditioned statuses, with a hint.
The lead list's status chips follow a relevant tag or custom-field filter. Without one, all statuses remain visible. A hidden status that still has leads in the result stays muted with its unchanged count. Boards without a segment filter keep their columns. Imports, the API and automations can still set any active status. A segment used by a status cannot be deleted until that reference is removed.
Show only when …
Not every choice fits every lead. Options, whole fields and templates can be limited to the leads they fit — with conditions on tags, status, source, “created via”, assignee, your own custom fields or a segment, also combined: e.g. “Segment is VIP” and “Status equals New”. Automations have their own filters and are not affected.
- Options and whole fields — in Settings → Custom Fields, every option of a choice field has a filter icon: “Show only when …” the conditions hold. The same exists for the whole field. On the lead page and when creating a new lead, only the matching options and fields remain.
- Preselect per kind — an option's “Show only when …” dialog has the tick “Preselect this option when it is visible”. In “Create lead”, the first visible option with the tick is selected, e.g. 35 % for Kreditgebühren and an SPW value for Sportwetten (a multiple choice ticks every visible one). When the kind changes, the preselected value changes with it; a prefilled value that no longer fits is never left selected. A value you picked yourself stays, marked “not usual for this lead”.
- Default per member — choice and yes/no fields have a “Default per member” list in Settings → Custom Fields: member → value. New leads that member creates start with that value as long as it fits, e.g. the kind of service someone usually handles. The order when creating a lead: the member's default → the preselected option → the field's default value → empty. An empty required field disables “Create lead” until it is filled in.
- WhatsApp and email templates — a template's visibility has two parts, each with its own switch, also together: Show only when … (hidden for the other leads) and Show on top when … (offered first for matching leads, for the others in the usual order). Example: only for the segment Kredit, and on top there while the status is New or Attempted. With neither part switched on, every lead sees the template. The template list shows one chip per part (“Only: Kredit”, “On top: Status is one of New, Attempted”). Set visibility changes each part on all ticked templates at once, as you choose: Leave as it is, Set … or Remove. Existing lead-status tags keep working as “show on top when the status is one of them”.
- Values from the list — you pick a condition's value from the field's own values: statuses (by their names), tags, sources, “created via”, assignees, the options of your own choice fields and segments. With is one of and is not one of you pick several — they show as chips, and an × takes one out again; with equals you pick one. Tags and sources can also be typed in new. A stored value the field no longer knows (say, a deleted option) stays as an “unknown” chip until you remove it.
- Live — add or remove a tag on the lead page and the choice fields and template lists follow right away, without a reload.
- Nothing is lost — a value the lead already has stays visible, marked “not usual for this lead”. Hiding is guidance, not a lock.
Customers
Customers is InsightHub's person record: whoever orders in the shop lands here automatically with orders, revenue and campaign attribution — and whoever writes to the helpdesk or is entered by hand lands here too, without an order at first. Leads remain the sales pipeline; a customer can be linked to their lead. This mirrors how helpdesk and e-commerce systems work: one person, one record.
- Buyers and contacts — the list filters by Buyers (at least one order) and Contacts (no order yet); the source (Shop, Helpdesk, Manual) is shown on the record. There is also a filter by tag, and Columns adds columns such as VAT ID, city, country and tags — your browser remembers the choice.
- Create a customer — "New customer" opens the full form with two tabs. Customer details: person or company (a company needs its name, a person a first or last name — the email address is optional), contact details, website, VAT / UID number (EU numbers are checked for their format), groups / tags, preferred language and currency (prefilled from the site's settings), customer address, notes and your custom fields. Billing & Shipping: billing address with "Same as customer address" and shipping address with "Copy billing address". Create returns to the list, Create and open goes to the new customer.
- Duplicates — before saving, InsightHub checks the email address, phone number and VAT ID against your existing customers and shows the matches with "Open". With the same phone number or VAT ID you can create the customer anyway; an email address always belongs to one customer only.
- Profile — first and last name, email plus additional addresses, phone numbers with a label (work, mobile, home), company, job title, website, social profiles, address and notes; plus your own custom fields for customers (Settings → Custom fields, object "Customer"). "Edit profile" shows the same form as creating, including the billing and shipping address. These details live in InsightHub and are not written back to the shop.
- Shop data stays shop data — orders, revenue and attribution come from the connected shop and cannot be edited. When a contact later orders, the shop sync fills the same record; orders and helpdesk conversations are matched by email address (any of the additional addresses too). With the WordPress plugin 2.51.0 or newer, an order also brings the company and the billing and shipping address: empty fields are filled and an address from the shop follows the shop — what you entered by hand in InsightHub is never overwritten.
- Conversations — with the helpdesk enabled, the customer page lists the person's helpdesk conversations with a jump into the timeline.
- Appointments — with appointments, the customer page lists the person's upcoming and past appointments; customers can be created from an appointment or linked to it (see Leads and customers from appointments).
Segments
A segment saves a condition under a name — e.g. VIP = tags contain “VIP”. You set the rule once and reuse it wherever “Show only when …” is offered, instead of repeating it on every field and template. Change the segment and the change applies everywhere it is used.
- Creating — under Settings → Segments → New segment, you first pick what the segment belongs to (Belongs to, today: Lead). It can't be changed later, because the condition tests that object's fields. Then come the name and the condition: tags, status, source, “created via”, assignee or your own custom fields; several conditions are combined with “match all” or “match any”.
- Overview — the list shows for each segment what it belongs to, its condition and where it is used (fields, options, WhatsApp and email templates). The Belongs to filter separates the segments by object.
- Using — on options and whole custom fields and in the visibility of templates; how this works on the lead page is described under Leads → Show only when ….
- Combining — in a condition, Segment is a field like status or tags: “Segment is VIP” or “Segment is not VIP”, together with other conditions, e.g. “Segment is VIP” and “Status equals New”. The rule still lives only in the segment — change it and every condition that uses the segment follows.
- Deleting — a segment that is still in use can't be deleted; change the fields and templates that use it first.
External lead sources (Facebook, Google Forms, Typeform, & co.)
Instead of manually exporting CSVs from Meta Lead Ads, Google Forms, Typeform, Mailchimp, HubSpot or other tools, you can stream leads into InsightHub in real time. InsightHub exposes a single ingestion endpoint (POST /v2/leads) that any external source can call directly over HTTP.
Most sources do this with a webhook. Google Forms has none, and needs a small script on the form instead — the endpoint is the same either way. See Google Forms.
Why webhooks: source tools deliver events in real time over HTTP-POST — directly from the tool itself, through an integration service, or from your own backend code. InsightHub's endpoint accepts them all in one common JSON schema. When a new source appears tomorrow, you just point its webhook URL at the InsightHub endpoint; nothing on the endpoint side has to change.
Endpoint & JSON schema
Every webhook call is a POST to the gateway URL with an X-API-Key header and a JSON body.
- Method:
POST - URL:
https://insighthub-gateway.sg5host.com/v2/leads - Header:
X-API-Key: ih_…your-key… - Body type:
application/json
Example body (Facebook Lead Ads):
{
  "name": "Max Mustermann",
  "email": "[email protected]",
  "phone": "+43 660 1234567",
  "source": "fb",
  "campaign": "<ad-id-from-meta>",
  "external_id": "<leadgen-id-from-meta>",
  "raw_data": { "...full original payload..." }
}
Only one of email or phone is required — everything else is optional. The full original payload lands in raw_data so nothing the source delivers gets lost.
Setup — step by step
- Create an API key in InsightHub — Site → API Keys → Create new key. Copy the raw key once (it isn't shown again). Right below the list you'll find the example curl call with the correct endpoint URL.
- Open your source tool and configure a webhook on the lead event (Typeform: "Connect" → "Webhooks"; Tally: "Integrations" → "Webhooks"; Calendly: "Workflows" → "Webhook"; etc.).
- Set URL and header as above. Map the body fields to whatever the source delivers.
- Save & test. Trigger a test submission in the source tool.
- Verify in InsightHub: within seconds the lead shows up in the Leads list with the configured Source and Created via: API.
Example sources
The same pattern works for every source that supports webhooks:
- Facebook / Meta Lead Ads — Page-level lead webhook → POST directly to
/v2/leads. - Typeform — per-form webhook → create a lead on every new response.
- Tally — webhook integration → map → POST.
- Mailchimp — webhook on subscribe event → newsletter signup becomes a lead.
- HubSpot / Pipedrive / Salesforce — workflow/automation on new contacts / deals → mirror into InsightHub.
- Calendly / Cal.com — webhook on booked appointment → lead with the booking details in the
raw_datafield. - Google Forms — has no webhooks; uses an Apps Script on the form instead. See Google Forms below.
Google Forms
Google Forms is the one significant exception: it has no webhooks of its own. Instead a small Google Apps Script is attached to the form and posts every response to the same /v2/leads endpoint. Nothing changes at the endpoint — only the bridge leading to it.
The script runs on Google's servers under whichever account installs it. Respondents never see it, and the API key never reaches a visitor's browser.
Script: google-forms-to-leads.gs.txt — open it, select all (Ctrl + A) and copy.
Step 1 — Paste the script
Open the form → ⋮ (top right) → Apps Script. This matters: open the editor from the form, not from the linked spreadsheet — only the form-bound event exposes the response ID that prevents duplicate leads.
In the editor, replace the myFunction() placeholder entirely: Ctrl + A, paste, Ctrl + S. No Deploy is needed — triggers always run against the saved code ("Head").
Step 2 — Add the credentials
In the Apps Script editor: ⚙ Project Settings → Script Properties → add two entries:
GATEWAY_URL=https://insighthub-gateway.sg5host.com/v2/leadsAPI_KEY= a key from Site → API keys (see step 1 of the setup above)
Spelling has to match exactly — the script reads those two names literally and otherwise reports "GATEWAY_URL or API_KEY missing".
Step 3 — Add two triggers
In the editor sidebar: ⏰ Triggers → Add Trigger, twice:
onFormSubmit— event source From form, event type On form submit. Sends each new response immediately.retryFailedSends— event source Time-driven, Minutes timer, Every 15 minutes. Re-sends anything that failed.
Under "Failure notification settings" choose Notify me immediately rather than the "Notify me daily" default — otherwise up to 24 hours can pass before anyone learns that leads have stopped arriving.
Google asks for authorisation on the first save; the warning about connecting to an external service is expected — that is the POST to the gateway.
Field mapping
At the top of the script, TITLE_TO_FIELD maps question titles to lead fields. Matching is deliberately loose: case, spaces, hyphens and punctuation are all ignored, so "E-Mail", "Email" and "e mail" hit the same entry.
const TITLE_TO_FIELD = {
  'Name': 'name',
  'First name': 'first_name',
  'Last name': 'last_name',
  'E-Mail': 'email',
  'Telefon': 'phone',
  'Organization': 'company',
  'Ihre Nachricht': 'message',
};
When the form asks for first and last name separately, prefer first_name and last_name over the single name: the salutation builders and DocuSeal templates read the structured columns, and one name string cannot be split reliably.
An unmapped question is never lost — it reaches raw_data under its literal title. That untidy key is precisely how you notice a mapping line is missing.
Two further lists in the script: TITLE_TO_PROPERTY assigns stable names to answers that have no lead field of their own (a dropdown, say), and APPEND_TO_MESSAGE appends an answer underneath the customer's own message — useful for qualifying details that should be visible on the lead at a glance.
Filling custom fields
Answers can also be written straight into the site's custom fields instead of only sitting in raw_data. TITLE_TO_CUSTOM_FIELD maps a question title to the field's slug (Site → Settings → Custom fields — the slug, not the label):
const TITLE_TO_CUSTOM_FIELD = {
  'Budget': 'budget',
  'Type of Car': 'type_of_car',
};
For select and multi-select fields that is not enough: the form shows labels while the field expects values, matched exactly and case-sensitively. CUSTOM_FIELD_VALUES translates between the two, and MULTI_SELECT_CUSTOM_FIELDS lists the fields that must receive a list:
const CUSTOM_FIELD_VALUES = {
  type_of_car: { 'Truck': 'truck', 'Mini Van': 'mini_van' },
};
const MULTI_SELECT_CUSTOM_FIELDS = ['type_of_car'];
Careful: a wrong slug or an unknown option value makes the engine reject the entire lead with 422 — not just that one field. Unknown slugs are refused deliberately, so that no data is lost silently. The script treats 4xx as final and does not retry, so the submission would be gone. Check slugs and option values against the site's field definitions before going live, and make one test submission.
What arrives on the lead
Alongside the mapped fields, every lead carries three identifiers in raw_data — the same names Facebook Lead Ads leads use, so one automation filter works across channels:
form_id— which form. The routing key when several forms feed the same site.platform—google-forms.external_id— which response. Unique per submission and permanent.
If leads stop arriving
The retry trigger only rescues sends that were actually attempted. If the trigger stops firing altogether — deleted, account suspended, authorisation lapsed — responses pile up quietly in the form with no error anywhere.
That is what backfillAll is for: select it in the editor and run it. It replays every form response and cannot create duplicates, because InsightHub merges on external_id. Run it as often as you like.
Tip: install the script under a shared company or service account rather than a personal one. The trigger runs as the account that created it — if that account is ever deactivated, delivery stops without warning.
Deduplication & idempotency
InsightHub dedupes incoming leads in this order:
external_id— when set, this is the primary lookup. Same external_id → existing lead is merged, never duplicated.- Email (case-insensitive) — falls back to this if no external_id.
- Phone (whitespace-trimmed) — last-resort match.
On a hit, missing fields on the existing lead are filled from the new payload; already-set values stay untouched (especially status, notes, value, and assignee — those reflect your team's working knowledge and should never be overwritten by a re-delivery). Re-running the same webhook is therefore safe: the same external_id returns the same lead row on subsequent attempts.
Automations
The visual flow editor lets you build multi-step automation workflows: connect nodes on a canvas to define what happens on an event — e.g. “New lead → welcome email”. Flows react automatically to events and replace repetitive manual steps.
Step "Send SMS": sends a short text message (max. 640 characters) — recipient and text are templates ({{ lead.phone }}, {{ lead.name }}, {{ customer.phone }}, {{ appointment.ics_url }}, {{ call.summary }}); separate several recipients with commas, {{ sms.team }} stands for the team recipients; without a recipient the record's phone number is used. The trigger Call ended starts a flow after every call of the phone assistant. Sending goes through the SMS settings under Channels → SMS (sender, daily limit); if SMS is switched off there, the flow skips the step and notes it in the run log.
Step "Query external system": calls a tool of a system connected under External systems — parameters as templates over the record ({{ lead.email }}, {{ order.number }}) — and stores the result; later filters branch on it (e.g. external.result.success or external.result.count). If the call fails, the flow continues and notes the reason in the run log.
Triggers
Every flow starts with exactly one trigger node. In the trigger you first pick the object (lead, order, cart, appointment, call or helpdesk conversation) and then the event. For leads:
- When a new lead is created — fires immediately when a lead arrives via form, chat, WhatsApp or API.
- When a lead is stale — time-based: a lead inactive for X days (since it was created, or since the last outbound email). Checked hourly.
- Lead converted — as soon as a lead reaches a "won" status.
- Manual — never fires automatically; only when you run the flow by hand from the lead detail.
Incoming email — fires for every email one of your mailboxes picks up (spam excluded, helpdesk mailboxes included). In the trigger you pick the mailbox and set conditions on the email itself: sender address, sender name, recipient, subject, message text, attachment names and links, each with equals, contains, starts with, ends with, matches (pattern) and the negations. Filters and texts see {{ email.from_email }}, {{ email.subject }}, {{ email.body }}, {{ email.first_link }} and {{ email.attachment_names }}.
The other objects bring their own events: order placed / completed / thank-you page (see Post-purchase banner and Reviews), cart abandoned (cart recovery), appointment booked / cancelled (Appointments), call ended (Voice) and helpdesk conversation created / customer replied / assigned / closed / overdue (Helpdesk). Filters and texts see the fields of that object, e.g. {{ order.number }} or {{ conversation.subject }}.
Steps & actions
From the trigger you connect any number of steps. Each step is named for what it acts on — Lead, Conversation, Email, File — and the Action inside it decides what happens to that:
- Wait / Delay — pauses the flow for minutes, hours or days.
- Email — pick a saved template or write the subject & body inline. Placeholders like
{{lead.name}}are filled in. - WhatsApp — send a Meta-approved WhatsApp template (with variables), always from your website's WhatsApp number. Send to picks the recipient: Lead (default — the lead's phone), Team (the team numbers under Channels → SMS, the same as
{{ sms.team }}) or Fixed number (international format with the country code, e.g.+43 660 1234567; separate several numbers with commas). This way a flow reports new leads straight to your team's phones, for example with a template like "Call from {{1}}: phone {{2}}. Request: {{3}}. Please call back soon." — worded factually so Meta rates it Utility. Messages to the team and to fixed numbers are notices: they do not appear in the lead's WhatsApp history or in the helpdesk; the activity log shows which numbers they went to. Team and fixed numbers work in lead automations only. An empty template value is sent as "–" (Meta does not accept empty values), line breaks as spaces. Requires the WhatsApp add-on. - Set Status — change the lead status (e.g. to “Lost” to auto-close).
- Lead — the step for the lead; pick the Action inside it: set status, tags, assign, salespeople, or set another field to a fixed or placeholder value (e.g. Country = “AT”).
- Webhook — POST/PUT/PATCH to an external URL with your own body and headers.
- Review — pick the Action inside it: Send request creates a tracked review invitation for the contact. The Mode picks “Invitation” (the first request) or “Reminder” (a follow-up on the invitation already created — skipped automatically if the person already reviewed or opted out). This lets the flow own the whole cadence:
invitation → wait → reminder. - Conversation (flows with the object Helpdesk conversation only) — one step for everything you do to the conversation; pick the Action inside it: set status, assign, tag, add an internal note, reply to the customer, forward. Alongside it, Email the team. Details under Helpdesk → Automations.
- File — the step for files; its Action today is Upload. It follows a link from the message and files it in your external storage (Nextcloud, for example). You pick the storage and the target folder (placeholders allowed, such as
/Eingang/{{ today }}for today’s date) and the link type: Automatic takes a WeTransfer link when the message has one, otherwise the first link; Direct link downloads the linked file itself. WeTransfer transfers are fetched without a login, including large ones that arrive as a ZIP, and the step can unpack them straight into the folder. The download runs in the background, the flow waits for it and then carries on. Later steps see{{ files.download.path }},{{ files.download.name }}and{{ files.download.error }}, and a filter onfiles.download.successseparates success from failure. - Filter / Branch — branches the flow on a condition (e.g. “Created via ≠ Manual”) into a true and a false path.
- A/B Test — splits the flow across weighted variants.
Building a flow
- Create a New automation and name it.
- In the editor, add steps from the left palette (click or drag & drop onto the canvas) and connect the node handles.
- Click each node and configure it in the right panel (template, delay, status, condition …).
- Save — then, once everything is right, enable the automation with the toggle. Disabled flows never run.
Note: existing single-step rules keep running unchanged — the flow editor adds to them, it doesn’t replace them. If you enable a flow that recreates an old rule, switch the old rule off so a lead isn’t processed twice.
Affiliates
External people or companies who brought a lead in and get a commission for it. For each lead you can record who brought it in and with which commission share.
Creating an affiliate
- Name or company — either the company or both first and last name (or both). At least one of them is required.
- Contact details — email and phone (optional, useful later for payout statements).
- Default commission — either percentage of the deal value or a fixed amount per converted lead. The value is suggested when the affiliate is attached to a lead and can be overridden per lead.
- Notes — free text, e.g. agreements or context.
- Active switch — inactive affiliates stay attached to historical leads but are hidden from the picker for new leads (preferred over deletion).
Attaching to a lead
On the lead detail page, an "Affiliates" card appears in the right rail. "Add affiliate" opens a picker with every active affiliate. After selection the default commission is prefilled — the share can be adjusted per lead. Multiple affiliates per lead are supported (e.g. introducer + closer).
List & filter
- List view shows every affiliate with attached lead count, default commission, and active status.
- The leads list has an affiliate filter so you can see which leads a specific partner brought in.
- Deleting an affiliate that still has linked leads triggers a confirm — soft-disable is recommended over hard delete so analytics stay intact.
Note: actual commission computation and payout statements belong to Phase 2. Phase 1 captures the lead ↔ affiliate relationship with share cleanly — enough for CSV export and manual payouts.
Surveys
Build customer surveys and deliver them wherever your customers are: as a pop-up on your website, via a shareable link, by email — or automatically after a purchase on the shop's thank-you page. Answers land in the app and feed the analytics. Each survey's look and flow is built in the visual form designer.
- Multiple question types (single & multiple choice, star rating, yes/no, free text)
- Charts and export
Copying a survey
The copy icon in the surveys list opens a dialog: copy the survey to this site or to another site of the same organization — every site with the surveys feature enabled is offered. You also choose whether to copy the questions only or the responses collected so far as well. The copy always starts as a draft; within the same site it gets the suffix "(Copy)", in another site it keeps its title. The post-purchase banner settings stay with the original.
Form designer
Every survey can be designed via drag and drop — from a plain form to a multi-step wizard. The designer opens straight from the surveys list.
- Sections & layout — questions are grouped into sections. Under Design → Layout you choose how the sections are delivered: One section per step (a fill-out wizard with Next/Back and an optional progress bar) or All sections on one page (headed groups with a single submit button — exactly like the canvas). Sections can be hidden without deleting them. The thank-you page always closes the survey and is configured right in the designer (icon, headline, text).
- Name & email fields — the contact block above the questions shows on open links by default (personalized links from email batches or the post-purchase banner skip it automatically). Under Design → Name & email fields it can be hidden entirely; duplicate protection by email then applies to personalized links only.
- Layout & elements — one- or two-column questions, icons per question and per answer option, star and card styles for ratings and choice questions, plus an info-text element for headings and explanatory copy with its own font sizes.
- Conditional follow-up questions — a question can appear only when a previous answer matches (e.g. "What was missing?" only after a 1–3 star rating). Works in the popup, via link, and on every other channel.
- Design & branding — colors and font per survey. The default is "use branding": the survey follows the site's branding (Settings → General) or the organization-wide brand — including a custom font or an uploaded font file. Any survey can still set its own colors and fonts.
- Preview — live preview in its own window with a desktop/mobile toggle, including unsaved changes.
Post-purchase banner (WooCommerce)
After an order completes, the thank-you page shows a feedback banner ("Your opinion matters!") with Yes/No. Yes opens the selected survey — or a form — right there as a popup; the email address and name come from the order. No dismisses the banner with a short thanks.
- Set-up — enable it under Settings → Forms in the Post-purchase settings section, choose what "Yes" opens — an active survey or a published form (the choice appears when your site has both) — and set the two re-ask intervals: ask again after "Yes" (default 180 days) or after "No" (default 60 days).
- With a form — the form behaves like a survey here: it doesn't have to ask for an email or a name, both come from the order (if the form has such fields itself, they are already filled in). Every submission carries the order number and the buyer and is listed under Forms → Submissions; with a data mapping to customers it also lands on the buyer's customer record. One submission per banner. The WordPress plugin needs version 2.56.0 for this.
- Prerequisite — the WordPress plugin (v2.38+) needs Order tracking and the banner switch on its Surveys tab enabled. The switch is off by default (opt-in) — the banner only appears once both the shop and the app have it on. The banner texts (title, question, both buttons, thank-you line) can be customized on the same tab; empty fields fall back to the bundled default in the site language (DE/EN, plugin v2.39+).
- Not pushy — throttled per customer (email address): someone who answers is only asked again once the interval has passed; someone who ignores the banner simply sees it again on their next order. Reloading the thank-you page shows the same banner without creating a second prompt.
- Insights — under Statistics → Surveys, the "Post-purchase banner" section shows per customer when they were asked, whether and when they agreed or declined — and when the next ask is due. For a form, the same overview sits on the form's page as "Post-purchase banner".
Control: Settings or Automation
The Control field under Settings → Forms (Post-purchase settings) decides who determines whether and what the banner offers:
- Settings (default) — the fields below decide: one fixed survey or form for every order plus the two re-ask intervals. The right choice for most shops.
- Automation (flow) — an automation decides per order. You build a flow with the "Order — Thank-you page" trigger and the Post-purchase banner step, where you pick a survey or a form (and optionally custom re-ask intervals). Before it you can add Filter nodes (e.g. only orders above a certain value or in a certain category) and A/B test nodes (test two surveys or forms against each other). Because the flow runs synchronously as the order comes in, only these steps are allowed — delays, emails etc. don't exist here. In this mode what the banner offers and the intervals come entirely from the flow (empty intervals = 180/60 days); the settings fields are hidden.
The quickest start is the "Post-purchase banner" template in the "New Automation" dialog — it seeds the trigger and banner step for you. Newly created flows start disabled: pick the survey or form in the step, then enable the flow from the automations list. The per-email throttle and the reload behaviour apply unchanged in both modes.
Forms
Forms collect inquiries right on your website — as a contact form, a lead form, a feedback form or anything you build. Every submission is stored with the form and can create or update a lead. Forms are their own area next to Surveys, which stay as they are. You find them in the menu under Forms. (Beta feature, enabled per site by SG5.)
Create a form
New form asks for a name, a template and the language of the form:
- Contact form — first name, last name, email, phone, message and consent; submissions create leads.
- Lead form — like the contact form, plus company and website.
- Feedback — rating, comment and an optional email address; the answers stay with the form.
- Blank form — no fields, you build it yourself.
The language (German or English) applies to the texts the form brings along: button, hints, error messages and thank you. A new form is a draft — its link and embeds work once you publish it.
Design the form
Edit form opens the builder. It looks like the survey form designer: the elements on the left, the form in the middle as it appears on your website, the settings of the selected element on the right. The toolbar above opens Design, Data mapping and Embed.
- Field types — text, long text, email (checked), phone, number, date, dropdown, single and multiple choice, yes/no, rating, static text, consent, file upload and hidden fields.
- Consent — a tick box with your text and an optional link, for example to your privacy policy. Consent is always required: the form can only be sent with the box ticked.
- Hidden fields — invisible to visitors, stored with every submission: the page's UTM parameters (source, medium, campaign, term, content), the page address, the referrer, any URL parameter (e.g.
?ref=newsletter) or a fixed value. - Sections, layout & design — fields in one or two columns, sections with headings (all on one page or one per step), sub-fields that only appear after a matching previous answer, colors and font as in surveys — taken from your branding by default.
- Submit — clicking the form's button opens its settings: the button text and what happens next — a thank-you message (icon, headline, text) or a redirect to a page, such as your website's thank-you page. The redirect moves the whole page there, also from an embedded form.
Requesting documents (file upload)
With the File upload field type, customers send you photos or PDFs with the form — for example the front and back of an ID card. The field has two buttons: Choose file opens the files, or the photo library on a phone; Take photo opens the camera directly on a phone. Each file is uploaded as soon as it is picked and shown with a preview; Remove lets the customer replace it. The form can only be submitted once all uploads have finished.
- Accepted files — photos and images (JPEG, PNG, WebP, HEIC), PDF only, both, or a Custom selection of photos and images, PDF, Word (DOCX), Excel (XLSX, CSV), PowerPoint (PPTX) and text (TXT). Office files only in the current formats and without macros; old .doc / .xls files and archives (ZIP) are refused. Office and text files are downloaded, never opened in the browser.
- For all forms — which kinds of files are allowed at all is set once under Settings → Forms → File uploads, together with the largest file (1 to 25 MB). Default: photos, images and PDF; Word, Excel, PowerPoint and text are switched on there. Every file field picks from this list. A kind you untick there is refused at once on every form; the form builder strikes it through in the field and shows a note.
- Files at most (1–10) and MB per file at most (1–25).
- Offer "Take photo" — useful for ID cards and receipts; turn it off when only files from the device make sense.
- Sample image — an image (JPEG, PNG or WebP, up to 5 MB) shown above the field to show what is needed, e.g. what the front of an ID card looks like. It can be uploaded once the field is saved.
Privacy: photos are saved without their location and camera details; iPhone photos (HEIC) become JPEG. The files are not public — they open only inside InsightHub, for members who may see forms or leads. With a data mapping to leads they land in the lead's documents (marked "via form" with the field's name); otherwise they stay with the submission. Per field, Save the files to — in the field's settings or under Data mapping → Fields — picks The lead's documents (default) or Only the submission. A known customer has no documents: their files stay with the submission. Files that were uploaded but never submitted are deleted after 24 hours.
Showing fields only after a matching answer
Any field can depend on the answers above it: in the field's settings, Show only when … opens the condition — a field above, a comparison (e.g. is one of) and the matching answers; several conditions can be combined. Example: Back only appears when the Document type is an ID card or a driving licence — for a passport one side is enough. In the builder the field carries the note "Only when: …".
While a field is hidden it is not required, and an answer to it is not saved. A condition can only name fields above the field: if you move a field below the one it depends on, the builder marks it and saving waits until the order fits again. If you delete a field other fields depend on, the builder asks first — their condition is removed and they show for everyone.
Data mapping: submissions as leads
Data mapping in the builder's toolbar decides where a submission goes:
- Only the form — the submission is stored, nothing else.
- Lead — create or update — when the person is already known (same email address or phone number, chosen under Recognize a known person by), their lead is updated: Only fill empty fields (default) or Overwrite with the new answers. Anyone else becomes a new lead.
- Customer — update an existing one — a known customer is updated and, if you like, the answers go into their notes. A public form never creates customers: anyone not yet known becomes a lead.
For every field, Maps to chooses which field of the record it fills — name, first name, last name, email, phone, company, website, street, postal code, city, country, message (for leads), notes or one of your custom fields (Settings → Custom Fields). Only fields that fit the field type are offered. For a submission to reach a record, the form needs a field for email or phone (that is how the person is recognized) and a consent field — data goes into the record only with the box ticked. While something is missing, Data mapping shows a note and saving waits; publishing checks it again.
A lead from a form has the form's name as its source and the page's UTM campaign as its campaign. The lead page shows From form: <name> with a link to the submission, and the timeline lists every answer with the consent text (can be switched off with Add all answers to the lead's timeline). New leads start your automations with the trigger “When a new lead is created”. In the leads list, Filters → Form narrows the list to one form.
Put it on your website
On the form's page, Publish makes it live and Close ends it later — a closed form shows visitors a note instead of its fields. Share & embed — and Embed in the builder — have everything ready to copy:
- Link — the form's own page, e.g. for emails or social media.
- On a website — a code snippet for any website; the form grows with its content, without a scrollbar of its own, and picks up the address and UTM parameters of the page it sits on.
- As a popup — a button that opens the form in a window over the page.
- WordPress — with the InsightHub plugin from version 2.55.0. Switch on Settings → InsightHub → Forms (off by default); the tab lists your published forms and builds the shortcode for you. Then add the InsightHub Form block, in Bricks or Elementor the InsightHub Form element or widget (category InsightHub) — pick the form, display, button text, language and colors — or use the shortcode, e.g.
[sg5ih_form id="f_0123456789ab"]or[sg5ih_form id="f_0123456789ab" mode="popup" label="Contact"]. Optional:accent(the form's color),color(the popup button's color) andlang="de|en"— withoutlangthe form keeps its own language. - iFrame — for systems that allow no scripts (fixed height).
Submissions
View submissions lists every submission of a form, newest first — with the answers, the page and campaign it came from, and the record it created or updated (New lead, Lead updated, Customer updated, No email or phone, Only the form). Export CSV downloads all submissions; single submissions can be deleted — a lead created from one stays. Uploaded files appear next to their answer with Open and Download; deleting a submission deletes its files too, except those already in a lead's documents.
After purchase — a form can also open the feedback banner on the shop's thank-you page (see Post-purchase banner). Such submissions show "After purchase · Order … · email"; the form's page lists who was asked with the banner.
Form analytics
Under Analytics & Data → Form analytics — or from a form's page with View results — pick a form, a period (all time, the last 7, 30 or 90 days, this year) and a source (After purchase = the banner on the thank-you page, Website = embedded, Link = the form's own page):
- Key figures — submissions, started, completion rate and average time, as for surveys. A visit counts as started once someone types into a field or clicks an answer; just seeing the form or closing the popup without input doesn't count. The time runs from the first input to sending.
- Per field — ratings with average, median and distribution (with NPS on a scale up to 10), choice fields with count and share per option, yes/no, numbers, dates by month, the share of consents, and for text fields the newest answers with a link to the submission. For file uploads, the share of submissions with files and the number of files. Deleted fields keep their answers.
- Trend & sources — submissions per day and where they came from; when the form opens the post-purchase banner, its numbers (asked, Yes, No) are shown too.
- Export — CSV and Excel with every submission including source and order number (Excel adds a summary per field), and a PDF report for the chosen period and source.
Spam protection
The booking page, surveys (their own page and embedded on your website) and forms are protected against spam bots by default, without visitors noticing: a hidden field that only bots fill in, a one-time page token, a minimum fill time and a limit per sender (by default at most 10 submissions in 10 minutes to the same page). Bots get the same confirmation as real visitors, but no appointment, response or lead is created. Anyone who submits the booking page or a survey twice gets the first booking or response back instead of a second one. If a page was open for more than 12 hours, it asks to reload and send again. Appointments the assistant books in the chat or on the phone are not affected.
Two cards, two settings: The Bot protection card under Settings → Appointments covers the booking page, the one under Settings → Forms covers forms and surveys. Each has its own switches and counts only its own pages.
Switching the standard protection off: If real people are turned away, for example because many send from the same network or the same tablet, switch off Invisible standard protection in the Bot protection card under Settings → Appointments or Settings → Forms and click Save below the card. The pages of that card then have no hidden field, minimum time or limit. Anything sent twice is still stored only once, and Turnstile stays as you set it. If SG5 has switched the spam protection off for all sites during an outage, the card says so.
Cloudflare Turnstile: If a page still gets spam, switch on Use Cloudflare Turnstile under Settings → Appointments or Settings → Forms and choose the credentials that hold the keys. You set them up once: with New credentials in the card or under Settings → Credentials, type Cloudflare Turnstile, with the Site key and Secret key of your Turnstile widget from the Cloudflare dashboard. Test asks Cloudflare whether it accepts the secret key. Then click Save below the card. Both cards can use the same credentials. Whether the check is visible, non-interactive or invisible is set on the widget in Cloudflare. While the bot protection uses the credentials, they cannot be deleted. Turnstile is off by default.
Cloudflare Turnstile: which hostnames to allow
Cloudflare checks which hostname the Turnstile widget runs on – and that is not your website: the booking page always runs on the booking domain, even when it is embedded on your website (it sits there in a frame); forms and surveys run through the InsightHub gateway. So add these under Hostnames in the widget:
- Booking page:
book.sg5.biz– or your site's own booking domain, if it has one. - Forms and surveys:
insighthub-gateway.sg5host.com
Your website's domain alone is not enough. When the hostname is missing, the widget shows an error instead of the check ("Could not connect", or the same message in the browser's language) and the browser console shows Turnstile error 110200. To fix it: in the Cloudflare dashboard open Turnstile → choose your widget → add the hostname under Hostnames → save → reload the page. If the booking page and the forms use the same widget, add both hostnames.
Refused submissions: Each card shows how many submissions to its pages were refused as spam in the last 30 days, with the reason (Hidden field, Too fast, Too many attempts, Sent twice, Page expired, Turnstile). The same count appears in Form analytics and Survey Analytics for the selected form or survey.
Reviews
Automatically collect customer reviews after a purchase or conversion, moderate them in a dedicated inbox, and reply — optionally with an AI-drafted response. Enable and configure everything under Settings → Reviews. (Reviews come with your organization's plan — see What the plan unlocks.)
When an invitation is created
There are two triggers — each creates exactly one invitation per event:
- Shop order — when an order is completed (WooCommerce, Shopify, or Business Central), the customer receives the invitation after a configurable waiting period. A later cancellation/refund suppresses the invitation.
- CRM conversion — when a lead moves into a status marked as “won”, the associated person is invited. This makes review collection work for lead-only / service sites without a shop, too.
Collection mode: Built-in or Workflow
The Collection mode decides who drives sending:
- Built-in (automatic) — the default. InsightHub schedules the invitation after “Invite after (days)” and exactly one reminder after “Reminder after (days)” if no review was submitted by then.
- Workflow (automation) — the built-in scheduler stands down; an automation drives the whole cadence instead. You build a flow with the “Order — Completed” trigger and the Send review request node — once in Invitation mode, then after a delay node again in Reminder mode. The delay nodes control the timing; the “Invite after” and “Reminder after” fields are hidden in this mode because they no longer apply. Chaining more reminder nodes builds a multi-step follow-up sequence. The order trigger knows two events: Completed only fires once the shop reports the order as completed (WordPress plugin v2.30+) — the right choice for review requests; Placed fires immediately when the order comes in, regardless of its status. Cancelled or refunded orders stop a scheduled invitation and its reminder in workflow mode too.
In both modes the throttle (max one invitation per email within the window) and the review-link validity still apply. A reminder is never sent once the person has reviewed, opted out, or clicked a review link.
The review inbox
Incoming reviews land in an inbox similar to the Helpdesk:
- Filters & To-Do — filter by stars, approval status, and channel; low ratings (up to a configurable star threshold) are auto-flagged as To-Do.
- Approve — moderate each review before it counts as “Approved”.
- Reply with AI — the assistant drafts a fitting reply that you review, adjust, and publish.
- Sub-questions — optional sub-ratings (e.g. Delivery, Product, Customer service).
Settings & legal
- Consent (UWG §7) — the default is “consent required”; alternatively “legitimate interest”. Invitation and reminder emails always carry an opt-out link — an opt-out is honoured permanently.
- Plugin switches — the WordPress plugin’s Review tab separates two things: whether the shop takes part in review requests at all (off = no order from this shop ever triggers one, in any consent mode), and whether the checkout shows the consent checkbox. Hide the checkbox only in “legitimate interest” mode — requests then go out without asking; under “consent required” a hidden checkbox means nothing is ever sent.
- Review targets — the internal review page and/or external targets such as a Google review link. Clicks are tracked and can stop the reminder.
- Email templates — subject and body for invitation, reminder, and reply with placeholders; the opt-out link is mandatory.
- Review language — the language of the review emails and the public review form: German, English, or (default) the site language from Settings → General.
- Reply author (public) — controls who is named as “Reply from …” on your website when you answer a review: the shop name (default), a custom name (e.g. “SG5 Support”), or — only as an explicit opt-in — the staff member’s real name. By default no staff names are published.
Show reviews on your website (shortcode)
With the WordPress plugin you can display collected reviews right on your site — a slider with a rating summary and individual review cards. Add the shortcode to a page or widget:
[sg5ih_reviews]
The slider shows the overall score (e.g. “4.73 – Excellent”), a sliding row of review cards (clicking a card opens the full review including your published reply) and a “verified” badge for shop orders. Only approved reviews are shown — you approve each review in the inbox. No customer names or email addresses are published. The matching schema.org markup (AggregateRating/Review) is emitted automatically for search engines.
Optional attributes: [sg5ih_reviews limit="20" min_rating="1" title="Our reviews" intro="What customers say about us" intro_text="…" color="#e8730c"] — limit caps the cards, min_rating shows only cards at or above that star rating, the rest control the heading, intro block and star color.
The heading, side title and side text can also be managed centrally in the WordPress plugin — Settings → SG5 InsightHub → Review (an empty field hides that element). The same tab hosts the review requests and the checkout consent checkbox — default label: “Dürfen wir Sie per E-Mail um eine Bewertung bitten?”.
Abandoned Carts
Capture the carts shoppers fill but never check out — and win them back with automated reminder emails that include a one-click cart-restore link. Fully GDPR-conformant: reminders only ever go to customers who explicitly opted in at checkout. (Beta feature — must be enabled for your site; capture is additionally switched on in the WordPress plugin.)
How capture works
WooCommerce has no cart API, so the WordPress plugin captures the cart right on the store: on every change (item added/removed) and when the checkout page opens. You enable capture under Settings → SG5 InsightHub — without that toggle, nothing is captured.
- Logged-in customers — email and name come securely from the server; the consent choice is stored on the customer account at purchase and carries over to future carts.
- Guests — as soon as an email address is typed at checkout it is attached to the cart. Consent is a dedicated checkbox below the billing fields (label configurable in the plugin). Without an email the cart stays anonymous.
The exact consent wording shown is stored with the cart — you can always prove what was agreed to.
The checkout checkbox itself is optional (plugin toggle “Show consent checkbox at checkout”, on by default): hide it only where no opt-in is legally required — e.g. a shop outside the EU, paired with “Consent required” off in the app — or when the exit-intent popup is your only consent surface. With “Consent required” on, carts captured without the checkbox are counted but never emailed.
Statuses & dashboard
Under Abandoned Carts in the sidebar you see every captured cart with KPIs (abandoned and recovered value, recovery rate) and a period filter. A counter on the menu item shows how many carts are currently sitting abandoned. Each cart moves through these statuses:
- Active — the cart is being filled right now.
- Abandoned — no activity for a configurable time (default: 60 minutes).
- Recovered — the shopper did buy after all: an order from the same email address within 14 days that actually contains items from the saved cart. The recovery date shows in its own column.
- Expired — an order arrived, but it shared no items with the saved cart (the shopper bought something else). The cart is closed without counting as recovered — so your recovery numbers stay honest.
Shoppers who simply order in one go never clutter the list: a cart that is still active and was never reminded disappears silently the moment its order comes in. Each row also shows the captured phone number, the reminder history (how many were sent, was the restore link clicked?) and — for system administrators — a delete button for individual rows.
Reminder emails via automations
You build the recovery sequence in the automation editor — with the new “Cart abandoned” trigger. A typical flow: trigger → wait (e.g. 2 hours) → email; add more wait/email steps for a multi-touch sequence. Inside the email you can use {{cart.*}} placeholders (e.g. cart value or the item list).
Every reminder automatically carries two links: the restore link, which rebuilds the saved cart in the shop and leads straight to checkout, and an opt-out link that unsubscribes the recipient from further cart reminders. Before every send the system re-checks: is the cart still abandoned? Is consent (still) in place? Is the address not opted out or bounced? Only then does it send.
Fastest start: pick the ready-made “Cart recovery” starter in the automation template picker. It waits two hours, then checks whether a phone number was captured — if yes, it sends a WhatsApp message and the reminder email; if not, just the email.
Reminder emails default to the built-in “Cart reminder” template — editable in German and English under Settings → Templates → E-Mail; the email node’s template picker lets you switch to any of your own templates at any time.
WhatsApp reminders: cart flows can also send WhatsApp template messages to the captured phone number (guests: the billing phone; logged-in customers: the account phone — carried over on restored carts too). WhatsApp must be connected and the template approved by Meta; the {{cart.*}} placeholders — including the restore and opt-out links — work there as well, and the same pre-send checks apply. One thing to mind: the default consent label speaks of e-mail — widen the wording in the plugin when you enable the WhatsApp branch.
Exit-intent popup (optional)
Optionally, enable the exit-intent popup in the plugin (off by default): when a guest with a filled cart moves to leave the page, a small dialog asks for their email to save the cart. Submitting counts as explicit opt-in and is recorded as such.
Privacy & retention
The feature is built for data minimisation. All controls live in the app under Settings → Abandoned Carts:
- Capture abandoned carts (master switch, default: on) — switched off, nothing new is captured at all; already-captured carts still follow their lifecycle and retention.
- Consent required (default: on) — a cart without consent is counted but never emailed. Only switch this off where no opt-in is legally required (e.g. a shop outside the EU) — reminders then go out without consent.
- Exclude anonymous carts (default: off) — when on, carts without an email address are not stored at all.
- Abandon after (minutes) — when an inactive cart counts as abandoned (default: 60).
- Retention (days) — after this, carts are automatically and permanently deleted (default: 60).
Data-subject requests work through the familiar WordPress → Tools → Privacy screens: export and erasure both cover the captured carts. The plugin also suggests ready-made wording for your privacy policy under Settings → Privacy.
Bookmarks
Queries, sessions, or documents you want to revisit. Click the bookmark icon to save one. The sidebar Bookmarks link gives you a central list with filters and status.
Helpdesk — shared mailboxes as a ticket system
The Helpdesk turns a shared mailbox such as support@ into a ticket system for your team: every incoming email becomes a conversation with a number, a status, an assignee, internal notes, tags and a response-time clock. Replies go out through the same mailbox and customer answers land back in the same conversation — customers never notice a thing. Several mailboxes (support, sales, billing) run side by side, each with its own rules. Open it from the Helpdesk menu item; the badge counts unread conversations in the mailboxes you may see.
Setup: make a mailbox a helpdesk
- Under Settings → Mailboxes add a mailbox: name, sender address, SMTP (sending) and IMAP (fetching). Test connection checks both logins right away with the values in the form. Polling enabled fetches new mail regularly — a freshly connected mailbox imports its whole inbox on the first run.
- Turn on the Helpdesk switch on the mailbox card. Incoming mail of that mailbox now becomes conversations, and the card shows the mailbox's helpdesk settings:
- First response within (hours) — the SLA clock. Conversations waiting that long for a reply are flagged yellow as SLA overdue in the list and can start an overdue flow. Empty = no SLA.
- Mail filters — named rules for incoming mail; see Set up mail filters.
- Auto reply — subject and text of the acknowledgment every new conversation receives exactly once. Insert variable adds placeholders such as
{{ customer.first_name }},{{ conversation.number }}or{{ mailbox.name }}. Machine-generated mail (no-reply, system notifications) and your own addresses get no auto reply. - Reply defaults — Status after replying (default Pending: the conversation waits for the customer and flips back to Active with their next mail), Assign the replying person when nobody is assigned, the From name on replies (mailbox name, "Person | Mailbox" or a custom text) and Auto BCC for an archive.
- Signature — appended to every helpdesk reply, with variables too (e.g.
{{ agent.name }}); a preview sits under the composer. - Access — which team members see and work this mailbox. Nobody checked = the whole team; owners and admins always see every mailbox. Access applies to the list, assignment, the board and the menu badge.
Numbering, tags and saved replies apply to all mailboxes and therefore live under Settings → Helpdesk; the mailbox card links there.
Mailboxes, folders, search and board
Top left you pick All channels or a single channel: a helpdesk mailbox (with two or more mailboxes also the Email group for all of them), WhatsApp, or where a ticket came from — Chat (the assistant in the widget), Contact form, Customer portal, Phone (the phone assistant) or Staff (created through the back-office assistant). A source only shows once it has tickets; whether the sources stand on their own or in one group is set under Settings → Helpdesk → Channel list. The list and the header of each conversation show where it came from. Below are the folders with counts — views on the same conversations, not places you file things into:
- Unassigned — open conversations with no owner yet (the team's inbox).
- Mine — assigned to you. Assigned — with colleagues.
- Starred — your stars (personal). Drafts — conversations where you have an unfinished reply.
- Closed and Spam. When a customer answers a closed conversation it reopens by itself and shows up as Active.
The tag list under the folders filters by tag (with counts); search covers subject, customer name, email address and number — and with GitHub or Trello switched on also the linked issue or card: 677 finds conversation #677 and the one linked to GitHub issue 677, repo#677 only that repository's issue, and a pasted issue or card link finds its conversation. The checkboxes select several conversations for bulk actions: Assign to me, unassign, Close, set active again, Mark as spam, Delete. Prefer columns? Under Boards create a board with the object Helpdesk — the columns are the statuses, dragging a card changes the status, clicking opens the conversation.
Filters, views and suggested views
+ Filter above the list narrows the folder by type, stage, assignee, tag, channel, priority, department, linked issue or card, dates, attachments, who is waiting and SLA; under More, Only open conversations shows every open conversation, whoever it is assigned to; Period narrows by when a conversation was created, last active or closed (today, the last 7 days, this week, this month …, always by your site's time zone, so a saved "Closed this week" view stays current); and Waiting longer than … days finds customers who have been waiting for a reply. Each filter shows as a pill, and × removes it. Save as view (the bookmark icon) keeps the folder, channel, search, filters and sorting under a name — for you, or shared with the site team (only you can change it). Views appear under Views in the rail, each with a live count.
Suggested views: + Add suggested views under Views opens a list of ready-made views, all ticked — untick the ones you don't need. Site admins can also tick Add for the whole team. Only views that fit what your site uses are offered, and the link disappears once you have all of them:
- Waiting for our reply — open conversations whose last customer message is unanswered, longest waiting first. Mine – waiting for my reply — the same for the ones assigned to you. Waiting for the customer — answered, the customer's reply is due, oldest activity first, for following up. Always offered.
- Overdue — open conversations past the first-response time. Offered when a mailbox, WhatsApp or the website requests have a response time (Settings → Helpdesk) or a request priority has its own hours.
- WhatsApp – open, Website requests – open and From phone calls — every open conversation of that channel. Offered only while WhatsApp is a helpdesk channel, website requests arrive in the helpdesk, or the phone assistant has a number and its requests arrive in the helpdesk.
- Mine – untriaged bugs, Waiting for verification and Unassigned feature requests — for teams that track bugs and feature requests. Offered with the GitHub extension; the second one only when a stage waits for the customer.
Suggested for you: the same dialog also suggests views from your own helpdesk. Some come from your filter habits: a combination you use often but haven't saved ("You used this filter 6 times on 3 days"). Others come from your site's data: a tag or department with many open conversations, a busy mailbox or request source, conversations waiting longer than 3 days, the weekly closing volume and — for site admins — a team member's backlog. Each suggestion shows why it is there and how many conversations it would show right now. Nothing is ticked or created on its own, and Not interested hides a suggestion for you for good. Suggestions from your site's data appear from the helpdesk's second week, as soon as each one has enough behind it (for example 10 open conversations with the same tag), and are refreshed weekly. Your filter habits count from the start: only which filters are combined, never what a conversation says. Settings → Helpdesk → Suggest views from your data switches all suggestions off; filter habits are then no longer recorded, and stored usage is deleted within the hour.
Working a conversation
The thread shows the newest message on top with the composer right under the header. Customer messages, your replies, auto replies, internal notes and system lines ("Anna assigned herself", "Status → Closed") are color-coded.
- Reply — goes out by email through the conversation's mailbox, with the signature and (when enabled) the conversation number in the subject. Attach adds PDFs or images (up to 60 MB each); images from customer mails render inline, every attachment can be downloaded. Send & close replies and closes in one step. Saved replies insert a prepared text with placeholders filled in; unfinished replies are saved as drafts automatically.
- Note — visible to the team only, the customer never sees it. A note can carry files too (paperclip): scans, screenshots or an attachment the customer forgot land in the conversation without anything going out to them. Type @ to mention a colleague: a list suggests matching people (arrow keys and Enter, or a click), the mention is highlighted in the note, and the person gets a notification whose link jumps straight to the note.
- Files — the third tab next to Reply and Note: drop files or pick them (they are stored as a note with attachments) and, below, the list of every file in the conversation — from customer emails, replies and notes — with open and download.
- Preview — clicking an image, an attachment, a file in a system line or in the Files tab opens the preview right on the page; the conversation stays where it is: images with zoom (click the image or + / −, drag to move while zoomed), PDFs inline, other files with Download. ← / → — or a swipe on the phone — go through all files of the conversation, Esc closes. At the bottom: Download, Open in new tab and, for images, Translate image. Ctrl/Cmd-click still opens the file in a new tab. A lead's documents and WhatsApp attachments use the same preview.
- AI suggestion — the button left of Send & close drafts the reply to the latest customer message: from the thread so far, the site's knowledge (FAQs, documents, products) and the business description from your AI assistant — in the customer's language, with a greeting, without a signature (the mailbox adds it). The suggestion lands in the composer as a draft, a line below names the sources used; nothing is sent until you say so. An existing draft is only replaced after a confirmation.
- Status — Active (someone on the team has to act), Pending (waiting for the customer), Closed, Spam. Assign to a person or to yourself; set tags; star for your own list.
- Customer rail on the right — contact details, mailbox, number, "waiting since", SLA state and the customer's other conversations (click opens one, View all lists them).
- Collision guard — when a colleague opens the same conversation you see it immediately ("… is also viewing this conversation" / "… is replying right now"), so nobody answers twice.
- Contact: link lead / customer — the customer column shows who is behind the email address: as a lead in the CRM (with status) and/or as a customer in the shop (orders, revenue), each with a jump to the record. When the address belongs to a shop customer, the link is set on intake. "Link lead / customer" searches leads and customers together, suggests matches with the same email address and links in one click — records that belong together (a lead and a customer with the same address) are linked as one. For unknown senders, "Create as customer" creates the customer record straight from the conversation — in the helpdesk the person behind an email is a customer, not a new lead; later shop orders land on the same record. Settings → Helpdesk → Contacts automates this: "Create new senders as customers automatically" creates the customer record on intake (no spam, no automated or no-reply senders). Once a person is linked, the button turns into "Open customer" / "Open lead". Every change appears as a system line in the timeline.
- Copy link on every message — the link opens exactly that conversation and briefly highlights the message, whatever folder it is in. Handy for chat and hand-overs. Clicking the number in the header (
SG5-0042) copies the direct link to the ticket. - ⋯ menu — Forward (the conversation as an email to another address, optionally with a note), Merge (fold a duplicate into another conversation; search by number, subject or customer), Split into separate requests (see Split a request), Print (print view of the thread), Create Trello card or Open Trello card / Unlink Trello card (see Trello), Delete.
- New conversation — starts a conversation from your side: channel, To, Cc/Bcc, subject, message, initial status and assignee — the number is assigned immediately. On the WhatsApp channel you pick the recipient by name or number (leads and customers with a phone) and a Meta-approved template instead of a subject; its text appears in the message box and you fill in the placeholders — the first message to a number must be a template (24-hour rule).
- Keyboard shortcuts in an open conversation: r reply, n note, a assign to me, c close, s star.
Split a request
Sometimes one request contains several ideas or bugs — "1. … 2. … 3. …". Split it, so each part can be handled, voted on and shipped on its own. This works for requests from the portal, the widget, the chat and forms.
- ⋯ menu → Split into separate requests… — the AI reads the customer's messages (never your internal notes) and proposes the parts: a title per part, the customer's own words as text and a type (feature request, bug, question). If it is one topic, it says so — you can still split by hand.
- Edit the proposal — change titles, texts and types, move parts up or down, merge two parts, remove one or add an empty one. One part stays in this conversation (Keep in #…): it takes that part's title as subject, the history stays as it is. Every other part becomes a new request of the same customer, with the files you tick for it.
- Options — copy tags, department, category, priority and assignee to the new requests; tell the customer by email (one message in their language that lists all parts with links); Close #… — then no part stays here: every part becomes a new request and the original is closed in the same step.
- Afterwards — the new requests start in the first stage of their type, the customer finds all of them under My requests in the portal, and feature requests carry the customer's vote. A line in each timeline links the parts both ways ("split off 2 requests: #116, #117" / "Split off by … from #115"). To undo a split, merge the part back.
- Hint — new portal, widget and form requests (ideas and bugs) are checked once. When one seems to contain several requests, the conversation shows "This request seems to contain 3 separate requests" with Split… (the proposal is ready) and Dismiss. Switch the check off under Settings → Helpdesk → Requests with several topics.
Notifications: who hears about what
The helpdesk speaks up on its own — through the bell at the top right and, depending on your settings, by email. The link opens the conversation directly. Anyone working in the helpdesk sees new entries on the bell within a minute, without reloading the page.
- New conversation — on every channel (email, WhatsApp, chat, contact form, support portal), as long as nobody has taken it. Several at once arrive as one entry, “3 new conversations”. Default: bell.
- Assigned to you — when someone else or an automation assigns a conversation to you. Taking one yourself sends nothing. Default: bell and email.
- Customer reply — on a conversation assigned to you (on conversations nobody has taken yet, to everyone, like new ones). Default: bell and email.
- Mention — someone mentioned you with @ in a note. Default: bell and email.
- Answer to the stage question — the reporter answered, for example “Works” or “Still broken” (see Stages); whoever had the conversation before it was handed to the reporter hears it too. Default: bell.
- Response time (SLA) — shortly before and once after the time for the first response runs out, when the mailbox has one. Default: bell.
You are never told about your own actions, and only about conversations in mailboxes you may see. Each person sets bell and email per event under Profile → Notifications → Helpdesk. Who hears about conversations nobody has taken yet — everyone in the helpdesk or selected people — you set under Settings → Helpdesk → Notifications. Emails arrive in the language the person uses InsightHub in.
Translating
Your team does not have to read every language: which languages are offered is set under Organization → Settings → Supported languages (overridable per site under Settings → General → Locale overrides; nothing selected = the languages from your own profile). Under Settings → Profile → Languages I read each person also lists their own languages, which appear at the top of the menu. From then on every customer message, reply and note offers Translate (one language = one click, several = a menu) and shows the translation with its source language above the original. While an email's quoted history is collapsed only the visible part is translated; once expanded, Translate quoted text too handles the rest. Image attachments — a photographed letter, say — are read and translated too (Text in the image). The other way round, the composer translates your written reply into the customer's language (detected automatically) or a chosen one before you send.
WhatsApp as a support channel
Next to the email mailboxes, the site's own WhatsApp Business number can be a helpdesk mailbox too. It needs the WhatsApp Cloud API set up (see Set up WhatsApp); then switch on the WhatsApp as a helpdesk channel card under Settings → Channels → WhatsApp. The card carries the same mailbox settings as a mailbox card: time to first response (SLA), access (which team members see the mailbox), status after reply, auto-assigning the replying person, and an auto reply to the first message.
- Inbound messages become conversations in the "WhatsApp" mailbox — with number, folders, assignment, notes, tags, saved replies, automations, Trello and AI suggestion, just like email. The subject is the first message; senders are recognized by their WhatsApp profile name and phone number, and a customer with that number is linked or created (contacts without an email address are possible). When the customer writes again the message lands in the open conversation; a closed one is reopened within the Reopen closed conversations for window (72 hours by default), after that a new one starts.
- Replies go out as WhatsApp messages — from the helpdesk, the lead page or the Inbox, all in the same conversation. WhatsApp rule: free-form replies are possible only within 24 hours of the customer's last message; the composer shows until when the window is open. After that it offers the Meta-approved templates — with placeholders such as
{{ customer.first_name }}. Delivery and read receipts show on the message. - AI assistant: with the WhatsApp AI auto reply switched on, the assistant answers first; its replies appear as "AI assistant" in the conversation. As soon as a person replies, the assistant stays quiet for that contact (pausing works as before in the Chat view). With the AI off, the card's auto reply applies.
- What WhatsApp cannot do (yet): attachments in replies, forwarding as email and new conversations started from the helpdesk — a WhatsApp conversation always begins with the customer; to reach out first, send a template from the lead page. Once the number is a helpdesk channel, the Chat view and the Inbox no longer show WhatsApp.
Settings → Helpdesk: numbering, tags, saved replies
Everything shared by all channels. The tab starts with the list of helpdesk channels (SLA, auto reply, access) linking to their cards.
- Numbering — prefix and digits define the display (
#42,SG5-0042); Next number starts at raises the counter, e.g. when migrating from another system (it never moves backwards). The sequence is shared with tickets, so every number exists only once. Add the number to the subject puts[SG5-0042]on outgoing mail — at the end ("Re: Login [SG5-0042]") or at the start ("[SG5-0042] Re: Login"); replies carrying that reference are matched even when a mail client loses the threading headers. - Tags — label, color and a key that is suggested from the label ("Size & Shipping" →
size-shipping) and can be adjusted; changing a key later does not touch existing conversations. Mailboxes sets whether a tag is offered in all or only in specific mailboxes. - Channel list — how the All channels menu shows where tickets came from (Chat, Contact form, Customer portal, Phone, Staff): Each on its own next to Email and WhatsApp (default) or In one group. Both groups can get a name of your choice — the email group (with two or more mailboxes, suggested “Email”) and the group of ticket sources (suggested “Other channels”); an empty field shows the suggestion in each viewer’s language.
- Stages — per request type the steps a bug or a feature request runs through, including the customer question (see Stages).
- Notifications — who hears about conversations nobody has taken yet: everyone who works in the helpdesk, or selected people (see Helpdesk notifications).
- Requests with several topics — "Suggest splitting new requests" checks new portal, widget and form requests once and shows a split hint when one contains several requests (on by default; see Split a request).
- Extensions — connections to other systems the helpdesk uses: switch Trello on and pick the Trello credential (see Trello).
- Saved replies — title and text with placeholders (
{{ customer.first_name }},{{ customer.name }},{{ agent.name }},{{ conversation.number }}), again for all or specific mailboxes. The composer only offers the replies that fit the conversation's mailbox.
Automations for conversations
The flow editor has the object Helpdesk conversation with the triggers Created, customer replied, assigned, closed and overdue (waiting longer than X hours for a reply — checked hourly, once per conversation). Filters and texts see {{ conversation.subject }}, {{ conversation.reference }}, {{ conversation.mailbox_name }}, {{ conversation.tags_csv }}, {{ conversation.assignee_name }}, {{ conversation.waiting_hours }}, {{ conversation.message }} (the latest customer message), {{ conversation.link }} plus {{ customer.name }} / {{ customer.email }}. The trigger Tag added fires as soon as a tag is added to a conversation — with Only for tag the flow reacts to exactly one tag (filter field {{ conversation.tag_added }}); Stage changed fires when a request gets a new stage. Available steps: Set conversation status, Assign conversation (a person or nobody), Tag conversation (add/remove), Add internal note, Reply to customer (through the conversation's mailbox, with signature, optionally "send & close"), Forward conversation, Email the team and Trello card (see Trello). Three templates get you there quickly: Route helpdesk mail by keyword (subject contains "invoice" → tag, note, team email), Helpdesk: unanswered for 24 h (team email with link) and Helpdesk: follow-up after closing. New flows start disabled — enable them in the list once they are ready.
Trello cards from conversations
Teams that plan their work on a Trello board connect the helpdesk to it directly: a conversation gets a card, the card remembers the conversation — and everything the customer writes afterwards lands on the card as a comment.
- Setup — under Settings → Credentials add a credential of type Trello: the API key and a token from your Trello account (
trello.com/power-ups/admin→ your Power-Up → API key, with the token link next to it). Test connection shows right in the dialog which Trello member the token belongs to. Then, under Settings → Helpdesk at the very bottom in Extensions, switch Trello on, pick that credential and optionally set a default board and default list (the dialog preselects them, a flow step without a list creates cards there). With Translate messages on the card into, every card and every mirrored comment shows the original text with the translation underneath, e.g. into Indonesian — in your own templates use{{ conversation.message_translated }}(team language) or{{ conversation.message | translate("id") }}(any language). Only then does Create Trello card appear in the ⋯ menu, and only sites that use Trello see it. - Create a card by hand — in the conversation's ⋯ menu choose Create Trello card: pick board and list; title (
SG5-0042 Subject) and description (customer, link to the conversation, latest message) are prefilled, plus labels, members and a due date. The checkbox Mirror customer replies as comments on the card (optionally our own replies too) decides what lands on the card automatically from now on. - Create cards automatically — a flow with the trigger Tag added (e.g. Only for tag "trello") or Created and the step Trello card: action Create card with board, list, title and description templates (
{{ conversation.reference }},{{ conversation.message }}…), labels, members, due in days, position and the reply mirror. A conversation has at most one card — a second create step is skipped. The step's other actions: Add comment (your own text) and Update card (move to a list, add/remove labels, due date, archive) — for example "conversation closed → move the card to Done". - Afterwards — every customer reply is added to the card as a comment with date and a link to the conversation (quoted tails are dropped). The card is linked in the customer rail; the thread shows a system line for creating, updating and failures (e.g. an expired token). Unlink Trello card in the ⋯ menu forgets the card without deleting it in Trello.
GitHub issues from bug reports
For teams that develop their software on GitHub: a bug report in the helpdesk becomes a GitHub issue with one click — one a developer (or a dev agent) can pick up right away — and the report remembers the issue.
- Set up — under Settings → Credentials add a credential of type GitHub: a fine-grained token (GitHub → Settings → Developer settings → Fine-grained tokens) with Issues: Read & write for the repositories you want; Test connection shows the GitHub user. Then under Settings → Helpdesk → Extensions switch GitHub on, pick the credential, enter the default repository and the list of allowed repositories (
owner/name, one per line). Optional: Mirror replies (customer replies as comments on the issue), Auto-triage new bug reports and the label for “Send to analysis” (defaultneeds-analysis). For GitHub's feedback, enter the shown webhook (URL + secret, events “Issues” and “Issue comments”) in the repository under Settings → Webhooks. - Create an issue — in a bug report's ⋯ menu choose Create GitHub issue. The AI triages the report (thread, diagnostics from the bug report, screenshots) and prefills the draft: title, report, steps / expected / actual, environment (app and engine version, page, browser, request ids), screenshots as links valid for 30 days, labels (area, severity) and hints about similar open issues and reports (duplicates). The AI does not see code and does not guess a cause — by design. You edit everything, pick repository and labels and click Create (the issue is ready) or Send to analysis: the issue then gets the analysis label and a developer or dev agent with code access adds the cause and a fix recommendation.
- Link an existing issue — when the issue already exists, choose Link existing issue in the ⋯ menu and paste its link or #number; in the Create GitHub issue dialog, Link next to a similar issue does the same. The conversation is linked like a created issue (mirroring, stages and labels work the same), and nothing changes on GitHub.
- Several reports, one issue — tick several bug reports in the list and use Create one GitHub issue for the selection in the selection bar: one issue, every report linked.
- Afterwards — the report shows GH #123 · open in the customer column, gets the tag
githuband an internal note with the link. What closing and reopening the issue does is described under Feedback from GitHub below. Developer comments on the issue appear as short internal notes (see below); customer replies land — depending on the setting — as comments on the issue. Unlink GitHub issue in the ⋯ menu forgets the issue without deleting it on GitHub and removes thegithubtag and the agent tags. Thegithubtag can also be unticked by hand in the Tags menu. - Feedback from GitHub — with the webhook set up, the issue reports its state back: when it gets an assignee or the label
in progress(configurable under Label for “in progress”), the report moves to the stage In progress; when it is closed, a bug moves to Fixed – please verify (the reporter is asked) and a feature request to Released; closed as not planned means Won't fix / Declined, a duplicate leaves the stage alone. Which stage a closed issue moves each type to can be changed under When the GitHub issue is closed. Recommended: an internal stage Testing (create it under Stages, category “Waiting on us”, no customer notification). Closed issues then land there first, you check the fix on production and only then move the request on, and the customer is asked or notified. A request already waiting on the customer or finished is never pulled back by a later close. When the issue is reopened, a bug moves to Reopened and a finished feature request back to In progress. By default, comments on the issue appear as a one-line internal note: the first sentence without code, file names, addresses and mentions, plus a Link to the comment on GitHub. Under GitHub comments in the ticket you choose Off (no note), Summary (the default) or Full text (the whole comment). A comment containing[helpdesk]always comes in full, unless the setting is Off — that is how a developer writes something the support team should read. Stages, labels, closing and reopening work with every setting. The linked issue shows on the right in the customer column as #123 · open. The webhook works with both content types GitHub offers. - Who is working on it — developer agents mark the issue they work on with an owner label (
agent:a,agent:b…). That label is copied automatically into the tags of every linked conversation and shows as a violet Agent B badge: in the list, at the top of the conversation and in the customer column next to #123 · open, there together with the work state from the labels (in progress / in review). When the label changes on GitHub, the tags follow; tags you set by hand are never touched, and Unlink GitHub issue removes the copied tags. The agents are listed in the left column under Tags and in the filter, so they work in saved views too. Which labels are copied is set under Copy these GitHub labels to the conversation's tags (names or patterns, defaultagent:*; empty = off). Sync labels now catches up the labels of all issues that are already linked. - Before/after for visible fixes — when a report is about something you can see (text, translation, layout, color, a missing or misplaced element) or comes with screenshots, the dialog suggests the label
check:before-after(only when it is among the Labels offered). A developer agent then shows the fix: the report's screenshot is the before, the same page with the fix the after. Both land as an internal note with the images on the linked conversation (never on the reporter's page) and as a before/after table on the GitHub issue. For this you generate a developer agent key under Extensions → GitHub: it is shown only once, opens only this one function and can be revoked at any time. Next to it you set how long the images stay visible on GitHub (default 365 days; the reporter's screenshots 30 days). - Checking the settings — Test connection shows the GitHub account behind the token and, per repository, whether it is reachable and its issues readable — with the values currently in the form. Labels offered are checkboxes with the repository's real labels; ticked ones appear in the dialog, none ticked means all.
Stages: where a request currently stands
A bug or a feature request has more states than "open" and "closed": confirmed, in progress, fixed — but not yet verified by the customer. That is what stages are for, one list per request type. Shipped: for bugs New → Confirmed → In progress → Fixed (verify) → Verified plus Reopened, Won't fix, Not a bug; for feature requests Submitted → Under review → Planned → In progress → Released or Declined. Questions have no stages to begin with.
- In the thread — next to type and tags a chip shows the stage; the menu behind it is grouped by category (Open, Waiting on us, Waiting on the customer, Done). The category sets the conversation status automatically — folders and SLA clocks keep working as before. Picking "Fixed (verify)" on a bug asks once for the version it was fixed in. Every change is a system line in the thread; changing the type resets the stage to the first one of the new type.
- Filters and boards — on the left below the tags, requests can be filtered by stage. Under Boards there is a board per type, Stages: Bug / Stages: Feature request, whose columns are the stages — dragging a card to another column changes the stage.
- Customer question — stages in the "waiting on the customer" category can ask a question with two answer buttons. Default on "Fixed (verify)": "We fixed the issue (version …). Does it work now?" with Works → Verified and Still broken → Reopened. The customer gets an email with one link per answer (valid once) and sees the same buttons on their request page (My requests or the visitor link); a comment lands in the thread as a customer message. If nobody answers, the auto-move applies after the configured period (default 14 days → Verified).
- Roadmap card — on feature requests the thread shows a roadmap panel; it says where the card is visible (Visible on: Ideas, Roadmap or What's new — or Private), with a link there. Publish as idea turns the request into a card on Ideas (the stage stays, customers can vote), Publish as planned also sets the stage Planned and puts it on the roadmap. Before publishing, a dialog asks for the public title and summary — that is what other customers read, the original text stays private. When the card has no texts yet, the AI proposes both from the customer's messages (never from internal notes; names, companies, email addresses, phone numbers and links are filtered out) — edit them or click Regenerate; existing texts stay, Suggest new text asks for a fresh proposal, and the roadmap panel has Suggest next to the summary. Pick the Card language (German or English) in the dialog; without a pick the AI writes in the request's language. The browser remembers the choice, and switching rewrites only a suggestion nobody has edited yet. Unpublish takes the card down; Released in names the version. Several feature requests at once: tick them in the list, then the light bulb Publish as idea — a list shows each request's title and summary for review before anything is published. Customers vote (one vote per person), the count shows in the panel; merging a duplicate moves its votes, and someone who voted for both counts once. How customers see it: Roadmap & ideas.
- Notify — a switch per stage: when a request enters the stage, the reporter gets an email with the new state (feature requests default to Planned, In progress, Released, Declined; bugs to Confirmed, Won't fix, Not a bug). Stages with a customer question ask the question instead.
- Languages — in the helpdesk the stages appear in the language you chose for the interface, not in the site's language; customers see them in theirs. The shipped stages come in eight languages (German, English, French, Spanish, Italian, Dutch, Portuguese, Indonesian). In the settings every supported language of the site has a tab; an amber dot marks missing texts, and the greyed text is what is shown instead. Translate missing labels lets the AI propose every empty text of the other languages — you review them and only then save.
- Assign to reporter — a switch on "waiting on the customer" stages (on for "Fixed – please verify"): when the reporter is one of your own team, the conversation is assigned to them while it waits in the stage — it sits in their Mine folder and no email goes out. "Still broken" returns it to the previous assignee. If a question email to a customer could not be sent, an internal note on the conversation says so.
- Set-up — Settings → Helpdesk → Manage stages: order, label per language, category, colour, on/off, add your own stages (up to 15 per type; shipped ones can be switched off but not deleted), and on "waiting on the customer" the question with buttons, target stages and period. Placeholders in the question text:
{{ fixed_in }},{{ reference }},{{ subject }}. - Automations — the trigger Stage changed fires on every change (by the team, a customer answer, an integration or the auto-move) and can be limited to a type and a target stage; filters and texts see
{{ conversation.stage }},{{ conversation.stage_label }},{{ conversation.stage_to }},{{ conversation.stage_from }},{{ conversation.stage_category }}and{{ conversation.kind }}.
Tickets from the chat
Next to the email conversations, Tickets (their own menu item) still exist: the AI assistant opens a ticket automatically when it can't answer a question well or when the visitor explicitly asks for human contact; tickets can also be created in the app. Tickets have the statuses open, in progress, resolved, closed and the types question, problem, feedback, feature request. Replies travel by email; the visitor sees the thread through a secure visitor link and can reply there. Files can be attached to tickets and replies (PDF, images; up to 10 MB each, screenshots via Ctrl+V) — in the site's inbox as well as via the visitor link. New tickets and replies trigger notifications to the contact address. Tickets and conversations share one number sequence (a ticket IH-0003, the next conversation SG5-0004); merging both into one list is planned. Toggle the helpdesk inside the widget under Widget.
Products
Read-only view of all products synced from your shop. Useful for checking what the engine actually indexed — handy when troubleshooting sync issues or missing hits.
Filters by availability, category, and date help inspect single items quickly.
Hotel chat (rooms, tours & availability)
The chat assistant also works for hotels and resorts: it knows rooms, tours and service packages, checks availability live, and hands guests over to the booking page — bookings never happen in the chat itself.
- Product types — WooCommerce product types such as Room, Tour package or Service package sync along. The assistant keeps them apart: asking for rooms never surfaces services. The app's product list can filter by type.
- Live availability — with the SG5 PMS plugin (v1.3.0+) on the WordPress site, the assistant checks availability for concrete dates: it asks for the date range and number of guests and shows available rooms with photo and price. Enabled via the Hotel PMS switch in the site settings.
- Booking link — once the guest has decided, the assistant asks whether they want to book and shares the booking-page link — with dates and guest count already pre-filled. The chat never collects names or email addresses for bookings.
- Room data — capacity ("a room for 6 people?"), facilities and amenities from the PMS are available to the assistant as structured data.
- Labels — the product-card badges can be renamed on the Widget tab, e.g. "Available"/"Fully booked" instead of "In stock"/"Out of stock" — per language too (see Languages).
Appointments — check availability and book
The assistant can offer free slots and book them right in the chat widget and on the phone — and visitors can pick a slot themselves on a booking page — a consultation, a fitting, an intro call. It builds on the calendar you already have (Google Calendar, Microsoft 365 / Outlook or Apple iCloud directly, via Cal.com or TidyCal, or an iCal feed): connect it once under Settings → Appointments, and from then on the assistant checks live availability, suggests matching slots, collects name and contact details, has the booking confirmed and books it. The customer gets a confirmation email with a calendar file (.ics); in the widget an appointment card with "Add to calendar" appears as well.
Connecting a calendar
- Cal.com (recommended) — the free booking tool syncs Google Calendar, Outlook/Microsoft 365, iCloud and CalDAV and manages availability rules, buffers and video links. In InsightHub you store the API key (Cal.com → Settings → Developer → API keys; stored encrypted) and pick the event type the assistant may book. Self-hosted installations also enter their base URL. Assistant bookings land as regular Cal.com bookings in your calendar, including cancel/reschedule links for the customer.
- TidyCal — the low-cost Cal.com alternative (AppSumo) works the same way: store the API token from Integrations → Advanced → "Manage API keys" (paid plan) and pick the booking type. The assistant reads free times from TidyCal and books there; TidyCal requires an email address for every booking, which the assistant asks for first. Note: TidyCal's own MCP server is read-only — InsightHub therefore uses the TidyCal API.
- Google Calendar — directly, no tool in between: Connect Google Calendar opens Google's consent screen (once, calendar permissions only); then you pick the calendar the assistant reads and books into; a Google Meet link per appointment comes from the Video conferencing setting. Busy times come live from Google and bookings land there as events with the customer as attendee — the customer invitation is still sent by InsightHub (the same confirmation email with .ics as with every provider). The connection lives as a "Google sign-in" credential under Settings → Credentials, where it can be reconnected or disconnected. Note: while Google's review of the InsightHub app is pending, Google shows an "unverified app" warning when connecting — continue via Advanced → Go to InsightHub; SG5 adds your Google account as a test user beforehand.
- Microsoft 365 / Outlook — directly, no tool in between: Connect Microsoft 365 opens Microsoft's sign-in (once, calendar permissions only; work/school accounts and personal Outlook.com accounts); then you pick the Outlook calendar the assistant reads and books into; a Teams link per appointment comes from the Video conferencing setting (work/school accounts only). Busy times come live from Outlook and bookings land there as events — the customer invitation is still sent by InsightHub (the same confirmation email with .ics as with every provider). The connection lives as a "Microsoft 365 sign-in" credential under Settings → Credentials (not to be confused with "Microsoft sign-in (Entra)" for Business Central), where it can be reconnected or disconnected. Note: some companies do not let staff grant access to outside apps — Microsoft then shows "Need admin approval", and IT approves InsightHub once.
- Apple iCloud / CalDAV — directly with your Apple ID: Add Apple account asks for the Apple ID and an app-specific password (create it at account.apple.com → Sign-In and Security → App-Specific Passwords; two-factor authentication required — Apple's guide). Then you pick the iCloud calendar the assistant reads and books into. Busy times come live from iCloud and bookings land there as events — the customer invitation is sent by InsightHub. The same option connects any other CalDAV server (Nextcloud, Fastmail, Synology, Posteo, mailbox.org): enter the server URL instead of "icloud". Note: changing your Apple ID password invalidates the app-specific password — create a new one and update the login. A meeting link comes from the Video conferencing setting (Google Meet, Microsoft Teams or Zoom).
- iCal feed — any private iCal address (Google Calendar: "Secret address in iCal format"; Outlook: Publish calendar → ICS link) provides busy times. Free slots are your bookable hours minus busy events; the booking itself then happens in InsightHub — the appointment shows on the Appointments page and in the customer's calendar via .ics, not automatically in yours. Ideal when you don't want a booking tool.
- Test on each connected account reads its enabled calendars for the next seven days and shows the free slots of the primary calendar — before you save (an iCal feed, Cal.com or TidyCal as the booking calendar: Test connection).
- Calendar entry — every booking lands in your calendar the way booking tools write it: the title "[booking type] – [customer] and [host]" (when the booking type has a host), then the customer's email and phone, the booking type, the location, a reschedule-or-cancel link (when customers may do that), notes and answers, and "Created with InsightHub". In Google Calendar the customer is listed as an accepted guest next to your account.
Video conferencing
The meeting link for online appointments is independent of the calendar: under Video conferencing you pick Google Meet, Microsoft Teams or Zoom — in any combination, say Google Calendar with a Zoom link or Apple iCloud with a Teams link. The link appears in the confirmation email, the calendar file and the calendar event; a cancellation deletes the meeting again. When the tool matches the primary calendar (Google Calendar + Meet, Microsoft 365 + Teams), Connect uses that calendar's account — no extra sign-in — and the link is created together with the calendar event. Otherwise (or with Use another account) you connect the tool once: Connect Google for Meet (a Google sign-in with the "Meet" service; guests knock and the host lets them in), Connect Microsoft for Teams (a Microsoft 365 sign-in with the "Teams" service, work/school accounts only) or Connect Zoom (a Zoom sign-in with the account whose user should host the meetings — Zoom asks once for meeting permissions; the connection runs through InsightHub's app on the Zoom App Marketplace; coming from the Marketplace you start at insighthub.sg5.biz/integrations/zoom — log in, pick your site, connect). If your Zoom admin blocks Marketplace apps there is a way without it: Server-to-Server app instead takes a Server-to-Server OAuth app of your Zoom account (marketplace.zoom.us → Develop → Build App → Server-to-Server OAuth; scopes meeting:write:meeting:admin, meeting:delete:meeting:admin, user:read:user:admin — Zoom's "granular" scope names; older apps show meeting:write:admin, meeting:delete:admin, user:read:admin instead; activate the app): enter its Account ID, Client ID and Client Secret, Test checks the connection right away; meetings are then created on the account owner. The connections live under Settings → Credentials. Cal.com and TidyCal manage their meeting links themselves (per event type); the setting is hidden there.
One row per tool: Zoom, Google Meet and Microsoft Teams each have a row with their logo and state — Connect, Reconnect or Remove when a sign-in has expired, and Disconnect while it is connected. Set as default makes a connected tool the default meeting link (badge Default) and saves at once — no Save at the bottom of the page needed; No meeting link by default works the same way. When the site has no default tool yet, the tool you connect becomes the default; an existing default stays. A personal Microsoft account gets a hint that it usually can't create Teams links.
Own meeting link: the last row stores one fixed link of your own — e.g. Teams (free), a Zoom personal room, Jitsi or Whereby. It needs no connection; Set as default makes it the default meeting link, and a booking type's Own meeting link starts with it. All customers join the same room. Microsoft Teams checks the account when you connect it: an account that can't create Teams meetings (no Teams license) is refused with the reason instead of showing as connected.
Several tools to choose from: which tools a booking page offers is set per booking type — under Location → Online meeting tick the connected tools, e.g. Google Meet and Microsoft Teams. On the booking page customers then pick "Online meeting via …"; only connected tools can be ticked. Bookings via chat and phone use the type's first tool (the default when it is ticked).
Disconnecting or removing Zoom: click Disconnect in the Zoom row (or on the Zoom sign-in under Settings → Credentials) — InsightHub revokes its access at Zoom and deletes the stored Zoom data (token, account ids). You can also remove SG5 InsightHub in the Zoom App Marketplace under Manage → Added Apps; Zoom notifies InsightHub, which then deletes the connection on every site that Zoom account had connected. Appointments already booked keep their Zoom link. If Zoom was the default tool, no default is set after disconnecting — the page says so; online appointments that use the default then get no meeting link until you connect again or set another tool as the default.
Connected tools only: a tool can only be saved as the meeting link once its connection works — otherwise the page reports “not connected yet”; a cancelled sign-in changes nothing. If a connection breaks later (e.g. access revoked), the appointment is still booked — just without an online link: the activity log records it and the internal notification (or the contact email) reports “appointment without an online meeting link” so you can send the customer a link.
Warnings: Settings → Appointments and the dashboard show when a booking type's online appointments get no meeting link (with a one-click Set Zoom as default or similar when a tool is already connected) and when the default tool is not connected; Settings → Appointments also shows when a tool is connected but not the default. A booking type's Location → Online meeting warns when no connected tool is ticked. When the site has no mailbox (Settings → Mailboxes) and no SMTP server of its own, InsightHub sends your customers' appointment emails (confirmation, request, decline, cancellation, reschedule and reminders) in your name: the sender shows your business name, and replies go to your contact email — Settings → Appointments and Settings → Mailboxes say so. The site's other emails, such as lead and helpdesk emails, still need a mailbox of their own. When a confirmation was not sent, the opened appointment says why (e.g. Not sent: no e-mail address).
Booking rules
Set per booking type (the time zone and the site's bookable hours stay under Settings → Appointments): duration of an appointment, buffer between two appointments, start times every x minutes (default: the appointment length — with 30 min a 60-minute appointment can also start at 09:30 or 10:30; applies to Google, Microsoft 365, iCloud/CalDAV and iCal feeds, for Cal.com and TidyCal set it there), lead time (earliest in x hours), horizon (how many days ahead), time zone and bookable hours per weekday (several ranges per day allowed). The service label ("Consultation") and a location/note ("in store or by phone") appear in the conversation, the confirmation and the calendar file. With Cal.com its own availability applies on top.
Booking page (calendar on your website)
Calendar connections: under Settings → Appointments you connect as many calendar accounts as you like — tiles with the Google, Microsoft 365 and Apple logos, plus iCal feeds, Cal.com and TidyCal. Each connected account lists its calendars. The primary calendar takes the bookings by default (Set primary); every calendar you switch on (Enabled) blocks its busy times for all booking types — for example your private calendar next to the work one, or a colleague's shared calendar — and can be picked as a booking type's calendar. An iCal feed is read for conflicts, or serves as the booking calendar when nothing can be written to (bookings then stay in InsightHub). Calendars the account can only read (holidays, a colleague's shared calendar) show as View-only: they can be checked for conflicts but never take bookings. Disconnect (Remove for an account that is already signed out) removes an account together with its conflict calendars — if it held the primary calendar, set another one. When you move the bookings to another calendar, the previous one keeps being checked for conflicts — switch it off if you don't want that. A further account never takes over the bookings on its own; only the very first one becomes the booking calendar. Test on an account shows the free slots of the primary calendar and whether each of its enabled calendars can be read. Cal.com and TidyCal manage free times themselves: while one of them takes the bookings, conflict calendars are not used.
Besides chat and phone there is a public booking page: visitors pick a free slot in a calendar, enter name, email and optionally phone, and book directly — no chat needed. It works with every connected calendar (Google, Cal.com, TidyCal, iCal feed), applies the same booking rules and triggers the same confirmations and automations as a booking made by the assistant. Every booking type has its own booking page: open Appointments → Booking types and the type — its Booking page section has the switch and the link — readable as book.sg5.biz/your-organization/page-address, with a page address you choose yourself (e.g. 60-minutes; unique within your organization, the previous link with the b_… id keeps working) —, the embed snippets for your website, an intro text, whether the phone number is optional, required or not asked at all, and optionally your own thank-you page to redirect to after booking — when embedded it opens in the whole browser window, not inside the frame (if a browser blocks that, the confirmation shows a Continue button to it).
Time zone, view and language: at the top of the page visitors choose their time zone — their browser's is preselected and every time is shown in it (someone booking from New York sees 03:00 instead of 09:00) — and switch between calendar (the month plus the times of the chosen day) and list (all free times by day). You set which view comes first under First view. The header has a language switch — DE | EN or your website's languages; the page starts in the browser's language (otherwise the website's), and ?lang=en (or ?lang=fr …) in the link forces a language. Confirmation and cancellation emails arrive in the chosen language (German or English — someone who books in another language gets them in English) and state the time in the customer's time zone, e.g. "03:00 (New York)"; the internal notification stays in your time zone.
- After the contact form — redirect visitors to the booking page after they submit;
?name=…&email=…&phone=…in the URL prefills the form. If you create leads through the lead API, the response also carriesbooking_url— a link with a lead token so the appointment lands on the right lead for sure. In email templates the same link is available as{{lead.booking_url}}. - Design — the page takes color, font and logo from your branding (Settings → General, or the organization's Brand) and speaks the website's language. Each booking type can have its own Theme: light, dark or matching the visitor's device, its own primary and background color, fonts for titles and text, and a background image; a preview shows the result. In dark mode the page uses the brand's logo for dark mode when one is set.
- Several appointment types — every booking type has its own page, link and embed code; the overview page lists them all. Each type decides whether its page shows the “‹ All booking types” link back to the overview (booking page settings).
- Add to calendar — after booking, the page shows Add to: with icons for Google Calendar, Outlook.com, Office 365, Yahoo and a calendar file (.ics — for Apple Calendar, Thunderbird and others); the same icons appear on the page with the booking (self-service) and on the appointment card in the chat widget. Events added this way are copies: they don't change when the appointment is rescheduled or cancelled — only the invitation attached to the confirmation email does.
Embed on your website and in WordPress
Click Embed on your website — in a booking type's Booking page section, or on the Overview page card under This site's overview for all booking types of this site (Appointments → Booking types). First choose the display: Calendar on the page (the calendar takes its own height, so there is no inner scrollbar, on desktop and on phones) or Button with popup (your button label; the calendar opens in an overlay that closes with ×, Esc or a click next to it). Then pick where it goes:
- WordPress — needs the InsightHub plugin 2.48.0 or newer, connected with your API key. Switch on Settings → InsightHub → Booking calendar (off by default). From plugin 2.49.0, that tab lists your booking types and builds the shortcode for you: pick the booking type, display and button label, then Copy — with no booking types yet, Manage booking types takes you straight to them in InsightHub. Then add the InsightHub Booking block and pick the booking type, display and button label — in Bricks or Elementor (plugin 2.50.0 or newer) the InsightHub Booking element or widget (in its own InsightHub category, plugin 2.54.0 or newer), with the same settings plus the language (in Elementor also the button's alignment) and colors — the calendar color and the button with the builder's own color pickers, global colors included — or use the shortcode:
[sg5ih_booking type="60-minutes"]for the calendar on the page,[sg5ih_booking type="60-minutes" mode="popup" label="Book now"]for a button,[sg5ih_booking]for the overview of this site's booking types.typeis the page address (or theb_…id, or the full link); optional:lang="de|en"(default: the page's language) andheight(the first height before the calendar sizes itself). - Other websites — two lines: a
<div data-sg5-booking="…">where the calendar or button should appear, and the scriptbooking-embed.js. Several calendars on one page work too. - iframe — the plain frame with a fixed height, for systems that only accept an iframe.
- Link — for emails, social media or a button of your own.
Allowed websites (optional): in the same dialog you can list the websites that may show your booking pages, one per line (e.g. example.com; its subdomains are included). Browsers then refuse to show the pages inside any other website. Empty = any website. The setting applies to all booking types of the site.
Booking types
A website can offer several kinds of appointments — say a free 30-minute intro call, a 60-minute consultation on site and a workshop for up to eight people — each configured on its own. Open Appointments → Booking types: your existing setup appears as the first type; New booking type adds more (a new type starts from the first type's settings). Every type — the first one too — can have its own hours and its own calendar. One type is the default (badge Default, Make default in the type's menu or editor): lead booking links ({{lead.booking_url}} in emails and the booking_url of the lead API) lead to its page, and bookings that name no type use it. The default can't be deleted until another type is the default; the assistant still asks which type a customer wants when several can be booked. Drag the handle to set the order, the switch turns a type on or off, the menu duplicates or deletes it — bookings already made keep their type.
- Basics — title, page address (every type has its own link
book.sg5.biz/your-organization/page-addressand embed code), description, duration, host (a member of your organization — the booking page shows them under With, the overview page on the type's card, emails as{{host_name}}; without one it's your website's name), visibility (listed: on the overview page; unlisted: only via its link; private: no public page — your team and the assistant can still book it) and whether the AI assistant may book it. - Location — in person (address), phone (the customer calls you, or you call the customer), online meeting (tick the connected tools — Google Meet, Microsoft Teams, Zoom; with several the customer picks — or an Own meeting link: one fixed https link every booking of the type gets, e.g. Teams (free), a Zoom personal room, Jitsi or Whereby; all customers join the same room, and a type with approval adds it once the request is confirmed) or your own text. Microsoft Teams links need a Microsoft 365 work or school account with a Teams license — for Teams (free) use the own meeting link. With more than one option the customer must choose one when booking; an online option creates the meeting link, the others book without one. When the customer picks “you call the customer”, the phone number is required (the field shows even if the booking page otherwise hides it).
- Availability and restrictions — the site's bookable hours or the type's own hours, start times every x minutes, buffer, days ahead, minimum notice and a maximum number of bookings per day. Conflicts are checked across all types — one person, one calendar.
- Questions — up to ten questions asked before booking (short or long text, choice, checkbox; optional or required). The answers appear with the appointment, in the calendar entry, in the internal notification and as
{{answers}}in email templates; the assistant asks them in the chat and on the phone. With leads, Save answer to sets per question where the answer goes on a lead or customer from the appointment: the note, the company or a lead field. - Leads & customers — For new bookings: create nothing, a lead or a customer. Applies to every new booking of the type (booking page, chat, phone and staff); a lead or customer with the same email address or phone number is linked instead. See Leads and customers from appointments.
- Notifications and reminders — confirmation email on or off; Notify about new bookings, changes and cancellations: the host and / or the team get an email for every new booking, request, change and cancellation, in the site's language (templates “New appointment”, “Appointment request”, “Appointment rescheduled” and “Appointment cancelled — to host / team” under Settings → Templates, with the customer's contact, who cancelled and why) — with nobody ticked, only requests that need approval and bookings without a meeting link reach the site's contact address; up to five team addresses, a reply-to address, and up to five reminders before the appointment by email, SMS or WhatsApp (an approved WhatsApp template; the customer ticks the WhatsApp opt-in on the booking page). Each reminder has Send to: the customer (by the reminder's channel), the host (the type's host) and / or the team (the type's team addresses) — any combination. Host and team always get an email with the appointment details, the customer's contact and the meeting link (template “Appointment reminder to host / team” under Settings → Templates). An email or SMS reminder sends the site's Default text (shown read-only; the email template lives under Settings → Templates) or your own (Custom, starting from the default). On top of that, the app reports every booking, request, change and cancellation personally in the bell — see Notifications in the app.
- Group bookings — several people book the same time, for a class, a tour or a webinar; the time stays bookable until all seats are taken (the booking page shows "3 seats left").
- Own calendar — a type books into the primary calendar or one of the calendars enabled under Settings → Appointments — also of another account (Google, Microsoft 365, iCloud/CalDAV) — or its own Cal.com / TidyCal event type; busy times of every calendar in use block all types. If that account gets disconnected, the type books into the booking calendar and shows a warning.
- Self-service — customers may cancel and/or reschedule up to x hours before the appointment: their emails then carry a link to a page with their booking.
- Approval — requests need confirmation by your team: the time is held, the customer gets "request received", and under Appointments you confirm (calendar entry, meeting link and confirmation are created then) or decline (the customer is told, the time is free again). Requests nobody answered expire at their start time. Not together with group bookings; Cal.com and TidyCal handle approval themselves.
Booking types in several languages: When your website has Supported languages (Settings → General; without its own list, the organization's), a booking type's editor shows one tab per language at the top. The first tab is the website's language — set up the booking type there as usual. Every other tab holds the texts only: name, description, your own places (address or custom text) and the questions with their options. Empty fields show customers the text in the website's language (grayed out in the editor); duration, hours, rules and everything else apply in every language. Translate empty fields proposes texts for all empty fields of the tab with AI — nothing is stored until you have checked them and saved. The booking page offers the website's language and the supported languages it can show: German, English, French, Spanish, Italian, Dutch, Portuguese and Indonesian (without a list, German and English as before); the language switch changes the texts without reloading. A language the page can't show yet is marked in the editor. The overview page, the page to manage a booking, the chat and phone assistant and the emails to the customer use the German or English texts; notifications to your team stay in the website's language.
Overview page: book.sg5.biz/your-organization lists the listed types of every website of your organization that switches it on (Booking types → Overview page, with its own page title — empty = your organization's name — and an optional intro text); visitors pick a type and book. Every website also has its own overview book.sg5.biz/your-organization/website with only its types — the page to share and the one embedded on your website (link with a copy button on the same card, same switch). Page addresses of booking types and websites share one namespace: a booking type can't take the address of a website of your organization. When you rename a type, the editor suggests the matching page address — it only changes when you click Use, because links you already shared keep the old one.
The settings that belong to one kind of appointment — title, duration, restrictions, notifications and the booking page — moved from Settings → Appointments into the booking types; the settings keep the calendar connection, video conferencing, the time zone and the site's bookable hours.
What the assistant does
- Real slots only — free times always come from the calendar, never from the language model's memory. If the calendar is unreachable the assistant says so and offers a callback.
- Confirmation before booking — the assistant repeats date, time and name and books only after a "yes". On the phone it offers at most two or three suggestions, in the chat a short list.
- Cancelling — customers can cancel their own appointment via email or phone number; the calendar is updated accordingly.
- Lead link — when email or phone number matches an existing lead, the appointment is attached to it and shows as a card on the lead detail page. When the booking type creates leads or customers (Leads & customers), one is created otherwise.
- Per assistant — under Assistants you switch appointment booking on or off per customer assistant (widget, phone).
- Booking types — with several booking types the assistant asks which one the customer wants (or picks it from the request), offers its locations and asks its questions; a type that needs approval is only requested, and the assistant says so.
The Appointments page
All appointments from chat, phone and manual entry, filterable by date range, status and customer. The page opens on Upcoming (appointments that aren't over yet); All includes past ones, Today and 7 days narrow it down. Shown as a list or as a calendar (the switch at the right of the filters; month, week or day, with Today and arrows to move; status, booking type and search filters apply to both). In the list, tick several appointments to set their status (booked, completed, no-show, cancelled — cancelling asks whether to notify the customers) or delete them at once. Statuses: Booked, Requested (a booking type with approval — Confirm or Decline; the Open requests button and the badge on the tab show how many are waiting), Completed (set automatically after the appointment), No-show, Cancelled, Declined and Expired (a request nobody answered). Reschedule gives an appointment a new time from the type's free slots; the customer gets the new time with an updated calendar file. Click an appointment to open it: all details (booking type, location, meeting link, how and when it was booked, confirmation email, the customer's link, calendar file) plus the actions in one place. There you can also edit the customer's name, email and phone, the title, the meeting link, the notes and the answers to the type's questions — the calendar entry follows for Google Calendar, Microsoft 365 and iCloud/CalDAV (tick Send the confirmation to the new address after correcting an email). The meeting link of an online appointment is created automatically when it's booked (Google Meet, Microsoft Teams or Zoom); if none could be created, for example because the tool isn't connected, enter one yourself — it moves with the appointment when you reschedule, and the confirmation can go out again with the new link. Reschedule sits next to the date; the status (Booked, Completed, No-show) is a dropdown next to Cancel and Delete and saves with Save. In the list the actions are icons — hover one to see its name. Delete removes an appointment for good (for example test bookings); a booking that is still ahead also loses its calendar entry and meeting link, without an email to the customer — use Cancel to tell them. The All button shows every appointment regardless of date. With several booking types the list filters by type and New appointment asks for the type, its location and its questions. New appointment books manually over the connected calendar's free slots — for example after a call your team handled itself: pick a day in the calendar (only days with free times can be picked), then the time. While you type the customer's name, InsightHub suggests matching customers and leads (by name, email or phone) and fills in email and phone; the chosen lead is linked to the appointment. Cancel cancels the appointment in the calendar and notifies the customer by email. Back-office assistants can list appointments as well and — after confirmation — cancel them.
Leads and customers from appointments
An appointment can become a lead (for sales) or directly a customer — for example an existing client who books a follow-up. The menu with the contact icon in the row and the Lead and Customer rows of the open appointment offer:
- Create lead / Create customer — a dialog prefilled from the appointment: first and last name (split from the name), email, phone, the company (from the question that saves to the company, else from a question named “Firma” or “Company”), for a lead the customer's message and a note with the other answers under a line naming the booking type and the date. Answers the booking type saves to lead fields are listed below — values the field does not take (e.g. “about 5k” for an amount field) stay in the note. The booking type's host becomes the assignee, the source is “appointment”, “Created via” reads Appointment; automations with the trigger Lead created run as for every new lead. A customer gets the company and every answer plus the message in its note.
- Duplicates — when a lead or customer with the same email address or phone number exists (in any format, “0660 1234567” = “+43 660 1234567”), the dialog offers Link this lead. A second lead is only created on purpose (Create a new lead anyway); a second customer never — a customer is the one record of a person.
- Link existing … — search leads and customers by name, company, email or phone; records with the appointment's email address or phone number are suggested at the top.
- Unlink — takes the lead or customer off the appointment; the record itself stays.
In the list, Lead: name / Customer: name appear under the person with a link. With several appointments ticked, Create leads gives them their leads at once: linked ones keep theirs, a lead with the same email address or phone number is linked, otherwise one is created — the message counts what happened. To do it automatically, use Leads & customers on the booking type. On the lead and customer pages, the Appointments card lists the person's upcoming and past appointments with booking type and status, a click opens the appointment; the lead's activity shows Created from an appointment, Linked to an appointment and Unlinked from an appointment. Creating and linking needs the permission to edit leads in addition to appointments.
Emails and automation
The appointment confirmation (with .ics attachment), the cancellation email and — for booking types — request received, request declined, appointment moved and the reminder live under Templates → System emails → Appointments, editable per language (a booking type can carry its own reminder text). When customers may reschedule or cancel, {{manage_url}} is their link. Optionally your team receives every booking at an internal address. In Automations the triggers Appointment booked, cancelled, requested, request declined and moved are available — for a reminder the day before or a WhatsApp message with directions; fields such as date, time, service and customer details are available as placeholders.
Notifications in the app
Every new booking, every request waiting for approval, every move and every cancellation shows up in the app's bell — whether it came through the booking page, the chat, the phone or from a colleague in the app. The booking type's host is told; whoever picks “All appointments” at Which appointments under Profile → Notifications → Appointments hears about every appointment of the sites they work on. A booking type without a host reaches everyone who works with appointments. Whoever booked, moved or cancelled it gets no message about their own action. A click opens the appointment — confirm or decline a request right there. Several notices of the same kind at once are bundled (“3 new bookings”). In the app every kind is on, by email only requests — each person sets this themselves. The booking type's team email (Notifications and reminders) is not affected: it goes to the type's addresses, the bell to each person.
InsightHub Voice — the AI assistant on the phone
With InsightHub Voice, the same assistant that answers in the chat widget also takes phone calls: it answers questions about products, prices and availability from your live shop data, captures callback requests as leads and hands calls over to your team when needed — around the clock. Voice is a paid add-on: SG5 enables it per website, after which the Voice tab with all options appears in the site settings.
Try it: InsightHub's public demo line answers at +43 1 435 11 33 — the assistant explains InsightHub itself and takes callback requests as leads (max. 3 minutes per call, standard landline rates). Callbacks requested on the website are possible twice a day per phone number and demo; the count starts again at midnight.
Setup
- Phone number — SG5 assigns a number for the assistant. Your existing number stays with your provider: forward it, or connect your phone system over SIP — see Connect your own number.
- Enable phone assistant — the switch on the Voice tab puts the assistant into service or pauses it. Calls to a paused number are not answered.
- Greeting — the first thing callers hear, with Text: Default or Custom. Default says "Hello! This is the AI assistant of [site name]. How can I help you?" in the phone language — which satisfies the EU AI Act duty to tell callers before the conversation that they are talking to an AI (Art. 50, in force since August 2, 2026); the field shows the exact text. Custom starts from that text for your own wording, which must still say that an AI is speaking. The greeting for calls the assistant places works the same way; its default is a generic callback ("You asked us to call you back."). Voice presets leave both on Default.
- Outside the opening hours — once opening hours are set there are two more greetings, each for calls and for callbacks: outside the opening hours (default: “… You're calling outside our business hours – we'll be back {next_open}. How can I help you?”) and on holidays and closures (“{closure} – we'll be back {next_open}.”).
{next_open}becomes the next opening (“today from 2 pm”, “tomorrow from 8 am”, “on Friday from 8:30 am”, “from 7 January at 8 am”),{closure}the sentence of the day (“Today is a public holiday” or the closure's own sentence). If there is no opening within the next 60 days, the part with the time is left out. The privacy notice goes into these greetings too. - Privacy notice — on by default: "We save this call as text to handle your request and improve our service – just say if you'd rather not." is added to both greetings, before the closing question (the whole greeting takes about 15 seconds). Keep the default wording or write your own; it is not added twice when your greeting already mentions it. "Callers hear" shows the finished greeting. You can switch it off, but the GDPR requires this notice when transcripts are stored — the details belong in your privacy policy.
- Speech recognition — which service turns the caller's speech into text: Deepgram (EU) (default, the fastest, Deepgram's servers in the EU), Deepgram (US) (Deepgram's standard servers) or Azure AI Speech (EU), which recognizes Austrian and Swiss German as their own variants and notices about half a second later that the caller has finished. Nothing is kept in any case — Deepgram is opted out of model training at the same price. The phone language Automatic (German & English) always uses Deepgram; a Deepgram voice runs in the US only with Deepgram (US).
- Words to recognize — names callers say that the speech recognition should know: your brand, products, places (separated by commas, at most 30). The site name is always included. Without them, a recognizer easily turns a brand name into ordinary words or drops it.
- Filler sentence — off by default. Switch it on to have the assistant say a short sentence while it looks something up ("Einen Moment bitte, ich schaue kurz nach." or your own text), so callers don't hear silence during longer lookups. Voice assistants have the same switch.
- Voice — provider and voice for the speech output; the default is a natural German voice. SG5 helps with special requests.
- Transfer targets — phone numbers for reception, sales and support. If a caller asks for a person or the assistant cannot help, it transfers the call there. Without a configured number it offers a callback instead. With opening hours calls are transferred only during them; a target marked also outside the opening hours rings at any time (e.g. an emergency line).
Connect your own number — forwarding, SIP trunk, 3CX
The Connect your phone number card on the Voice tab offers two ways for callers to dial your usual number and still reach the assistant. Forwarding (simplest, any provider): forward your number to the assigned assistant number — on a mobile with the standard codes shown (always / when unanswered / when busy / when unreachable), on a landline or phone system via call forwarding, an IVR option, "outside opening hours" or queue overflow. The forwarded leg costs your usual call minute. Which of your numbers was dialed is shown on the conversation under Chat sessions.
SIP trunk (no forwarding cost, for phone systems such as 3CX or carrier trunks such as peoplefone): Set up SIP access creates a dedicated SIP domain for your site and shows the username and password — the password only this once, later Generate new password helps. Optionally add your system's public IP as an extra lock. In the phone system create a generic SIP trunk without registration pointing at that domain and route calls to it by rule: the assistant's number or any extension works as the destination — the assistant recognizes the domain. The caller id is preserved, and the transfer targets may now be extensions of your system (sip:200@your-pbx), so the assistant hands callers straight to a phone. Note for 3CX: hosted free instances only allow the trunk providers 3CX lists; self-hosted or dedicated instances support generic trunks.
Get your own phone number — registered to your business
The Get your own phone number card on the Voice tab obtains a local or mobile number in Austria, Germany or Switzerland that is registered to your business — for customers without a number of their own, or as a second line next to the connected number. The carrier requires proof of who uses the number: local numbers need a business address inside the area code, mobile numbers an address in the country, plus a commercial register excerpt and the ID of an authorized representative.
- Country & number type — Austria, Germany or Switzerland; local or mobile. The required details and documents follow this choice and are loaded live from the carrier.
- Company & address — company name, authorized representative, a registration number or enterprise ID depending on the country, and the business address as on the register excerpt (no PO box). Names and address must match the documents exactly.
- Documents — one file per item (PDF, JPG or PNG, up to 5 MB), e.g. the register excerpt, an ID and a proof of address such as a utility bill. Files go straight to the carrier and are not stored in InsightHub.
- Review — an automatic pre-check runs before submission and shows gaps per field. The carrier then reviews the documents: usually 1–3 business days in Austria, longer in Germany. The status refreshes on its own; after a rejection, Edit again shows the objected documents for replacement.
- Choose a number — once approved you search by area code (it must match the address) and optionally a digit sequence. Buy registers the number to your business, connects it to the assistant and sets it as the assistant number — calls are answered as soon as the phone assistant is switched on. SG5 bills the monthly fee.
- Data protection — calls on purchased numbers are processed in the EU. The registration data (company details, address, documents) is processed by the carrier as a data processor under the EU standard contractual clauses; InsightHub does not store the documents.
- Phone account — new registrations get a phone account of their own: numbers, registration and call data are kept there separately. The Voice tab shows the account's status and the current month's usage (minutes, calls, numbers). When deleting the site you can close the account together with the numbers — final; new numbers require the registration again.
- Reusing a registration — if another site of your organization already has an approved registration, step 1 offers "Take over an existing registration": company details, documents and approval come over with one click and you pick a number right away — no new review. Country and number type follow the registration you take over. Further numbers within the same site need no new review either.
- Removing a registration — the bar above the steps shows whether the registration is the site's own or taken over, and from where. Remove registration starts the wizard again at step 1 — for example to register your business on its own after taking over a test registration. Only what belongs to this site is removed: its own registration or its copy is deleted at the carrier; a shared registration only loses the link. The registration it was taken over from stays unchanged and approved. Release the site's numbers first — the button is locked while the site has a number.
- Manage numbers — the card lists every purchased number (default: two per site); each can be set as the assistant number or released. A released number goes back to the carrier and cannot be recovered.
Phone prompt
On the phone the assistant can have its own system prompt. If the field is empty, it uses your chat prompt from the AI tab in phone mode. With your own text, the phone prompt replaces the chat prompt on calls only — useful when your chat prompt mentions links, product cards or forms that make no sense on the phone. The template "Telefon – Webshop (DE)" is a good start; "Copy chat prompt" copies your existing prompt for editing. The spoken format (short sentences, at most two options, no links) and the facts-only rule (only data from your shop) are always enforced on top. The preview shows what the phone assistant actually receives.
What happens during and after a call
- Grounded in facts — prices, availability and product data come only from your synced shop data, never from the language model's memory. If the assistant doesn't know something, it says so and offers a callback.
- Callbacks as leads — when a caller wants a callback, a quote or advice, the assistant asks for their name and creates a lead with source "Voice". Your automations for new leads apply as usual.
- One answer per thought — the assistant waits until the caller has finished speaking, also across short pauses, and answers everything they said at once. If the caller keeps talking while an answer is being prepared, that answer is dropped and the assistant replies to both parts together.
- Ends the call — when the caller says goodbye or needs nothing else, the assistant says goodbye and hangs up. If the caller says something during the goodbye, the call goes on.
- Short answers from your pages — on the phone the assistant reads only the matching passage of your pages and FAQs, so answers come faster.
- Call transcript — every call appears as a session with channel Phone under Chat sessions, including the recognized questions, the answers and the caller's number. An answer the caller did not hear because they kept talking is marked "[vom Anrufer nicht gehört]".
- No audio recording — calls are not stored as audio; only the text transcript is kept.
- Callers can say no — if a caller says they don't want the call stored, the assistant confirms and keeps helping; when the call ends, the transcript is deleted. Only a note remains in the chat session, and the call summary (SMS, automations) carries no content. Details given for a requested callback stay on the lead.
SMS notifications
Under Settings → Channels, SMS has its own tab: SMS notifications enables three one-way text messages — this is not a chat channel, replies to the SMS are not read. Appointment confirmation: when a caller books or cancels an appointment and a mobile number is known, they get an SMS with date, time and a calendar link. Call summary: the numbers under Team recipients receive an SMS after every call with the caller, the duration, the request in one sentence, the lead created or appointment booked, and a link to the transcript. New phone leads: when the assistant creates a lead on the phone, the same recipients get an SMS right away. The sender is the assistant's phone number or a registered alphanumeric sender id; landline numbers cannot send SMS. A daily limit (default 50) prevents surprises; every sent or failed SMS shows up in the lead's activity.
Control: By default the three switches send with a fixed text. For your own texts, conditions or delays set Control to Automations: the switches disappear and your flows take over — the templates "Appointment confirmation by SMS", "Call summary by SMS" and "New phone lead by SMS" in the New automation dialog match the three switches exactly. The new trigger Call ended provides caller, duration, request, lead, appointment and the transcript link as placeholders; the team recipients are available as {{ sms.team }}.
Templates: Right below the switch you pick a template — German (Germany, Austria or Switzerland), English or Automatic. It sets language, voice provider, voice, greeting and filler sentence to matching defaults and fills the phone prompt if it is still empty. Adjust and save afterwards.
Phone language: In the Voice tab you choose the language the assistant listens and answers in: German, English, Deutsch (Österreich) (German recognition, Austrian wording such as "Jänner", the Austrian voices Ingrid or Jonas, a "Grüß Gott" greeting — Deepgram has no Austrian voice, so pick Azure (EU)), Deutsch (Schweiz) (German recognition for Swiss Standard German, the Swiss voices Leni or Jan, a "Grüezi" greeting) or Automatic (German and English within the same call, answering in the caller's language). The setting drives speech recognition, the default voice and the spoken standard phrases (greeting, "one moment please", clarifying questions). For an English test, switch to English, save and start the test call.
Test call in the browser
At the bottom of the Voice tab you find the Test call in the browser card. Click Start call, allow the microphone, and you are talking to your phone assistant, no phone number needed. The test call uses the saved phone prompt, greeting, voice and all tools, exactly like a real call, and sounds like one: the connection runs in phone quality (8 kHz). During the conversation you see the transcript live, with the engine's response time and the tool used for every answer. After the complete greeting, you can deliberately interrupt answers.
Interruptions: The entire greeting, including the privacy notice, is spoken first. Noise, coughs and brief acknowledgements such as “yes”, “okay” or “yes, right” do not end an answer in progress. A deliberate objection such as “No, please wait.” or “Stop!” can interrupt it. This depends on recognised words, so the assistant reacts after speech recognition. If speech output fails or stalls, listening is released again.
Callbacks: The assistant uses a usable caller number directly, without a routine confirmation question. If caller ID is unavailable, it asks for a number and reads it back for confirmation; a requested alternative is also read back and saved. The business or forwarding number never replaces the callback number. It does not routinely ask for callback timing: volunteered times are preserved, with targeted clarification only when unclear. A failed save does not count as a captured lead.
After hanging up, a link opens the conversation in Chat sessions (channel Phone), where you can read it like any call. That makes prompt tuning a loop: change the prompt, save, test call, check the transcript.
Assistants — several chat and phone assistants per site
By default every site has one assistant: the customer chat in the widget (with its system prompt under Settings → AI) and, with the Voice add-on active, its phone variant. With Assistants you create additional assistants with their own prompt, greeting, voice and tools — for example a back-office chat for your team inside the app or a second back-office phone number. The existing assistant stays unchanged and is listed as Standard.
Creating assistants
Under Settings → Assistants click Create assistant and choose the channel (In the app or Phone) and the audience (Customers or Back office). A template prefills prompt, greeting and tools — e.g. "Back-office chat" or "Back-office phone". Then adjust the prompt; the prompt preview shows exactly what the assistant receives.
Back-office assistants
An assistant with audience Back office talks to your team, not to customers. It knows the same products and documents as the customer chat but answers in an internal tone and can additionally look up the site's records: orders, customers, leads and tickets. It also knows your campaign numbers — visits, leads, customers and clicks on the tracked goals such as the WhatsApp, phone or email button, per campaign and period (e.g. "How often was WhatsApp clicked in the oktoberfest campaign this month?"); clicks exist only for goals switched on under Settings → Conversions. These lookup tools are available to back-office assistants only; a customer assistant can never receive them. Which tools an assistant may use is set in the Tools section.
Actions with confirmation
Back-office assistants can also do things on request: create a lead, change a lead's status, add an internal note to a lead or ticket, or open a helpdesk ticket. None of these actions runs immediately. Instead the assistant shows a confirmation card with every detail — for example "Markel Timothy: new → attempted" — and only Run saves the change; Cancel discards it. A card stays valid for ten minutes; after that simply ask for the action again. Executed actions appear as an answer with a link to the record and show up in the lead's or ticket's activity under your name. These tools are also available to back-office assistants only and can be deselected individually in the Tools section.
External systems: ERP, till, booking tool
A back-office assistant can also query systems that do not live in InsightHub — your ERP, your till, or a booking tool. The data is not synced: the assistant asks the system live and relays the answer; nothing is copied. Connections are created once under Settings → External systems; in the assistant editor, under External systems, you only choose which systems this assistant may use and which of their tools. If a system is unreachable, the assistant says so instead of inventing values. External systems are available to back-office assistants only.
The assistant in the app
Assistants with channel In the app are reached through the Assistant menu entry. Ask questions like in a chat; the tools used and the records found are shown under each answer and linked directly. Every conversation is stored as a chat session with channel Internal. Access is controlled by the permission Use assistants. Conversations are linkable: the address bar always reflects the open conversation, and the chain icon in the Recent conversations list copies its link — so you can send a colleague exactly that conversation, or bookmark it.
The assistant in other applications (API)
An assistant with channel In the app can also be built into other applications — your ERP or intranet, so your team asks where it already works. In the assistant, enable API access for other applications and generate a secret, shown only once. It belongs on the connecting application's server only, never in a browser. The application calls the endpoints listed there (answer, streaming answer, action confirmation, sessions) server to server through the InsightHub gateway, sends the secret as bearer and states in every call which of its users is asking — the application handles the login itself. Answers, record cards and confirm cards match the Assistant page in InsightHub; sessions are kept per user. A secret is valid for exactly this one assistant; "Generate new" replaces it immediately, "Revoke" blocks every call.
The assistant in Telegram
An assistant with channel Telegram answers in a Telegram bot — for your team on the go (back-office assistant) or for customers who use Telegram. Create the bot with @BotFather (/newbot), copy the token and paste it into the Telegram bot card of the assistant; "Connect" validates the token and sets up the webhook. Under Allowed senders enter Telegram user ids or @usernames, one per line — your own id is shown by e.g. @userinfobot. A back-office bot answers nobody while this list is empty, because any Telegram user can find the bot; customer bots may stay open. Back-office bots have the same tools as the assistant in the app (orders, leads, tickets, external systems); actions such as "add note" appear as Run / Cancel buttons. /new starts a fresh conversation, /start shows the greeting. Every conversation appears under Chat sessions with channel Telegram. Photos and voice messages are not processed yet.
The assistant in Microsoft Teams
An assistant with channel Microsoft Teams answers in the InsightHub bot right inside Teams — for teams that work there all day anyway. There is a single InsightHub bot for all customers; you need neither Azure nor tokens. Flow: your Microsoft 365 administrator uploads or approves the "InsightHub" app once in the Teams admin center — download the package here: insighthub-teams-app.zip (Teams admin center → Teams apps → Manage apps → Upload new app). Then open the InsightHub app under Apps in Teams — a chat with the bot appears. In the assistant editor click Generate pairing code (valid for ten minutes) and send the code to the bot as a message. That pairs the assistant with your Microsoft 365 organization and adds you as an allowed sender. Under Allowed senders you add more people — by Microsoft Entra user id or email address; anyone not yet approved is shown their id by the bot. A back-office bot answers nobody who is not on this list. Tools, records, external systems and actions with confirmation (a card with Run / Cancel) work as in the app and in Telegram. /new starts a fresh conversation. Every conversation appears under Chat sessions with channel Microsoft Teams. Files and images are not processed yet; Teams channels (instead of personal chats) come later.
Second phone number
An assistant with channel Phone gets its own number, greeting, voice and language — the same settings as in the Voice tab, per assistant. One number can answer customer calls while a second, unpublished number serves the team. The test call in the browser is available for every phone assistant. The Voice add-on is required.
Assistants are enabled per site; contact support if you need them.
Organization & billing
An organization groups your sites, your team and the plan. You reach its overview from the site switcher at the top of the sidebar (the entry with the building icon) or from the first item in the breadcrumb navigation. The overview shows every site as a card and, below, the areas Team (members, roles, invitations), Billing (plan, AI usage, add-ons) and Settings (name, brand, language, defaults) — depending on your role: owners and admins see all three, members only what they are allowed to open.
Billing & plans
Under Organization → Billing you see your current plan and the cards of all plans (Starter, Professional, Business, Enterprise, Agency) with what they include. Changing the plan currently runs through Contact us — the plan is already in the email subject; we switch it and get back to you. The plan features are also on the pricing page (German).
What the plan unlocks: the areas of the app — Leads, Inbox, Helpdesk, Appointments, Automations, Reviews and the rest — follow the organization's plan: a plan change shows or hides them at once, without anyone having to switch them on. WhatsApp and Voice are add-ons that SG5 switches on per site. Areas you don't need you hide under Settings → Menu. A few new features are still marked Beta (currently Forms, Assistants, Abandoned Carts and Reports): SG5 switches them on per website on request, and they may still change. For a single website SG5 can also switch a module on or off apart from the plan.
AI usage
The AI usage card shows three numbers per site:
- AI conversations this month — the unit your plan includes (e.g. 1,000 on Professional). A conversation is a chat session with at least one AI reply — on any channel (widget, WhatsApp, Telegram, Teams, back-office assistant) and regardless of how many messages it has. Phone calls are not counted (they run on the Voice add-on). At 80 % owners and admins get a notification; once the allowance is reached, ongoing conversations continue and new conversations still get an AI reply for 7 days (grace period). After that the chat answers new visitors with a pointer to search and FAQ until the month changes, a conversation pack is booked or the plan is changed. With your own AI key there is no allowance.
- Tokens today — the daily AI allowance from Settings → AI, AI assists included.
- AI assists this month — how often the AI helped outside the chat (translations, reply suggestions, image translations, auto-tags …); the tooltip shows the breakdown. Assists do not count as conversations.
The SG5 team can set exceptions per site (higher daily limit, extra conversations, conversation packs, stronger model) — visible on the same card.
Add-ons
WhatsApp and phone (Voice) are included from Professional — you pay only numbers and usage (messages, minutes). On Starter they are paid add-ons. SG5 switches them on per site; under Billing → Add-ons you see whether they are active and ask for them with Contact us.
Notifications
Under Profile → Notifications each person chooses what they are told about by email and in the app. Two notices go to the organization's owners and admins by default: Sync errors (when a scheduled run — shop sync, lead import, Google reviews, mailbox polling, reports — fails: one message on the first failure, one on the next successful run) and AI allowance (80 %, reached, grace period, blocked — once per month each). Anyone who works in the helpdesk also finds the Helpdesk group there: new conversations, assigned to you, customer replies, mentions, answers to the stage question and response time — each with its own switch for app and email (see Helpdesk notifications). Anyone who works with appointments finds the Appointments group: new booking, booking request, appointment moved and appointment cancelled, plus Which appointments — only the ones you host, or all of them (see Appointments → Notifications in the app).
Partner
The Partner page in the sidebar (group System) is for SG5's resellers: create prospects here and show them InsightHub on their own website — as a demo with chat widget and phone assistant. You see the demos of your own demo organization; customer organizations don't see this page. Prospects never land in a lead list: your sales work stays in your own CRM.
New demo
- Open “New demo” and get the details — in one of two ways:
- From the website: enter the prospect's website, a Google Maps link or company + city under Import details. Company, contact person, email, phone, website and a short description are filled in — please check the highlighted fields.
- From a lead: search a lead of your own organization (name, company or email) and pick it. Its details are taken over and the demo is linked to it: its timeline shows the demo, and “Convert to customer” marks it won. There is one demo per lead.
- Add what's missing: Company and Website are required, plus contact person, email, phone and notes for you. Without a website an imported Google listing is enough: the demo is then built from the listing (opening hours, address, reviews), and the field What they offer describes the services — the more precise, the better the assistant answers.
- Choose the language — it sets the phone assistant's language and voice (German – Austria, Germany or Switzerland, English or automatic). The language of the prospect's country is suggested.
- Choose the channel: Phone (callback), Chat or Phone and chat. The demo page always offers the callback; it shows the chat widget only with chat. It is suggested by the page for the link (the phone assistant's industry pages → Phone, web shops → Phone and chat); Edit changes it later.
- Choose the website page for the link — the page on sg5.biz the demo link opens. The list comes from the website's sitemap (pages that run the demo), grouped by area, and is read again every hour; Refresh reads it at once. If a page is missing, Other path… takes its path (e.g.
/produkte/insighthub/neue-seite/). The same list applies when you edit a demo and to Copy link. - “Create demo” — InsightHub creates a demo site in your demo organization at once and shows the five-digit code and the demo link to copy. The prospect's website is read in the background; the subtitle and example questions appear on the demo page within a few minutes. While it is being built, its row in the list shows the step; once it is finished, it says Ready. The Build report shows what was read. The build is the demo's setup: its dashboard shows no “Setup not finished” notice but a link to the build report.
If a build fails, the demo site it created stays — “Try again” continues in the same site.
Demo link and phone
The demo link opens the InsightHub page with the prospect's name, color, example questions and chat widget; there they can ask the assistant to call them back. When they call the number on the demo page, they reach their own assistant: at once from the phone number you entered for them, from any other number after typing the five-digit code.
The list
Each row shows the prospect with contact person, email, phone, website and notes, the demo site, the status, the expiry date and how often the demo was used (views, callbacks, calls). A demo runs for 30 days.
- Copy link — the demo link once more.
- Edit — the contact details and the texts of the demo page (name, color, subtitle, example questions).
- +30 days extends the demo, Revoke ends the code at once (page, callback and code entry).
Became a customer — or not
- Convert to customer — creates the customer's organization with a trial, moves the demo site there with all its content and settings and invites the owner; the prospect's email is filled in. You stay an admin of the new organization.
- Delete site — ends the demo and moves its site to the trash; to confirm, you type the site's address.
Support requests
Questions or problems with InsightHub itself go to the SG5 team via user menu (avatar top right) → Support: New support request with a type (question, problem, feature request), subject and description. Attach files: PDF or images (PNG, JPG, WebP, HEIC), up to 10 MB each and 10 per message — or simply paste a screenshot into the text field with Ctrl+V. My support requests lists your requests with status and replies. It opens on the open ones; the Type and Status filters (each option with its count, e.g. Bug (4) or In progress (3)) narrow the list, and All requests shows the closed ones last. Every reply from us also arrives by email, and you can answer right in the request. If we write to you in another language, Translate under the reply shows it in the language you use InsightHub in; Show original switches back. Your replies can carry files too (or just a pasted screenshot), and so can the answer to "Does it work now?": Still broken plus a screenshot shows us right away what's still wrong. The same works on the request page you reach from our emails without logging in.
Roadmap & ideas: suggest features and vote
Under user menu → Roadmap & ideas (also from the Support page) you see what other customers suggested and what we are building. Four tabs:
- Ideas — every published suggestion, sorted by votes, with search. The arrow button casts your vote — every person has one vote, colleagues at the same company included. Afterwards it reads Voted; a second click or Undo in the message at the bottom takes the vote back. Your own suggestion counts as your vote automatically. Popular ideas are considered for the roadmap — a submission is no promise. Declined ideas stay visible as Not planned so nobody files them again.
- Roadmap — the columns Planned, In progress and Released: what we committed to and where it stands. The decision is made here, so there is no voting any more — the number shows the votes from the idea phase. Notify me sends you an email as soon as the feature is released; everyone who voted gets it anyway.
- What's new — what shipped, with the version.
- My requests — your own bugs, questions and feature requests with their stage; only you and your organization see them.
Suggest a feature opens the form for a new support request of type feature request. Other customers see only the title and summary we wrote, the votes and the stage on a card — never your original text or your name. Every stage change (planned, in progress, released, declined) emails you; "Released" also emails everyone who voted or chose Notify me. The roadmap is the same for all customers.
From request to idea to roadmap
- Request — you suggest a feature; at first it is a private support request.
- Idea — our support team writes a title and summary and publishes it under Ideas. Now everyone votes. The AI drafts them from your request — without your name, company or contact details; support checks the draft before publishing.
- Roadmap — once it is planned, the card moves to the roadmap; the votes stay, and instead of voting you can choose Notify me.
- What's new — when it ships, it shows under What's new, and everyone who voted or asked to be notified gets an email. Ideas we won't build stay on Ideas as Not planned.
Not to be confused with your site's Helpdesk — that is the ticket and mailbox system for your customers.
How do I help support reproduce an issue?
Attach diagnostics: When you report a problem (support request in the user menu or in the support panel top right), Attach diagnostics is preselected. Sent along are the page you were on, version, browser and screen size, language and time zone, the last error messages and failed requests (status and request id only, no typed text or content) and the latest entries of your website's activity log. Add screenshot takes a screenshot you see before sending and can remove again. Diagnostics stay in InsightHub and go to no third party.
Synonyms
Synonyms improve search by linking related terms — e.g. "sneaker" and "trainer". Maintain them manually or let the AI suggest them.
- Bidirectional (both terms find the same hits) or unidirectional (term A finds B, but not vice versa)
- Sources: manual, AI suggestion, or imported
FAQ
Getting started
Do I need a technical team?
Setup just requires embedding the widget snippet on your website once. Everything else — sync, configuration, analytics — runs in the app. More
How do I switch language?
Click your name at the bottom left, then Settings: under Profile settings you choose the app's language – German, English or Indonesian. The support chat in the app has its own language switch at the top right.
Can I use InsightHub without a website?
Yes. While no platform and no address are set yet, the “Setup not finished” notice on the dashboard first asks whether your business has a website. Without one, you take over the details from your Google listing or enter them yourself — they become the assistant's knowledge in chat and on the phone. The phone assistant is an add-on; you can add a website or the chat later at any time. More
How do I customize my dashboard?
Every team member arranges their own dashboard for each website. Customize lets you move widgets, pick a size (S, M, L), remove them or add more from the catalogue via Add widget; Reset to default brings back the standard layout. The period at the top (7, 30 or 90 days) applies to every widget, and your layout and period are saved for you on every device. More
Where can I see what my visitors search for?
The Statistics page shows the number of search queries, trends over time, the top search terms and zero-result queries — a falling zero-result rate means better search quality. “Who searched?” breaks the queries down into identified customers, known visitors, repeat visitors and anonymous queries. Every single search with its hit count is listed under Search queries. More
AI & chat
Can I use my own AI provider (OpenAI, Mistral)?
Yes. In AI settings you can plug in your own API keys. Request costs then flow through your account directly. More
How do I give the assistant more knowledge?
On the Documents page you add texts, FAQs, how-tos or product background that isn't synced from your shop — write in the editor or paste Markdown. Changes are available to the chat immediately. For common customer questions, click + Add Document, choose the type FAQ and phrase the title the way customers actually ask. More
Where can I see the conversations with the assistant?
The Chat sessions page records every conversation — widget chats and, if active, WhatsApp and calls handled by the phone assistant. You see the full history with the sources used and the rating of each answer, and filter by period, status, channel and rating. You can reply yourself at any time or pause the AI; Resume AI switches the assistant back on. More
What can I do when search returns unsuitable results?
If a search term returns an off-topic product, hide it for that term only via the eye icon under Search queries — it still shows for every other search. Link related terms such as “sneaker” and “trainer” as synonyms, manually or via AI suggestion, e.g. with “Generate synonyms” in a query's three-dot menu. You can also assign documents to search queries so they are preferred as sources there. More
Can I create more assistants, e.g. for my team?
Yes. Under Settings → Assistants you create assistants with their own prompt, greeting and tools — for example a back-office chat your team uses through the Assistant menu item. A back-office assistant can also look up orders, customers, leads and tickets, and it only saves changes after you confirm them. Assistants are enabled per site; contact support if you need them. More
Widget
The widget doesn't appear — what now?
Check three things: (1) is the snippet embedded before </body>, (2) is your domain whitelisted in widget settings, (3) has the first sync finished? More
How do I add the chat widget to my website?
Copy the ready-made snippet under Settings → Chat Widget and paste it once before the closing body tag of your website — on Shopify into the file layout/theme.liquid. With the InsightHub plugin for WordPress, the widget is embedded automatically. Mode, color, position and greeting text are set in the widget configuration; changes show up automatically, without re-embedding. More
Does the widget support several languages?
Yes, the widget speaks eight languages. Under Settings → Chat Widget you set the default language and switch on automatic language detection for the languages you want — visitors then see the widget in their browser language and, with two or more languages, can switch themselves. Custom texts are adjusted per language in the “Translations” card. The AI's answers follow the customer's language anyway. More
Why does the widget show an AI notice?
Since August 2, 2026, visitors must be told before the chat that they are talking to an AI (Art. 50 AI Act). So when your disclaimer is empty, the widget automatically shows a default notice in every language. Your own disclaimer under Settings → Chat Widget replaces it — name the AI explicitly, e.g. “AI assistant” rather than just “chatbot”. The notice cannot be switched off entirely. More
Inbox & helpdesk
What does the Inbox show?
The Inbox brings your customer conversations into one list: emails from mailboxes with Show in Inbox switched on, WhatsApp messages (as long as the number is not handled in the Helpdesk) and the chats from your website. In a website chat, Take over pauses the AI and your reply appears in the visitor's chat window within a few seconds; Resume AI hands the chat back to the assistant. More
How do I turn a mailbox into a helpdesk?
Add a mailbox under Settings → Mailboxes with SMTP (sending) and IMAP (fetching), check it with Test connection and turn on Polling enabled — the first run imports the whole inbox. Then switch on Helpdesk on the mailbox card: incoming mail becomes conversations with a number, status and assignee. The same card holds SLA, spam rules, auto reply, signature and access. More
How do I set up helpdesk notifications?
The helpdesk notifies you through the bell at the top right and, depending on your settings, by email — for example about new conversations, assignments, customer replies and @mentions. Each person sets bell and email per event in their own settings (click your name at the bottom left → Settings → Notifications → Helpdesk). Under Settings → Helpdesk → Notifications you decide who hears about conversations nobody has taken yet — everyone in the helpdesk or selected people. More
Can I translate customer messages?
Yes. In the helpdesk every customer message, reply and note has Translate — text in image attachments is translated too. The languages offered come from Organization → Settings → Supported languages and from “Languages I read” in your profile. The other way round, the composer translates your reply into the customer's language before you send it; Chat sessions and the Inbox have Translate as well. More
How do I connect WhatsApp to InsightHub?
WhatsApp is an add-on that SG5 switches on for your site. Once it's active, open Settings → Channels → WhatsApp and use “Connect WhatsApp in one click”: in Meta's popup you connect your WhatsApp Business account, and the phone number ID, account and access token are stored automatically. Alternatively, the step-by-step guide in the help center walks you through the manual setup with access token and webhook. More
Can I keep using the WhatsApp Business app on my phone?
Yes, with Meta's Coexistence. Under Settings → Channels → WhatsApp, pick App + API in parallel (Coexistence) at “Connect WhatsApp in one click” and scan the QR code with the WhatsApp Business app — it needs version 2.24.17 or newer and two-step verification switched on. Messages then arrive on the phone and in InsightHub; chats from before the connection stay on the phone only. More
Why do I sometimes need a template on WhatsApp?
WhatsApp allows free-form replies only within 24 hours of the customer's last message; the composer shows until when the window is open. After that — and for the first message to someone who has never written to you — you need a Meta-approved template. Create templates under Templates → WhatsApp and send them for review with “Submit to Meta”. More
Can I handle WhatsApp in the helpdesk?
Yes. With the WhatsApp Cloud API set up, switch on the “WhatsApp as a helpdesk channel” card under Settings → Channels → WhatsApp — incoming messages then become conversations with a number, assignment, notes, tags and AI suggestion, just like email. With the AI auto reply on, the assistant answers first until someone on your team replies. The Chat view and the Inbox then no longer show WhatsApp. More
Appointments
How do I connect my calendar for bookings?
Under Settings → Appointments you connect Google Calendar, Microsoft 365 / Outlook or Apple iCloud directly — or Cal.com, TidyCal or an iCal feed. From then on the assistant offers free times from your calendar in the chat and on the phone and books them once the customer confirms; visitors can also book themselves on a booking page. The customer gets a confirmation email with a calendar file. More
How do I embed the booking page on my website?
Every booking type has its own booking page: under Appointments → Booking types you switch it on in the Booking page section, which also has Embed on your website — calendar on the page or button with popup, as code, iframe or link. On WordPress (InsightHub plugin 2.48.0 or newer), switch on Booking calendar under Settings → InsightHub and add the InsightHub Booking block or the shortcode. More
How do online appointments get a meeting link?
Under Settings → Appointments, connect Google Meet, Microsoft Teams or Zoom at Video conferencing — independent of your calendar — and set one tool as the default. The link is created automatically at booking and appears in the confirmation email, the calendar file and the calendar event. Alternatively, store one fixed meeting link of your own. In each booking type, tick under Location → Online meeting which tools it offers. More
Can I remind customers of their appointment?
Yes. Under Appointments → Booking types, open the type and add up to five reminders before the appointment under Notifications and reminders — by email, SMS or WhatsApp (with an approved WhatsApp template). Each reminder goes to the customer, the host and/or your team. There you also choose whether a booking is confirmed by email and/or in the customer's WhatsApp chat, and who is told about new bookings, changes and cancellations. More
Phone assistant
How do I set up the phone assistant?
InsightHub Voice is an add-on that SG5 switches on for your site; once it's active, the Voice tab appears in the site settings. There you put the assistant into service with Enable phone assistant and set the greeting, voice and transfer targets. Test call in the browser lets you talk to it without a phone number. Calls show up as text transcripts under Chat sessions. More
Can I keep my existing phone number?
Yes, your number stays with your provider. The simplest way is to forward it to the assistant's number — on a mobile with the codes shown, on a landline or phone system via call forwarding. Alternatively, connect a phone system such as 3CX over a SIP trunk, with no forwarding cost. You find both ways on the Connect your phone number card in the Voice tab. More
What happens to calls outside opening hours?
Once you enter your weekly hours, public holidays and closures under Settings → Opening hours, the phone assistant greets callers outside them with its own greeting and says when you are back. Calls are transferred only during opening hours — except to targets allowed to ring outside them too, such as an emergency line. The chat and WhatsApp know the hours as well, so don't type them into a prompt by hand. More
Leads & customers
What's the difference between leads and customers?
Leads are your sales pipeline: prospects from forms, the chat widget, WhatsApp, imports or manual entry. Customers is the person record: whoever orders in your shop lands there automatically with orders and revenue, and so does anyone who writes to the helpdesk or is entered by hand. A customer can be linked to their lead. More
Can I email or WhatsApp a lead from InsightHub?
Yes, from the lead detail. Email opens a reply editor there; it sends through your SMTP settings (Settings → Email & Reports), and the lead's replies come back into the same lead thread automatically. With the WhatsApp add-on active, you message the lead with one click — outside the 24-hour service window via an approved template. More
How do I bring in leads from Facebook, Typeform or Google Forms?
By webhook, in real time: create an API key under Site → API Keys — the same page shows an example call with the correct endpoint URL. Then set up a webhook in your source tool that posts to that URL with the key in the X-API-Key header. Google Forms needs a small Apps Script on the form instead of a webhook. After a test submission, the lead shows up in the Leads list within seconds. More
Can InsightHub fill in a lead's details for me?
Yes. Above the “Create lead” form there's an Import details box: paste a website, a Google Maps link or a company and city, and InsightHub suggests the company, address, phone and more. Only empty fields are filled; different values wait in the yellow box to be taken over. Sites that load their content only with JavaScript can't be read yet. More
Marketing & automation
How do I create an automation?
Under Automations, create a New automation and build the flow in the visual editor: exactly one trigger (e.g. “When a new lead is created”), then steps such as Wait, Email, Set Status or Filter. Click each node to configure it in the right panel. Save first, then enable it with the toggle — disabled flows never run. More
How do I win back abandoned carts?
In WooCommerce, the WordPress plugin captures the carts; switch capture on there under Settings → SG5 InsightHub. Build the reminders in the automation editor with the “Cart abandoned” trigger — the “Cart recovery” template is the fastest start. Every reminder carries a restore link and, by default, only goes to customers who consented. Beta feature; it must be enabled for your site. More
How do I collect customer reviews automatically?
Configure reviews under Settings → Reviews. An invitation is created when a shop order is completed (WooCommerce, Shopify or Business Central) or when a lead moves into a “won” status. You approve incoming reviews in the review inbox and reply, optionally with an AI-drafted response. More
How do I put a form on my website?
Under Forms, create one with New form, e.g. from the Contact form template, and publish it — only then do its link and embeds work. Share & embed has a link, a code snippet, a popup button and an iFrame to copy; with the WordPress plugin 2.55.0 or newer you can also use a block or shortcode. Submissions can also create a lead if you want. Beta feature, enabled per site by SG5. More
How do I see where my visitors and leads come from?
The Campaigns page shows visits, leads and customers by source, medium, campaign and landing page, with a timeline and a PDF report. Visits from links with UTM tags (newsletters, ads, social posts) are attributed to the matching source and campaign. Under Settings → Conversions you decide which visits are recorded — with “All visits”, visits without UTM tags count too. More
How do I ask customers for feedback after a purchase?
With the post-purchase banner: the thank-you page of your WooCommerce shop asks for feedback, and “Yes” opens the survey you selected as a popup. Enable it under Settings → Forms in the Post-purchase settings section. The WordPress plugin (v2.38+) also needs Order tracking and the banner switch on its Surveys tab enabled; that switch is off by default. More
Sync & data
A sync is failing. What now?
Most common cause: invalid API credentials in sync settings. Logs are right on the sync page. If the error persists, email us at [email protected]. More
Can I export my data?
Yes. Statistics and search queries export as PDF and CSV. On request you can also get a full data export for your website. More
Which shop systems can I connect to InsightHub?
WordPress/WooCommerce connects through the InsightHub plugin; Shopify and Microsoft Dynamics 365 Business Central connect directly through their API. For Magento, Sana Commerce, Shopware and others, pick your platform under Settings → Sync & Filters and enter the API credentials. A website without a shop system works too — the assistant then learns from the website's pages. More
How do I keep my product data up to date?
On the Sync page, a full sync re-reads all products and static pages — recommended once at the start, then only after major changes. The incremental sync fetches only changed products and runs automatically based on your configuration. On Shopify and Business Central an auto-sync interval (Settings → Sync & Filters) keeps the data current; on WooCommerce the stock monitor flags out-of-stock items so the chat won't recommend them. More
How does the assistant learn from my website's pages?
Under Settings → Sync & Filters you add static pages the assistant reads as knowledge, e.g. FAQ, shipping or about us. Pages of normal length go under Whole pages, long help or FAQ pages under Pages split into sections — the assistant then finds and links each section on its own. Re-sync automatically keeps that knowledge current when the pages change. More
Accounts & sites
Can I manage multiple websites?
Yes. An organization can hold any number of websites. Each has its own data, configuration, and statistics. More
Where do I invite team members and set roles?
In your organization's overview. Open it from the site switcher at the top of the sidebar (the entry with the building icon) or from the first item in the breadcrumb navigation. There you find the Team area with members, roles and invitations. Owners and admins see it; members only see what they're allowed to open. More
Where do I set a site's logo, currency and time zone?
Under the site's Settings → General. There you set the name, language, locale (date, currency, time zone) and date formats — including how numbers and dates appear in the app and the widget. The branding (logo, colors, font) replaces the organization's brand for this site; for dark backgrounds you can also add a logo for dark mode. More
Billing
How does billing work?
Under Organization → Billing you see your current plan and all plans with what they include. Changing the plan currently runs through Contact us – we switch it and get back to you. WhatsApp and Voice are booked as add-ons. More
Privacy
How do you handle GDPR?
InsightHub is built GDPR-compliant. The data processing agreement (DPA) can be viewed and signed online. End-customer data is hosted in the EU. More
What do I need to add to my privacy policy?
The help center has a ready-made text section for your privacy policy, including notes for your cookie banner; adjust the company name, address and, if needed, the AI provider. You also need the data processing agreement (DPA) with SG5. The template is not legal advice, so have it reviewed before publishing. More
Can I keep documents internal so customers never see them?
Yes. Every document has a visibility: Public (the default) is available in the widget, in search and to customer assistants. Internal only is known exclusively to back-office assistants with the knowledge “All documents” — it never appears in the widget or in a customer answer. Choose it when creating or editing a document; on the documents list, click the badge to switch it. More
Support
How do I contact InsightHub support?
Write to us in the support chat (the support icon in the app's top bar), or open a support request: click your name at the bottom left → Support → New support request, with a type (question, problem, feature request), subject and description. You can attach PDFs or images or paste a screenshot with Ctrl+V. Every reply also arrives by email. More
How do I suggest a new feature?
Click your name at the bottom left → Roadmap & ideas; there, Suggest a feature opens a support request of type feature request. If support publishes it as an idea, other customers only see the title and summary we wrote — never your text or your name. Under Ideas you vote for suggestions, and every stage change of your suggestion emails you. A submission is no promise. More
How do I help support reproduce an issue?
When you report a problem, leave Attach diagnostics on — it's preselected. It sends, among other things, the page you were on, version, browser, the last error messages and failed requests (no typed text or content) and the latest activity-log entries. Add screenshot takes a screenshot you see before sending. Diagnostics stay in InsightHub and go to no third party. More
Data protection for your shop
InsightHub processes your website visitors' data on your behalf. Under data-protection law you are the controller and SG5 is your processor. Three things are needed for a compliant setup:
- Data Processing Agreement (DPA) under Art. 28 GDPR with SG5 — see DPA. The DPA can be signed electronically right on the DPA page (Sign electronically); SG5 countersigns and you receive the document by email.
- Add a section to your privacy policy about InsightHub — ready-made template below.
- Cookie banner: by default InsightHub sets no cookie (see Recognize visitors). Only if you chose With a cookie after consent, list the
ih_vidcookie in your consent tool under the "Statistics" category — it is only set after consent, with the lifetime chosen there (7, 30 or 90 days).
Note: this template is a starting point, not legal advice. Have it reviewed by your DPO or lawyer before publishing.
Template for your privacy policy
Copy the following section into your privacy policy (e.g. after your "Cookies" section). Adjust the company name, address and — if applicable — the AI provider to match your shop's configuration.
InsightHub — AI chat, search analytics & campaign tracking
Our website uses InsightHub, a service provided by SG5 Digital Solutions, Vienna (Austria), as a processor under Art. 28 GDPR. Processing and storage take place on servers within the EU (Germany).
AI chat. We process your chat messages and the assistant's replies, a session ID and the message timestamps. To let the conversation continue, the session ID and conversation history are stored locally in your browser (localStorage); they persist after you close the tab or browser and are automatically deleted after 7 days. Any personal data you voluntarily enter in the chat (e.g. name, email) is also stored. Responses are generated by an AI language model of Microsoft's Azure OpenAI Service (Microsoft Ireland Operations Ltd.), processed exclusively in the Azure region Sweden (EU); search uses embeddings from Mistral AI SAS, Paris (EU). Legal basis: Art. 6(1)(f) GDPR.
Search analytics. When you use our search, your search terms and the number of results are logged to improve search and identify common queries. Legal basis: consent (Art. 6(1)(a) GDPR) or legitimate interest (lit. f).
Campaign tracking. If you have consented, we record campaign parameters (utm_source, utm_medium, utm_campaign, etc.), the page visited and the referring URL. When you submit a form, the data you provide (e.g. name, email, phone) is stored as a conversion and attributed to the campaign. An anonymous visitor ID (
ih_vid, see "Cookies / storage") is used for this. Legal basis: consent (Art. 6(1)(a) GDPR).Order data. [Only with order synchronization enabled:] After you complete an order we transmit the order number, order date and status, the ordered products and amounts, and the name, email address and billing address of the buyer to InsightHub, so that the AI chat can answer questions about your orders and we can analyze our shop. The legal basis is Art. 6(1)(b) GDPR (performance of the contract) and Art. 6(1)(f) GDPR (our legitimate interest in analyzing and improving our offering).
Post-purchase feedback and surveys. [Only with the feedback banner or surveys enabled:] After you complete an order, the order confirmation page shows a short question asking whether you would like to give us feedback. Taking part is voluntary. If you agree, a short survey or form opens; your email address is linked to it so that we do not ask you repeatedly (at the earliest after 60 days if you declined, or 180 days after taking part). Your answers are stored together with the order and used solely to improve our products and service. The legal basis is Art. 6(1)(f) GDPR; you may object at any time. No additional cookies are set for this.
Phone assistant. [Only with the Voice add-on:] When you call our phone number, an AI assistant answers the call. We process your phone number, the time and the conversation as a text transcript (no audio recording); details you volunteer (e.g. name, callback number) are stored to handle your request. Speech is converted to text in real time and the reply is spoken back; the providers used for this do not store the audio permanently. Calls to our number are routed within the EU (Ireland). Legal basis: Art. 6(1)(f) GDPR; you can always reach us by email instead.
WhatsApp. [Only with the WhatsApp add-on:] If you write to us via WhatsApp, we process your messages, your phone number, your WhatsApp profile name and the time, and — depending on our settings — the AI assistant or our team replies. WhatsApp is operated by Meta Platforms Ireland Ltd.; WhatsApp's own privacy notice applies in addition. Legal basis: Art. 6(1)(b) or (f) GDPR.
Cookies / storage.
ih_vid— anonymous visitor ID linking searches and campaign visits (Statistics category). [Pick the variant that matches your setting:] [Without cookies:] We set no cookie for this and store nothing in your browser. [For the browser tab:] The ID is kept only in your browser'ssessionStoragefor the open tab and deleted when you close it; we set no cookie. [With a cookie after consent:] The ID is stored as a first-party cookie, but only once you have consented to the "Statistics" category; lifetime [7 / 30 / 90] days. If you withdraw your consent, the cookie is deleted. If you use the chat, the conversation history is stored in your browser'slocalStorage(so the conversation can continue) and automatically deleted after 7 days.Recipients / processors. SG5 Digital Solutions, Vienna (Austria), technical operation · Microsoft Ireland Operations Ltd., Dublin, Ireland (Azure OpenAI Service — AI language model, processed in the Azure region Sweden, EU) · Mistral AI SAS, Paris, France (embeddings for search, processed in the EU). [Only if enabled for your shop: OpenAI, L.L.C., San Francisco, USA — transfer to the USA based on Standard Contractual Clauses under Art. 46(2)(c) GDPR.]
Retention. Data is stored for as long as necessary for the stated purposes.
Your rights. You have the rights of access, rectification, erasure, restriction and objection (Art. 15–21 GDPR). Contact: [your contact details].
IMPORTANT: Please adjust the following points for your shop
- AI provider: by default the chat runs on Azure OpenAI (Microsoft, region Sweden, EU) and search on Mistral AI (Paris, EU) — no transfer to the USA. Only list OpenAI (USA, Standard Contractual Clauses) if OpenAI is explicitly enabled for your shop.
- Retention: deliberately open ("as long as necessary"), since no fixed automatic deletion interval is guaranteed.
- Hosting: processing and storage take place in the EU (Germany).
- Phone & WhatsApp: the two bracketed paragraphs belong in your policy only if the Voice or WhatsApp add-on is subscribed for your site. For the phone assistant, additionally name Deepgram, Inc. (USA) and — depending on the selected voice — ElevenLabs, Inc. (USA) or Microsoft (EU/USA) as speech providers, each under standard contractual clauses.
- Order data & feedback: the two bracketed paragraphs belong in your policy only if order synchronization or the feedback banner (Settings → Surveys) is switched on in the WordPress plugin; the 60/180-day intervals are the defaults under Settings → Forms (Post-purchase settings) and must be adjusted if you set other values.